This is the multi-page printable view of this section. Click here to print.
Linux Distributions
1 - Debian
![]()
1.1 - Debian
Install wifi drivers
When i was installing Debian 10, automatic network detection failed to load wifi drivers. Hence i have to manually add non-free debian sources and install the fimware wifi drivers.
# Reference : https://wiki.debian.org/iwlwifi

apt edit-sources
# add below non-free sources of debian to the list
# deb http://deb.debian.org/debian buster main contrib non-free
# deb-src http://deb.debian.org/debian buster main contrib non-free

apt update

apt install wireless-tools
apt install firmware-iwlwifi

modprobe -r iwlwifi
modprobe iwlwifi
root@sriram-pc:~# lspci
00:00.0 Host bridge: Intel Corporation Xeon E3-1200 v6/7th Gen Core Processor Host Bridge/DRAM Registers (rev 02)
00:02.0 VGA compatible controller: Intel Corporation HD Graphics 620 (rev 02)
00:04.0 Signal processing controller: Intel Corporation Skylake Processor Thermal Subsystem (rev 02)
00:14.0 USB controller: Intel Corporation Sunrise Point-LP USB 3.0 xHCI Controller (rev 21)
00:14.2 Signal processing controller: Intel Corporation Sunrise Point-LP Thermal subsystem (rev 21)
00:15.0 Signal processing controller: Intel Corporation Sunrise Point-LP Serial IO I2C Controller #0 (rev 21)
00:15.1 Signal processing controller: Intel Corporation Sunrise Point-LP Serial IO I2C Controller #1 (rev 21)
00:16.0 Communication controller: Intel Corporation Sunrise Point-LP CSME HECI #1 (rev 21)
00:17.0 SATA controller: Intel Corporation Sunrise Point-LP SATA Controller [AHCI mode] (rev 21)
00:1c.0 PCI bridge: Intel Corporation Sunrise Point-LP PCI Express Root Port #5 (rev f1)
00:1c.5 PCI bridge: Intel Corporation Sunrise Point-LP PCI Express Root Port #6 (rev f1)
00:1f.0 ISA bridge: Intel Corporation Sunrise Point-LP LPC Controller (rev 21)
00:1f.2 Memory controller: Intel Corporation Sunrise Point-LP PMC (rev 21)
00:1f.3 Audio device: Intel Corporation Sunrise Point-LP HD Audio (rev 21)
00:1f.4 SMBus: Intel Corporation Sunrise Point-LP SMBus (rev 21)
01:00.0 Network controller: Intel Corporation Wireless 3165 (rev 79)
02:00.0 Ethernet controller: Realtek Semiconductor Co., Ltd. RTL8101/2/6E PCI Express Fast/Gigabit Ethernet controller (rev 07)
How to enable enp0s8 interface
# List all the available interfaces
ip a

# Install net-tools
apt-get install net-tools

# execute the commands as root
vi /etc/network/interfaces

# Add below lines to the interface file
auto enp0s8
iface enp0s8 inet dhcp

# Start the network interface
ifup enp0s8

# Check the status of enp0s8
ip a show enp0s8
configure static IP for enp0s8
# Add below lines in /etc/network/interfaces
auto enp0s8
iface enp0s8 inet static
        address 192.168.0.100
        netmask 255.255.255.0
        network 192.168.0.0
        broadcast 192.168.0.255
        gateway 192.168.0.1

# Restart the network
systemctl restart networking

# update /etc/hosts entry
127.0.0.1       localhost.localdomain   localhost
192.168.0.100   server1.example.com     server1

# Reboot the system
systemctl reboot
References
1.2 - Debian
How to install draw.io
# https://github.com/jgraph/drawio-desktop/releases/

cd /tmp
wget https://github.com/jgraph/drawio-desktop/releases/download/v13.6.2/draw.io-amd64-13.6.2.deb
sudo dpkg -i draw.io-amd64-13.6.2.deb
Install insomnia
# Add to sources
echo "deb https://dl.bintray.com/getinsomnia/Insomnia /" \
    | sudo tee -a /etc/apt/sources.list.d/insomnia.list

# Add public key used to verify code signature
wget --quiet -O - https://insomnia.rest/keys/debian-public.key.asc \
    | sudo apt-key add -

# Refresh repository sources and install Insomnia
sudo apt-get update
sudo apt-get install insomnia
References
2 - CentOS
2.1 - CentOS-8
Extra Packages for Enterprise Linux (EPEL)
Extra Packages for Enterprise Linux (EPEL) is a special interest group (SIG) from the Fedora Project that provides a set of additional packages for RHEL (and CentOS, and others) from the Fedora sources.
Note
EPEL is not an official part of the RHEL subscription or an official offering from Red Hat. But it can come in handy for admins and developers who work with RHEL and need a few utilities packaged for RHEL from a source they can feel good about.dnf -y install epel-release
dnf update -y
[root@192 ~]# dnf install epel-release
Last metadata expiration check: 1:50:34 ago on Fri 17 Jul 2020 11:34:52 AM CEST.
Dependencies resolved.
================================================================================================================
 Package                       Architecture            Version                    Repository               Size
================================================================================================================
Installing:
 epel-release                  noarch                  8-8.el8                    extras                   23 k

Transaction Summary
================================================================================================================
Install  1 Package

Total download size: 23 k
Installed size: 32 k
Is this ok [y/N]: y
Downloading Packages:
epel-release-8-8.el8.noarch.rpm                                                  98 kB/s |  23 kB     00:00
----------------------------------------------------------------------------------------------------------------
Total                                                                            71 kB/s |  23 kB     00:00
warning: /var/cache/dnf/extras-2770d521ba03e231/packages/epel-release-8-8.el8.noarch.rpm: Header V3 RSA/SHA256 Signature, key ID 8483c65d: NOKEY
CentOS-8 - Extras                                                               1.6 MB/s | 1.6 kB     00:00
Importing GPG key 0x8483C65D:
 Userid     : "CentOS (CentOS Official Signing Key) <security@centos.org>"
 Fingerprint: 99DB 70FA E1D7 CE22 7FB6 4882 05B5 55B3 8483 C65D
 From       : /etc/pki/rpm-gpg/RPM-GPG-KEY-centosofficial
Is this ok [y/N]: y
Key imported successfully
Running transaction check
Transaction check succeeded.
Running transaction test
Transaction test succeeded.
Running transaction
  Preparing        :                                                                                        1/1
  Installing       : epel-release-8-8.el8.noarch                                                            1/1
  Running scriptlet: epel-release-8-8.el8.noarch                                                            1/1
  Verifying        : epel-release-8-8.el8.noarch                                                            1/1
Installed products updated.

Installed:
  epel-release-8-8.el8.noarch

Complete!


[root@192 ~]# dnf update
Extra Packages for Enterprise Linux Modular 8 - x86_64                          122 kB/s |  82 kB     00:00
Extra Packages for Enterprise Linux 8 - x86_64                                  1.1 MB/s | 7.4 MB     00:06
Dependencies resolved.
Nothing to do.
Complete!
How to install draw.io
# check the latest available release of draw.io from github before installing.
sudo dnf install https://github.com/jgraph/drawio-desktop/releases/download/v13.4.5/draw.io-x86_64-13.4.5.rpm
References
2.2 - CentOS-7
How to setup network after RHEL/CentOS minimal installation
After installing RHEL/CentOS minimal, You may not able to connect network in that machine. This will happen because Ethernet interfaces are not enabled by default.
Method 1 – Using NetworkManager Service
edit '/etc/sysconfig/network-scripts/ifcfg-enp0s8'
change onboot parameter to yes, and restart the interface
'ONBOOT=YES'
# Restart the interface
ifdown ifcfg-enp0s8
ifup ifcfg-enp0s8
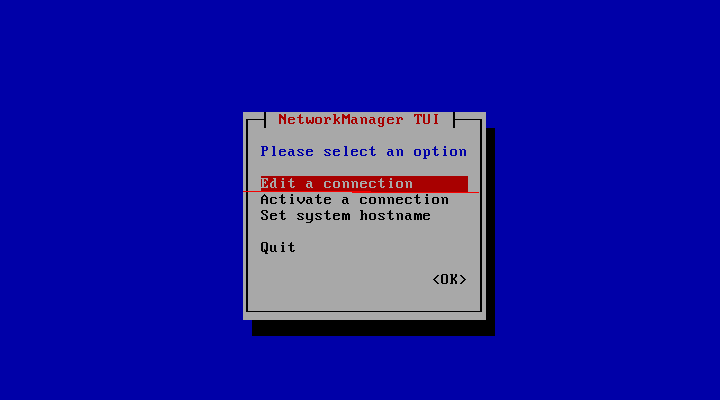
Method 2 – Using nmcli Tool
#nmcli d (List the available interfaces)
#nmtui
1. open Network manager, and choose Edit connection
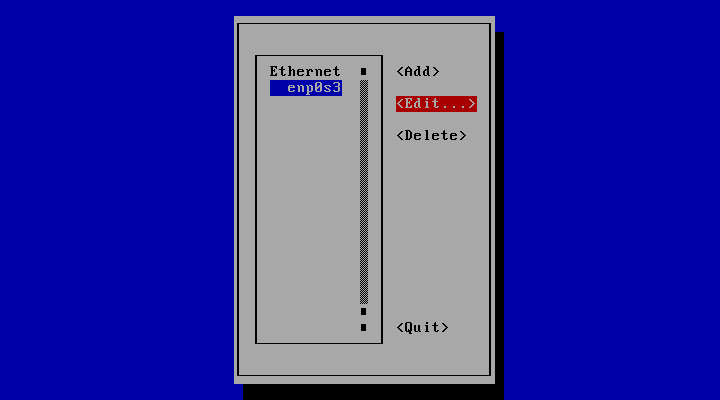
2. choose you network interfaces and click “Edit”
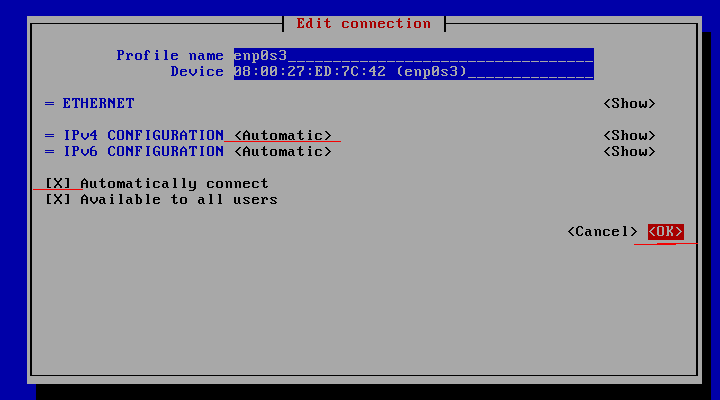
3. Choose “Automatic” in IPv4 CONFIGURATION and check Automatically connect check box and press OK and quit from Network manager.
4. Restart network service 'systemctl restart NetworkManager.service'
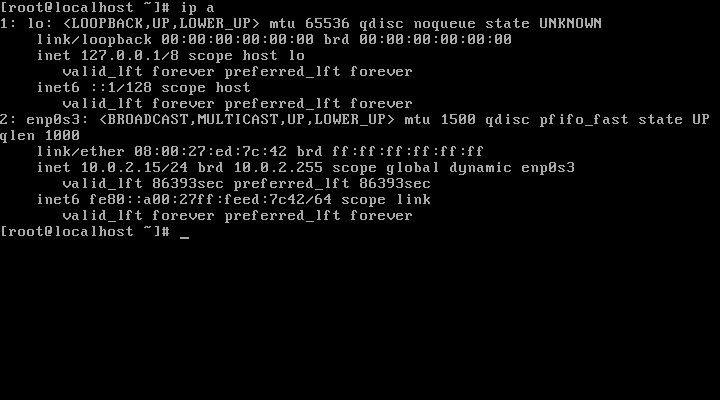
[root@10 ~]# nmcli dev status
[or]
[root@10 ~]# nmcli d
DEVICE TYPE STATE CONNECTION
enp0s3 ethernet connected enp0s3
enp0s8 ethernet connected enp0s8

How to configure Static IP address
# vim /etc/sysconfig/network-scripts/ifcfg-eth0

## Default Configuration
DEVICE="eth0"
ONBOOT=yes
NETBOOT=yes
UUID="41171a6f-bce1-44de-8a6e-cf5e782f8bd6"
IPV6INIT=yes
BOOTPROTO=dhcp
HWADDR="00:08:a2:0a:ba:b8"
TYPE=Ethernet
NAME="eth0"

## Configuration for Static IP
HWADDR=00:08:A2:0A:BA:B8
TYPE=Ethernet
BOOTPROTO=static
# Server IP #
IPADDR=192.168.2.203
# Subnet #
PREFIX=24
# Set default gateway IP #
GATEWAY=192.168.2.254
# Set dns servers #
DNS1=192.168.2.254
DNS2=8.8.8.8
DNS3=8.8.4.4
DEFROUTE=yes
IPV4_FAILURE_FATAL=no
# Disable ipv6 #
IPV6INIT=no
NAME=eth0
# This is system specific and can be created using `uuidgen eth0` command #
UUID=41171a6f-bce1-44de-8a6e-cf5e782f8bd6
DEVICE=eth0
ONBOOT=yes
# Restart network interface
systemctl restart NetworkManager

# Verify new IP settings:
ip a s eth0

# Verify new routing settings:
ip r

# Verify DNS servers settings
cat /etc/resolv.conf
How to enable kernel modules
# Error message : "Your system does not seem to be set up to build kernel modules"
# Solution:
yum clean all
yum install gcc-c++
yum install kernel-devel
yum install kernel-headers
3 - Ubuntu
Show Hiddenfiles
Ctrl + H
Taking a screenshot
Hold shift + prtScr , mouse turns to a cross. Select the area to screenshot.
Image will be saved to pictures folder by default.To copy to Clipboard, use: Ctrl + Shift + PrtScn
Configure Wifi Network
Reference: netplan
- Find the network interface :
ip link show - Add
config.yamlfile in/etc/netplans
ubuntu@myberry:/etc/netplan$ cat config.yaml
network:
  version: 2
  renderer: networkd
  wifis:
    wlan0:
      dhcp4: no
      dhcp6: no
      addresses: [192.168.2.40/24]
      gateway4: 192.168.2.1
      nameservers:
              addresses: [8.8.8.8,192.168.2.1]
      access-points:
        "ACCESSPOINT_NAME":
          password: "PASSWORD"
- Apply the configuration :
sudo netplan apply - See the routing table :
ip r
ubuntu@myberry:/etc/netplan$ ip r
default via 192.168.2.1 dev wlan0 proto static
192.168.2.0/24 dev wlan0 proto kernel scope link src 192.168.2.40
Settingup SSH service
If there is any issue starting ssh service, remove and install openssh packages.
sudo apt remove openssh-server openssh-client --purge \
&& sudo apt autoremove \
&& sudo apt autoclean \
&& sudo apt update \
&& sudo apt install openssh-server openssh-client
sudo systemctl enable ssh
sudo systemctl daemon-reload
sudo systemctl status ssh

ubuntu@myberry:/etc/netplan$ systemctl status ssh
● ssh.service - OpenBSD Secure Shell server
     Loaded: loaded (/lib/systemd/system/ssh.service; enabled; vendor preset: enabled)
     Active: active (running) since Sat 2020-07-04 19:44:17 UTC; 21min ago
       Docs: man:sshd(8)
             man:sshd_config(5)
   Main PID: 1880 (sshd)
      Tasks: 1 (limit: 9255)
     CGroup: /system.slice/ssh.service
             └─1880 sshd: /usr/sbin/sshd -D [listener] 0 of 10-100 startups

Jul 04 19:44:17 myberry systemd[1]: Starting OpenBSD Secure Shell server...
Jul 04 19:44:17 myberry sshd[1880]: Server listening on 0.0.0.0 port 22.
Jul 04 19:44:17 myberry sshd[1880]: Server listening on :: port 22.
Jul 04 19:44:17 myberry systemd[1]: Started OpenBSD Secure Shell server.
Jul 04 19:47:28 myberry sshd[2195]: Accepted password for ubuntu from 192.168.2.13 port 36716 ssh2
Jul 04 19:47:28 myberry sshd[2195]: pam_unix(sshd:session): session opened for user ubuntu by (uid=0)