This is the multi-page printable view of this section. Click here to print.
Linux
- 1: Linux Distributions
- 2: Concepts
- 2.1: Firewall
- 2.2: Linux FileSystem
- 2.2.1: Linux file system
- 2.3: Networking
- 2.4: Package Management
- 2.5: Storage
- 2.5.1: Storage
- 2.6: users
- 3: Others
- 3.1: BootableDrive
- 3.2: KDE
- 3.3: RHEL
- 4: Scripting
- 4.1: AWK
- 4.2: Shell Scripting
- 4.3: Tasks
- 5: System Admin
- 6: vim
1 - Linux Distributions
1.1 - Debian
![]()
1.1.1 - Debian
Install wifi drivers
When i was installing Debian 10, automatic network detection failed to load wifi drivers. Hence i have to manually add non-free debian sources and install the fimware wifi drivers.
# Reference : https://wiki.debian.org/iwlwifi

apt edit-sources
# add below non-free sources of debian to the list
# deb http://deb.debian.org/debian buster main contrib non-free
# deb-src http://deb.debian.org/debian buster main contrib non-free

apt update

apt install wireless-tools
apt install firmware-iwlwifi

modprobe -r iwlwifi
modprobe iwlwifi
root@sriram-pc:~# lspci
00:00.0 Host bridge: Intel Corporation Xeon E3-1200 v6/7th Gen Core Processor Host Bridge/DRAM Registers (rev 02)
00:02.0 VGA compatible controller: Intel Corporation HD Graphics 620 (rev 02)
00:04.0 Signal processing controller: Intel Corporation Skylake Processor Thermal Subsystem (rev 02)
00:14.0 USB controller: Intel Corporation Sunrise Point-LP USB 3.0 xHCI Controller (rev 21)
00:14.2 Signal processing controller: Intel Corporation Sunrise Point-LP Thermal subsystem (rev 21)
00:15.0 Signal processing controller: Intel Corporation Sunrise Point-LP Serial IO I2C Controller #0 (rev 21)
00:15.1 Signal processing controller: Intel Corporation Sunrise Point-LP Serial IO I2C Controller #1 (rev 21)
00:16.0 Communication controller: Intel Corporation Sunrise Point-LP CSME HECI #1 (rev 21)
00:17.0 SATA controller: Intel Corporation Sunrise Point-LP SATA Controller [AHCI mode] (rev 21)
00:1c.0 PCI bridge: Intel Corporation Sunrise Point-LP PCI Express Root Port #5 (rev f1)
00:1c.5 PCI bridge: Intel Corporation Sunrise Point-LP PCI Express Root Port #6 (rev f1)
00:1f.0 ISA bridge: Intel Corporation Sunrise Point-LP LPC Controller (rev 21)
00:1f.2 Memory controller: Intel Corporation Sunrise Point-LP PMC (rev 21)
00:1f.3 Audio device: Intel Corporation Sunrise Point-LP HD Audio (rev 21)
00:1f.4 SMBus: Intel Corporation Sunrise Point-LP SMBus (rev 21)
01:00.0 Network controller: Intel Corporation Wireless 3165 (rev 79)
02:00.0 Ethernet controller: Realtek Semiconductor Co., Ltd. RTL8101/2/6E PCI Express Fast/Gigabit Ethernet controller (rev 07)
How to enable enp0s8 interface
# List all the available interfaces
ip a

# Install net-tools
apt-get install net-tools

# execute the commands as root
vi /etc/network/interfaces

# Add below lines to the interface file
auto enp0s8
iface enp0s8 inet dhcp

# Start the network interface
ifup enp0s8

# Check the status of enp0s8
ip a show enp0s8
configure static IP for enp0s8
# Add below lines in /etc/network/interfaces
auto enp0s8
iface enp0s8 inet static
        address 192.168.0.100
        netmask 255.255.255.0
        network 192.168.0.0
        broadcast 192.168.0.255
        gateway 192.168.0.1

# Restart the network
systemctl restart networking

# update /etc/hosts entry
127.0.0.1       localhost.localdomain   localhost
192.168.0.100   server1.example.com     server1

# Reboot the system
systemctl reboot
References
1.1.2 - Debian
How to install draw.io
# https://github.com/jgraph/drawio-desktop/releases/

cd /tmp
wget https://github.com/jgraph/drawio-desktop/releases/download/v13.6.2/draw.io-amd64-13.6.2.deb
sudo dpkg -i draw.io-amd64-13.6.2.deb
Install insomnia
# Add to sources
echo "deb https://dl.bintray.com/getinsomnia/Insomnia /" \
    | sudo tee -a /etc/apt/sources.list.d/insomnia.list

# Add public key used to verify code signature
wget --quiet -O - https://insomnia.rest/keys/debian-public.key.asc \
    | sudo apt-key add -

# Refresh repository sources and install Insomnia
sudo apt-get update
sudo apt-get install insomnia
References
1.2 - CentOS
1.2.1 - CentOS-8
Extra Packages for Enterprise Linux (EPEL)
Extra Packages for Enterprise Linux (EPEL) is a special interest group (SIG) from the Fedora Project that provides a set of additional packages for RHEL (and CentOS, and others) from the Fedora sources.
Note
EPEL is not an official part of the RHEL subscription or an official offering from Red Hat. But it can come in handy for admins and developers who work with RHEL and need a few utilities packaged for RHEL from a source they can feel good about.dnf -y install epel-release
dnf update -y
[root@192 ~]# dnf install epel-release
Last metadata expiration check: 1:50:34 ago on Fri 17 Jul 2020 11:34:52 AM CEST.
Dependencies resolved.
================================================================================================================
 Package                       Architecture            Version                    Repository               Size
================================================================================================================
Installing:
 epel-release                  noarch                  8-8.el8                    extras                   23 k

Transaction Summary
================================================================================================================
Install  1 Package

Total download size: 23 k
Installed size: 32 k
Is this ok [y/N]: y
Downloading Packages:
epel-release-8-8.el8.noarch.rpm                                                  98 kB/s |  23 kB     00:00
----------------------------------------------------------------------------------------------------------------
Total                                                                            71 kB/s |  23 kB     00:00
warning: /var/cache/dnf/extras-2770d521ba03e231/packages/epel-release-8-8.el8.noarch.rpm: Header V3 RSA/SHA256 Signature, key ID 8483c65d: NOKEY
CentOS-8 - Extras                                                               1.6 MB/s | 1.6 kB     00:00
Importing GPG key 0x8483C65D:
 Userid     : "CentOS (CentOS Official Signing Key) <security@centos.org>"
 Fingerprint: 99DB 70FA E1D7 CE22 7FB6 4882 05B5 55B3 8483 C65D
 From       : /etc/pki/rpm-gpg/RPM-GPG-KEY-centosofficial
Is this ok [y/N]: y
Key imported successfully
Running transaction check
Transaction check succeeded.
Running transaction test
Transaction test succeeded.
Running transaction
  Preparing        :                                                                                        1/1
  Installing       : epel-release-8-8.el8.noarch                                                            1/1
  Running scriptlet: epel-release-8-8.el8.noarch                                                            1/1
  Verifying        : epel-release-8-8.el8.noarch                                                            1/1
Installed products updated.

Installed:
  epel-release-8-8.el8.noarch

Complete!


[root@192 ~]# dnf update
Extra Packages for Enterprise Linux Modular 8 - x86_64                          122 kB/s |  82 kB     00:00
Extra Packages for Enterprise Linux 8 - x86_64                                  1.1 MB/s | 7.4 MB     00:06
Dependencies resolved.
Nothing to do.
Complete!
How to install draw.io
# check the latest available release of draw.io from github before installing.
sudo dnf install https://github.com/jgraph/drawio-desktop/releases/download/v13.4.5/draw.io-x86_64-13.4.5.rpm
References
1.2.2 - CentOS-7
How to setup network after RHEL/CentOS minimal installation
After installing RHEL/CentOS minimal, You may not able to connect network in that machine. This will happen because Ethernet interfaces are not enabled by default.
Method 1 – Using NetworkManager Service
edit '/etc/sysconfig/network-scripts/ifcfg-enp0s8'
change onboot parameter to yes, and restart the interface
'ONBOOT=YES'
# Restart the interface
ifdown ifcfg-enp0s8
ifup ifcfg-enp0s8
Method 2 – Using nmcli Tool
#nmcli d (List the available interfaces)
#nmtui
1. open Network manager, and choose Edit connection
2. choose you network interfaces and click “Edit”
3. Choose “Automatic” in IPv4 CONFIGURATION and check Automatically connect check box and press OK and quit from Network manager.
4. Restart network service 'systemctl restart NetworkManager.service'

[root@10 ~]# nmcli dev status
[or]
[root@10 ~]# nmcli d
DEVICE  TYPE      STATE      CONNECTION
enp0s3  ethernet  connected  enp0s3
enp0s8  ethernet  connected  enp0s8

How to configure Static IP address
# vim /etc/sysconfig/network-scripts/ifcfg-eth0

## Default Configuration
DEVICE="eth0"
ONBOOT=yes
NETBOOT=yes
UUID="41171a6f-bce1-44de-8a6e-cf5e782f8bd6"
IPV6INIT=yes
BOOTPROTO=dhcp
HWADDR="00:08:a2:0a:ba:b8"
TYPE=Ethernet
NAME="eth0"

## Configuration for Static IP
HWADDR=00:08:A2:0A:BA:B8
TYPE=Ethernet
BOOTPROTO=static
# Server IP #
IPADDR=192.168.2.203
# Subnet #
PREFIX=24
# Set default gateway IP #
GATEWAY=192.168.2.254
# Set dns servers #
DNS1=192.168.2.254
DNS2=8.8.8.8
DNS3=8.8.4.4
DEFROUTE=yes
IPV4_FAILURE_FATAL=no
# Disable ipv6 #
IPV6INIT=no
NAME=eth0
# This is system specific and can be created using `uuidgen eth0` command #
UUID=41171a6f-bce1-44de-8a6e-cf5e782f8bd6
DEVICE=eth0
ONBOOT=yes
# Restart network interface
systemctl restart NetworkManager

# Verify new IP settings:
ip a s eth0

# Verify new routing settings:
ip r

# Verify DNS servers settings
cat /etc/resolv.conf
How to enable kernel modules
# Error message : "Your system does not seem to be set up to build kernel modules"
# Solution:
yum clean all
yum install gcc-c++
yum install kernel-devel
yum install kernel-headers
1.3 - Ubuntu
Show Hiddenfiles
Ctrl + H
Taking a screenshot
Hold shift + prtScr , mouse turns to a cross. Select the area to screenshot.
Image will be saved to pictures folder by default.To copy to Clipboard, use: Ctrl + Shift + PrtScn
Configure Wifi Network
Reference: netplan
- Find the network interface :
ip link show - Add
config.yamlfile in/etc/netplans
ubuntu@myberry:/etc/netplan$ cat config.yaml
network:
  version: 2
  renderer: networkd
  wifis:
    wlan0:
      dhcp4: no
      dhcp6: no
      addresses: [192.168.2.40/24]
      gateway4: 192.168.2.1
      nameservers:
              addresses: [8.8.8.8,192.168.2.1]
      access-points:
        "ACCESSPOINT_NAME":
          password: "PASSWORD"
- Apply the configuration :
sudo netplan apply - See the routing table :
ip r
ubuntu@myberry:/etc/netplan$ ip r
default via 192.168.2.1 dev wlan0 proto static
192.168.2.0/24 dev wlan0 proto kernel scope link src 192.168.2.40
Settingup SSH service
If there is any issue starting ssh service, remove and install openssh packages.
sudo apt remove openssh-server openssh-client --purge \
&& sudo apt autoremove \
&& sudo apt autoclean \
&& sudo apt update \
&& sudo apt install openssh-server openssh-client
sudo systemctl enable ssh
sudo systemctl daemon-reload
sudo systemctl status ssh

ubuntu@myberry:/etc/netplan$ systemctl status ssh
● ssh.service - OpenBSD Secure Shell server
     Loaded: loaded (/lib/systemd/system/ssh.service; enabled; vendor preset: enabled)
     Active: active (running) since Sat 2020-07-04 19:44:17 UTC; 21min ago
       Docs: man:sshd(8)
             man:sshd_config(5)
   Main PID: 1880 (sshd)
      Tasks: 1 (limit: 9255)
     CGroup: /system.slice/ssh.service
             └─1880 sshd: /usr/sbin/sshd -D [listener] 0 of 10-100 startups

Jul 04 19:44:17 myberry systemd[1]: Starting OpenBSD Secure Shell server...
Jul 04 19:44:17 myberry sshd[1880]: Server listening on 0.0.0.0 port 22.
Jul 04 19:44:17 myberry sshd[1880]: Server listening on :: port 22.
Jul 04 19:44:17 myberry systemd[1]: Started OpenBSD Secure Shell server.
Jul 04 19:47:28 myberry sshd[2195]: Accepted password for ubuntu from 192.168.2.13 port 36716 ssh2
Jul 04 19:47:28 myberry sshd[2195]: pam_unix(sshd:session): session opened for user ubuntu by (uid=0)
2 - Concepts
2.1 - Firewall
A firewall provides a means to protect machines from any unwanted traffic. It enables users/administrators to control incoming network traffic on host machines by defining a set of firewall rules. These rules are used to sort the incoming traffic and either block it or allow through.
firewalld
firewalldis a firewall service daemon that provides a dynamic customizable host-based firewall. Being dynamic, it enables creating, changing, and deleting the rules without the necessity to restart the firewall daemon each time the rules are changed.firewalld uses the concepts of zones and services
Zones are predefined sets of rules.
Network interfaces and sources can be assigned to a zone.
The traffic allowed depends on the network your computer is connected to and the security level this network is assigned.
Firewall services are predefined rules that cover all necessary settings to allow incoming traffic for a specific service and they apply within a zone.
Services use one or more ports or addresses for network communication.
Firewall filter communication based on ports.
# To start firewalld
systemctl unmask firewalld
systemctl enable firewalld.service
systemctl start firewalld

# To stop firewalld
systemctl stop firewalld
systemctl disable firewalld
systemctl mask firewalld

# Quick command to check whether the firewall is enabled or disabled
systemctl is-enabled firewalld
[root@centos8 ~]# systemctl status firewalld
● firewalld.service - firewalld - dynamic firewall daemon
   Loaded: loaded (/usr/lib/systemd/system/firewalld.service; enabled; vendor preset: enabled)
   Active: active (running) since Mon 2019-10-28 15:05:45 CET; 1min 25s ago
     Docs: man:firewalld(1)
 Main PID: 772 (firewalld)
    Tasks: 2 (limit: 11525)
   Memory: 36.2M
   CGroup: /system.slice/firewalld.service
           └─772 /usr/libexec/platform-python -s /usr/sbin/firewalld --nofork --nopid

Oct 28 15:05:44 centos8 systemd[1]: Starting firewalld - dynamic firewall daemon...
Oct 28 15:05:45 centos8 systemd[1]: Started firewalld - dynamic firewall daemon.
firewall-cmd
firewall-cmd is a cli for firewall service.
To get more details on how to use firewall-cmd : firewall-cmd --help
# Examples:

# How to add a service to firewall
yum install tftp-server
firewall-cmd --add-service=tftp

# How to add and open port to firewall
## The command below will open the port effective immediately, but will not persist across reboots:
firewall-cmd --add-port=<YOUR PORT>/tcp
## The following command will create a persistent rule, but will not be put into effect immediately:
firewall-cmd --permanent --add-port=<YOUR PORT>/tcp
Resources
firewalld(1) man page
firewalld.zone(5) man page
redhat-documentation
2.2 - Linux FileSystem
2.2.1 - Linux file system
sriram@sriram-Inspiron-5567:~$ sudo fdisk -l /dev/sda
Disk /dev/sda: 111,8 GiB, 120034123776 bytes, 234441648 sectors
Units: sectors of 1 * 512 = 512 bytes
Sector size (logical/physical): 512 bytes / 512 bytes
I/O size (minimum/optimal): 512 bytes / 512 bytes
Disklabel type: gpt
Disk identifier: 833807FE-A7E1-46DA-B629-ECC1B32A087E

Device         Start       End   Sectors   Size Type
/dev/sda1       2048   1050623   1048576   512M EFI System
/dev/sda2    1050624 217874431 216823808 103,4G Linux filesystem
/dev/sda3  217874432 234440703  16566272   7,9G Linux swap
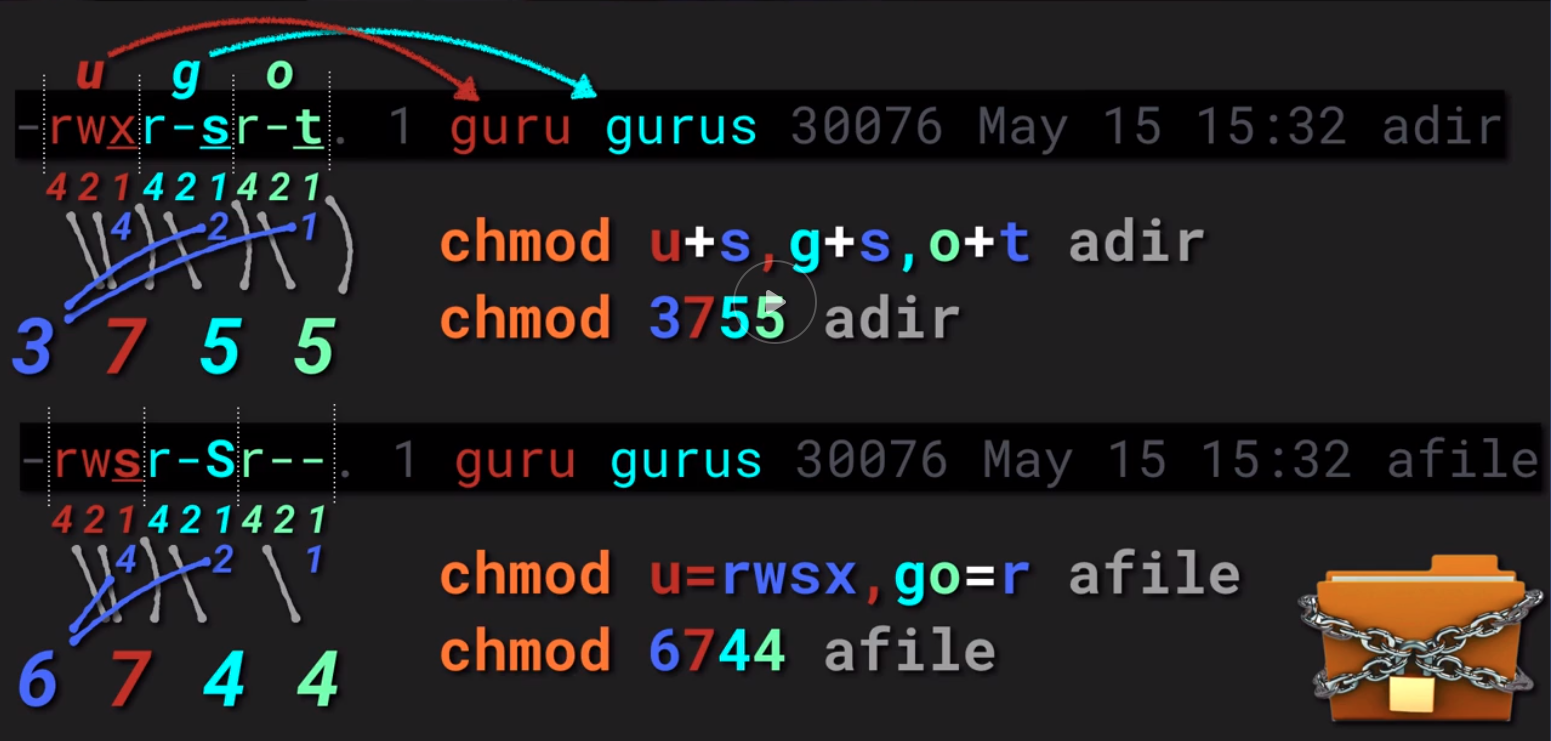
Linux File Permissions
-rwsrwsrwtchmod u+s,g+s,o+t dir
- Sticky bit
Items in directory may only be deleted by owner.
[root@10 ~]# ls -ld /tmp
drwxrwxrwt. 8 root root 216 Oct 27 11:18 /tmp
SGID - Set Group Identity
Can be set on directories aswell as on files Directory : New objects in this directory inherit its group ownership.
Execuable File : Runs as owning group rather than invoker’s group.SUID - Set User Identity
Executable: Program runs as owner, rather than caller.
References
Linux file system
man hier
2.3 - Networking
Warning
net-tools utilities are obsoleted by iproute2https://wiki.linuxfoundation.org/networking/iproute2
| Legacy utility | Replacement command | Note |
|---|---|---|
| ifconfig | ip addr, ip link, ip -s | Address and link configuration |
| route | ip route | Routing tables |
| arp | ip neigh | Neighbors |
| iptunnel | ip tunnel | Tunnels |
| nameif | ifrename, ip link set name | Rename network interfaces |
| ipmaddr | ip maddr | Multicast |
| netstat | ip -s, ss, ip route | Socket statistics |
ip address statistics with colors and human readable format
ip -stats -color -human addrip -s -c -h a
How to start/stop an interface
ifup eth0  (deprecated)
ifdown eth0 (deprecated)
To show the current neighbour table in kernel$ ip neigh
To temporarily assign IP Address to a specific network interface (eth0)$ sudo ip addr add 192.168.56.1 dev eth0
To remove an assigned IP address from an network interface (eth0)
$ sudo ip addr del 192.168.56.15/24 dev eth0
ethtool
a command line utility for querying and modifying network interface controller parameters and device drivers.$ sudo ethtool enp0s3
ping (Packet INternet Groper)
Utility normally used for testing connectivity between two systems on a network (Local Area Network (LAN) or Wide Area Network (WAN)). It uses ICMP (Internet Control Message Protocol) to communicate to nodes on a network.
To test connectivity to another node, simply provide its IP or host name, for example.$ ping 192.168.0.1
traceroute | tracepath
Traceroute is a command line utility for tracing the full path from your local system to another network system. It prints number of hops (router IP’s) in that path you travel to reach the end server. It is an easy-to-use network troubleshooting utility after ping command.
Tracepath is similar to traceroute but for non root users.
In this example, we are tracing the route packets take from the local system to one of Google’s servers with IP address 216.58.204.46.$ traceroute 216.58.204.46
If traceroute is not available on the system, then install the utility as a root : yum install traceroute
MTR - a network diagnostic tool
MTR is a modern command-line network diagnostic tool that combines the functionality of ping and traceroute into a single diagnostic tool. Its output is updated in real-time, by default until you exit the program by pressing q.
The easiest way of running mtr is to provide it a host name or IP address as an argument, as follows.
$ mtr google.com (or) $ mtr 216.58.223.78
route - show / manipulate the IP routing table
route is a command line utility for displaying or manipulating the IP routing table of a Linux system. It is mainly used to configure static routes to specific hosts or networks via an interface.
You can view Kernel IP routing table by typing.
$ route
Add a default gateway to the routing table.
$ sudo route add default gw <gateway-ip>
Add a network route to the routing table.
$ sudo route add -net <network ip/cidr> gw <gateway ip> <interface>
Delete a specific route entry from the routing table.
$ sudo route del -net <network ip/cidr>
nmcli - command line tool for network management
nmcli is an easy-to-use, scriptable command-line tool to report network status, manage network connections, and control the NetworkManager.
Install network-manager for nmcli:sudo apt install network-manager
To check network connections on your system$ nmcli con show
List out all network interfaces and status$ nmcli d (or) $ nmcli dev status
[root@10 ~]# nmcli d
DEVICE  TYPE      STATE      CONNECTION
enp0s3  ethernet  connected  enp0s3
enp0s8  ethernet  connected  enp0s8
lo      loopback  unmanaged  --
Warning
netstat is obsolete and replaced by ssAdditionally, it is also a fundamental network service debugging tool used to check which programs are listening on what ports. For instance, the following command will show all TCP ports in listening mode and what programs are listening on them. $ sudo netstat -tnlp
To view kernel routing table, use the -r flag (which is equivalent to running route command above). $ netstat -r
ss (socket statistics) - another utility to investigate sockets
ss (socket statistics) is a powerful command line utility to investigate sockets. It dumps socket statistics and displays information similar to netstat. In addition, it shows more TCP and state information compared to other similar utilities.
The following example show how to list all TCP ports (sockets) that are open on a server.$ ss -ta
nc (or netcat) - arbitrary TCP and UDP connections and listens
NC (NetCat) also referred to as the “Network Swiss Army knife”, is a powerful utility used for almost any task related to TCP, UDP, or UNIX-domain sockets.
- It can open TCP connections
- send UDP packets
- listen on arbitrary TCP and UDP ports
- do port scanning
- deal with both IPv4 and IPv6.
Example to show how to scan a list of ports.$ nc -zv www.google.com 21 22 80 443 3000
nc -zv www.google.com 21 22 80 443 3000
nc: connect to www.google.com port 21 (tcp) failed: Connection timed out
nc: connect to www.google.com port 21 (tcp) failed: Connection timed out
nc: connect to www.google.com port 22 (tcp) failed: Connection timed out
nc: connect to www.google.com port 22 (tcp) failed: Connection timed out
Connection to www.google.com 80 port [tcp/http] succeeded!
Connection to www.google.com 443 port [tcp/https] succeeded!
nc: connect to www.google.com port 3000 (tcp) failed: Connection timed out
You can also specify a range of ports as shown.$ nc -zv www.google.com 20-90
The following example shows how to use nc to open a TCP connection to port 5000 on server2.tecmint.lan, using port 3000 as the source port, with a timeout of 10 seconds.$ nc -p 3000 -w 10 server2.tecmint.lan 5000
nmap
Nmap (Network Mapper) is a powerful and extremely versatile tool for Linux system/network administrators. It is used gather information about a single host or explore networks an entire network. Nmap is also used to perform security scans, network audit and finding open ports on remote hosts and so much more.
You can scan a host using its host name or IP address, for instance.
$ nmap google.com
Find all devices connected to the same Network using nmap
~$ nmap -sP 192.168.2.1/24
Starting Nmap 7.80 ( https://nmap.org ) at 2020-07-04 22:14 CEST
Nmap scan report for wn3000rpv3.home (192.168.2.1)
Host is up (0.098s latency).
Nmap scan report for 192.168.2.6 (192.168.2.6)
Host is up (0.098s latency).
Nmap scan report for 192.168.2.11 (192.168.2.11)
Host is up (0.011s latency).
Nmap scan report for sriram-inspiron-5567.home (192.168.2.13)
Host is up (0.00024s latency).
Nmap scan report for 192.168.2.40 (192.168.2.40)
Host is up (0.064s latency).
Nmap scan report for router.home (192.168.2.254)
Host is up (0.088s latency).
Nmap done: 256 IP addresses (6 hosts up) scanned in 11.17 seconds
DNS Lookup Utilities
host command is a simple utility for carrying out DNS lookups, it translates host names to IP addresses and vice versa.$ host google.com
dig (domain information groper) is also another simple DNS lookup utility, that is used to query DNS related information such as A Record, CNAME, MX Record etc, for example:$ dig google.com
Nslookup is also a popular command line utility to query DNS servers both interactively and non-interactively. It is used to query DNS resource records (RR). You can find out “A” record (IP address) of a domain as shown.$ nslookup google.com
tcp dump
Linux Network Packet Analyzers: Tcpdump is a very powerful and widely used command-line network sniffer. It is used to capture and analyze TCP/IP packets transmitted or received over a network on a specific interface.
To capture packets from a given interface, specify it using the -i option.$ tcpdump -i eth1
To capture a specific number of packets, use the -c option to enter the desired number.$ tcpdump -c 5 -i eth1
To capture and save packets to a file for later analysis, use the -w flag and specify the output file.$ tcpdump -w captured.pacs -i eth1
References
2.4 - Package Management
2.4.1 - apk
Alpine is the light weight linux distribution. Alpine uses apk as the package manager.
References
2.4.2 - deb
The major reason to use apt tools though is for the dependency management. The apt tools understand that in order to install a given package, other packages may need to be installed too, and apt can download these and install them, whereas dpkg does not.
References
2.4.3 - dnf
DNF or Dandified yum is the next generation version of yum, a package manager for RPM-based Linux distributions like fedora,centos and redhat.
dnf -h
dnf --help
[root@192 ~]# dnf history
ID     | Command line             | Date and time    | Action(s)      | Altered
-------------------------------------------------------------------------------
     5 | install transmission-gtk | 2020-07-17 13:26 | Install        |    3
     4 | install epel-release     | 2020-07-17 13:25 | Install        |    1
     3 |                          | 2020-07-17 11:33 | Install        |    8
     2 |                          | 2020-07-17 11:27 | Removed        |    1
     1 |                          | 2020-07-17 11:15 | Install        | 1476 EE
[root@192 ~]# dnf repolist
repo id                             repo name
AppStream                           CentOS-8 - AppStream
BaseOS                              CentOS-8 - Base
epel                                Extra Packages for Enterprise Linux 8 - x86_64
epel-modular                        Extra Packages for Enterprise Linux Modular 8 - x86_64
extras                              CentOS-8 - Extras
google-chrome                       google-chrome
#search package details for the given string

[root@192 ~]# dnf search chrome
Last metadata expiration check: 0:31:24 ago on Fri 17 Jul 2020 01:25:55 PM CEST.
======================================== Name & Summary Matched: chrome ========================================
google-chrome-stable.x86_64 : Google Chrome
google-chrome-beta.x86_64 : Google Chrome (beta)
google-chrome-unstable.x86_64 : Google Chrome (unstable)
chromedriver.x86_64 : WebDriver for Google Chrome/Chromium
============================================= Name Matched: chrome =============================================
chrome-gnome-shell.x86_64 : Support for managing GNOME Shell Extensions through web browsers
mathjax-winchrome-fonts.noarch : Fonts used by MathJax to display math in the browser
=========================================== Summary Matched: chrome ============================================
webextension-token-signing.x86_64 : Chrome and Firefox extension for signing with your eID on the web
# clear all cached packages from the system
[root@192 ~]# dnf clean all
44 files removed
References
2.4.4 - rpm
2.4.5 - yum
yum is broken on the server
### YUM not working on Centos and gave below error
could not retrieve mirrorlist http://mirrorlist.centos.org/?release=7&arch=x86_64&repo=extras&infra=stock error was
14: curl#6 - "Could not resolve host: mirrorlist.centos.org; Unknown error"

### To Fix above issue : go to /etc/resolve.conf and add/update nameserver
nameserver 8.8.8.8
Fix : Rebuild the yum database
yum clean all
rm -f /var/lib/rpm/__db*
rpm --rebuilddb
yum update
2.5 - Storage
2.5.1 - Storage
# from baremetal
sriram@sriram-Inspiron-5567:~$ sudo fdisk -l /dev/sda
Disk /dev/sda: 111,8 GiB, 120034123776 bytes, 234441648 sectors
Units: sectors of 1 * 512 = 512 bytes
Sector size (logical/physical): 512 bytes / 512 bytes
I/O size (minimum/optimal): 512 bytes / 512 bytes
Disklabel type: gpt
Disk identifier: 833807FE-A7E1-46DA-B629-ECC1B32A087E

Device         Start       End   Sectors   Size Type
/dev/sda1       2048   1050623   1048576   512M EFI System
/dev/sda2    1050624 217874431 216823808 103,4G Linux filesystem
/dev/sda3  217874432 234440703  16566272   7,9G Linux swap

# From Virtual Machine
[root@CentosServer1910 ~]# fdisk -l
Disk /dev/sda: 10 GiB, 10737418240 bytes, 20971520 sectors
Units: sectors of 1 * 512 = 512 bytes
Sector size (logical/physical): 512 bytes / 512 bytes
I/O size (minimum/optimal): 512 bytes / 512 bytes
Disklabel type: dos
Disk identifier: 0xec47036c

Device     Boot   Start      End  Sectors Size Id Type
/dev/sda1  *       2048  2099199  2097152   1G 83 Linux
/dev/sda2       2099200 20971519 18872320   9G 8e Linux LVM

Disk /dev/mapper/cl_centosserver1910-root: 8 GiB, 8585740288 bytes, 16769024 sectors
Units: sectors of 1 * 512 = 512 bytes
Sector size (logical/physical): 512 bytes / 512 bytes
I/O size (minimum/optimal): 512 bytes / 512 bytes

Disk /dev/mapper/cl_centosserver1910-swap: 1 GiB, 1073741824 bytes, 2097152 sectors
Units: sectors of 1 * 512 = 512 bytes
Sector size (logical/physical): 512 bytes / 512 bytes
I/O size (minimum/optimal): 512 bytes / 512 bytes
UUID - Get the uuid of devices on linux
UUID is the universally unique identifier that is assigned to devices on a linux system for the purpose of identification.
For example if your hard disk has 3 partitions then each partition is a device and has a uuid.
To find the uuid of devices connected to a system use the command ls -l /dev/disk/by-uuid/
[sriram@CentosServer1910 ~]$ ls -l /dev/disk/by-uuid/
total 0
lrwxrwxrwx. 1 root root 10 Nov  3 12:55 64b6f04f-d510-4c39-9a37-cacfeeec774b -> ../../sda1
lrwxrwxrwx. 1 root root 10 Nov  3 12:55 860d422d-1b58-4545-a139-10ffc6677f63 -> ../../dm-1
lrwxrwxrwx. 1 root root 10 Nov  3 12:55 86f561ac-6bdf-4768-8cdd-4333d6e74b47 -> ../../dm-0
Another command to find UUI : blkid
# from baremetal
sriram@sriram-Inspiron-5567:~$ sudo blkid
/dev/sda1: UUID="5FAA-9D41" TYPE="vfat" PARTLABEL="EFI System Partition" PARTUUID="80a7a0c8-1f77-45b0-b720-93a044c6b597"
/dev/sda2: UUID="17e11c76-30e6-4e5d-84ee-9ad13021351b" TYPE="ext4" PARTUUID="2376aa03-2148-4b8c-92c5-c0a40a3124a3"
/dev/sda3: UUID="170ab405-c120-4c49-a8cd-24a0b2bf346d" TYPE="swap" PARTUUID="ed20cc7f-76de-4371-8016-e10c030c1ef8"

# from virtual server
[sriram@CentosServer1910 ~]$ blkid
/dev/mapper/cl_centosserver1910-root: UUID="86f561ac-6bdf-4768-8cdd-4333d6e74b47" TYPE="xfs"
/dev/sda2: UUID="wi21xh-Sj3l-ocKe-Q6Qr-aRLv-n3Nm-hcYhL5" TYPE="LVM2_member" PARTUUID="ec47036c-02"
To get the uuid of a specific device, simply put the device name next to blkid : blkid /dev/sda1
[sriram@CentosServer1910 ~]$ sudo blkid /dev/sda*
/dev/sda: PTUUID="ec47036c" PTTYPE="dos"
/dev/sda1: UUID="64b6f04f-d510-4c39-9a37-cacfeeec774b" TYPE="ext4" PARTUUID="ec47036c-01"
/dev/sda2: UUID="wi21xh-Sj3l-ocKe-Q6Qr-aRLv-n3Nm-hcYhL5" TYPE="LVM2_member" PARTUUID="ec47036c-02"
2.6 - users
How to create a non-login user?
- Create user with -M (caps) flag.
- Lock the account to prevent from login
useradd -M subversion
usermod -L subversion
How to create a system user ?
$ adduser --system -s usr/sbin/nologin subversion
# The -r flag will create a system user - one which does not have a password, a home dir and is unable to login.
# -s flag is for shell , /bin/nologin prevents to have a shell for this user.

## Testing
$ sudo adduser --system --no-create-home --shell /usr/sbin/nologin subversion
Adding system user `subversion' (UID 109) ...
Adding new user `subversion' (UID 109) with group `nogroup' ...
Not creating home directory `/home/subversion'.

$ sudo grep subversion /etc/passwd /etc/shadow
/etc/passwd:subversion:x:109:65534::/home/subversion:/usr/sbin/nologin
/etc/shadow:subversion:*:18628:0:99999:7:::

## Check if account is usuable
$ sudo -u subversion whoami
subversion

$ sudo -u subversion date
Fri 01 Jan 2021 07:35:20 PM CET
3 - Others
3.1 - BootableDrive
How to create a bootable drive
dd bs=4M if=<path to your image.iso> of=<path to your USB> status=progress
bs : This stands for “block size.
if : This stands for “input file”. input file will be the iso file.
of : This stands for “output file”.
status : To see the progress.
3.2 - KDE
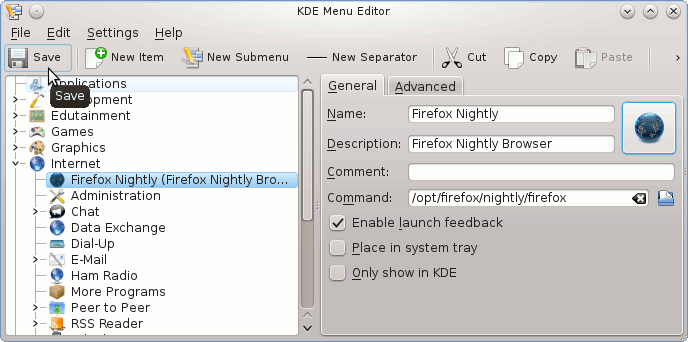
How to manage KDE applications launcher


3.3 - RHEL
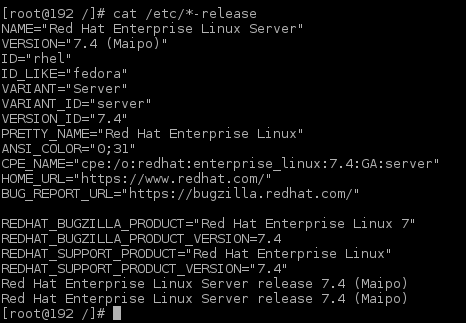
RedHat Enterprise Linux.
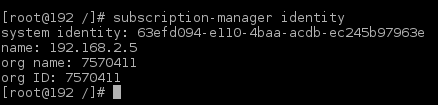
How to subscribe to Redhat using subscription-manager
subscription-manager
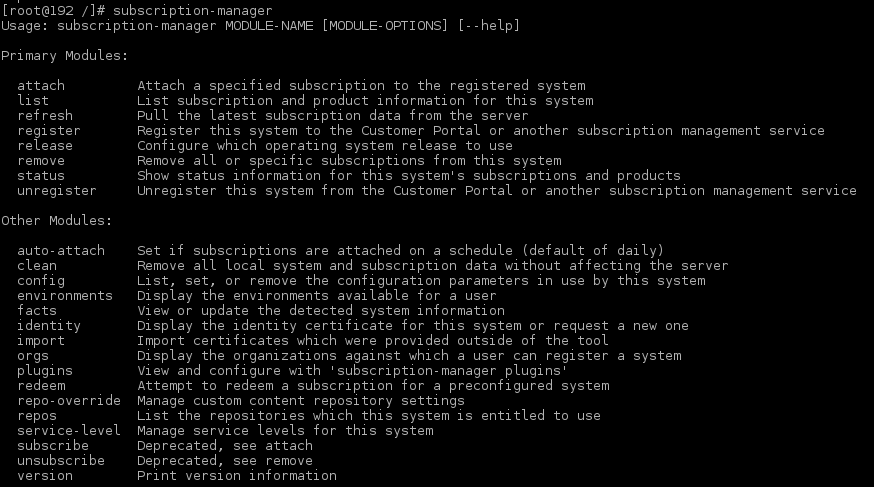
subscription-manager list
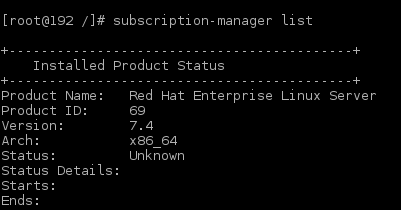
subscription-manager register

subscription-manager attach
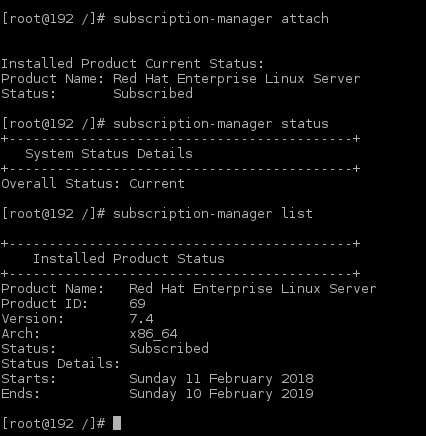
subscription-manager identity
Add GUI from basic installation
 yum groupinstall gnome-desktop x11 fonts
 yum groupinstall "Server with GUI"
 systemctl set-default graphical.target
 systemctl start graphical.target
References
4 - Scripting
4.1 - AWK
- Scans a file line by line
- Splits each input line into fields
- Compares input line/fields to pattern
- Performs action(s) on matched lines
Search Patterns:
Patterns are marked by forward slash at beginning and end of search key word
awk '/keyword/ {print}'
cat /etc/passwd | awk -F: '/bin/ {print}'
cat /etc/passwd | awk -F: '/bin\/false/ {print}'
cat /etc/passwd | awk -F: '/usr\/sbin\/nologin/ {print $1}'
Delimiter and Multiple Delimiters
cat /etc/passwd | awk -F: '/bin/ {print}'

awk -F'[/=]' '{print $3 "\t" $5 "\t" $8}' filename

SYNTAX: -F"<separator1>|<separator2>|..."
awk -F"/|=" '{print $3 "\t" $5 "\t" $8}' filename
4.2 - Shell Scripting
Linux Shell Scripting
| Special Parameter | Description |
|---|---|
| $0 | returns name of the script |
| $# | returns total number of arguments count |
| $@ | returns list of arguments |
| $* | If a script receives two arguments, $* is equivalent to $1 $2 |
| $? | returns exit value of the last executed command |
| $! | returns process number of the last background command |
| $$ | returns PID of current shell |
| !$ | Last argument in a command |
`$*` and `$@` both will act the same unless they are enclosed in double quotes, "".
"$*" special parameter takes the entire list as one argument with spaces between and the "$@" special parameter takes the entire list and separates it into separate arguments.
#!/bin/bash
# Check if arguments are given, $0 is the script name #
if [ $# -lt 3 ]
then
        echo "Missing Arguments"
        echo "Usage : $0 arg1 arg2 arg3"
        exit
fi
File Test Operators
| operator | Description |
|---|---|
| -a file | True if file exists. |
| -b file | True if file exists and is a block special file. |
| -c file | True if file exists and is a character special file. |
| -d file | True if file exists and is a directory. |
| -e file | True if file exists. |
| -f file | True if file exists and is a regular file. |
| -g file | True if file exists and is set-group-id. |
| -h file | True if file exists and is a symbolic link. |
| -k file | True if file exists and its ``sticky’’ bit is set. |
| -p file | True if file exists and is a named pipe (FIFO). |
| -r file | True if file exists and is readable. |
| -s file | True if file exists and has a size greater than zero. |
| -t fd | True if file descriptor fd is open and refers to a terminal. |
| -u file | True if file exists and its set-user-id bit is set. |
| -w file | True if file exists and is writable. |
| -x file | True if file exists and is executable. |
| -G file | True if file exists and is owned by the effective group id. |
| -L file | True if file exists and is a symbolic link. |
| -N file | True if file exists and has been modified since it was last read. |
| -O file | True if file exists and is owned by the effective user id. |
| -S file | True if file exists and is a socket. |
| -v varname | True if the shell variable varname is set (has been assigned a value). |
| -z string | True if the length of string is zero. |
| -n string | True if the length of string is non-zero. |
| str | Check if str is not empty; if empty, then returns false. |
# $1 is the first argument, expecting a string
if [ -z $1 ]; then
   echo "You must specify a string in first argument"
   exit
fi

# using translate command 'tr', Translate any uppercase characters into lowercase #
test=$( echo "$1" | tr -s  '[:upper:]'  '[:lower:]' )
# Check if the given file exists where arg3 is the given filename to check #
if [ ! -f $3 ]
then
        echo "Filename given \"$3\" doesn't exist"
        exit
fi
Standard Streams
| value | Stream |
|---|---|
| 0 | /dev/stdin |
| 1 | /dev/stdout |
| 2 | /dev/stderr |
String vs Numeric comparision
For string comparision use,
==
!=
<

For numeric comparision use,
-gt
-lt
-eq
-ne
For and While loops
#!/bin/bash
for variable in {list}
do
    <commands>
done

# Example
for i in {1..10}
do
    echo $i
done

# Bash v4.0+ has inbuilt support for setting up a step value using {START..END..INCREMENT} syntax
#!/bin/bash
echo "Bash version ${BASH_VERSION}..."
for i in {0..10..2}
  do
     echo "Count $i times"
 done

#output
Bash version 4.4.20(1)-release...
Count 0 times
Count 2 times
Count 4 times
Count 6 times
Count 8 times
Count 10 times
# C Style for loop
#!/bin/bash
for (( i=1; i<=5; i++ ))
do
   echo "Welcome $i times"
done

# Infinite loop
#!/bin/bash
for (( ; ; ))
do
   echo "infinite loops [ hit CTRL+C to stop]"
done
Loop through array elements
BOOKS=('Title-1' \
     'Title-2' \
     'Title-3' \
     'Title-4')
for book in "${BOOKS[@]}"
do
  echo "Book: $book"
done

# Output
Book: Title-1
Book: Title-2
Book: Title-3
Book: Title-4
Conditional exit with break
You can do early exit with break statement inside the for loop.You can exit from within a FOR, WHILE or UNTIL loop using break.
for i in {1..10}
do
  statements1      #Executed for all values of ''i'', up to a disaster-condition if any.
  statements2
  if (disaster-condition)
  then
     break            #Abandon the loop.
  fi
  statements3         #While good and, no disaster-condition.
done

# Example
# This shell script will go though all files stored in /etc directory.
# The for loop will be abandon when /etc/resolv.conf file found.

#!/bin/bash
for file in /etc/*
do
     if [ "${file}" == "/etc/resolv.conf" ]
     then
          countNameservers=$(grep -c nameserver /etc/resolv.conf)
          echo "Total  ${countNameservers} nameservers defined in ${file}"
          break
     fi
done
#!/bin/bash
while [[condition]]
do
    <commands>
done

# Example
num=1
while [ $num -le 5 ]
do
   echo "$num"
   num=$((num+1))
done
Continue
To resume the next iteration of the enclosing FOR, WHILE or UNTIL loop use continue statement.
for I in 1 2 3 4 5
do
  statements1      #Executed for all values of ''I'', up to a disaster-condition if any.
  statements2
  if (condition)
  then
     continue   #Go to next iteration of I in the loop and skip statements3
  fi
  statements3
done

# Example
# This script will make backup of all file names specified on command line. If .bak file exists, it will skip the cp command.
#!/bin/bash
FILES="$@"
for f in $FILES
do
        # if .bak backup file exists, read next file
     if [ -f ${f}.bak ]
     then
          echo "Skiping $f file..."
          continue  # read next file and skip the cp command
     fi
     /bin/cp $f $f.bak
done
Case
# The CASE statement is the simplest form of the IF-THEN-ELSE statement in BASH.
case $variable in
     pattern-1)
          commands
          ;;
     pattern-2)
          commands
          ;;
     pattern-3|pattern-4|pattern-5)
          commands
          ;;
     pattern-N)
          commands
          ;;
     *)
          commands
          ;;
esac
References
gnu.org Bash Reference Manual
Conditional Expressions
bash wikibook
Linux Shell Scripting Tutorial
Bash-Scripting
Bash-Beginners-Guide
4.3 - Tasks
Find all files aged more than 7 days and delete
find /path/* -mtime +7 exec rm -rf {} \; > /dev/null
5 - System Admin
List all Hardware : lshw
List all pci devices : lspci
# Required pciutuls package to be installed 'yum install pciutils'

[root@10 ~]# lspci
00:00.0 Host bridge: Intel Corporation Xeon E3-1200 v6/7th Gen Core Processor Host Bridge/DRAM Registers (rev 02)
00:02.0 VGA compatible controller: Intel Corporation HD Graphics 620 (rev 02)
00:04.0 Signal processing controller: Intel Corporation Xeon E3-1200 v5/E3-1500 v5/6th Gen Core Processor Thermal Subsystem (rev 02)
00:14.0 USB controller: Intel Corporation Sunrise Point-LP USB 3.0 xHCI Controller (rev 21)
00:14.2 Signal processing controller: Intel Corporation Sunrise Point-LP Thermal subsystem (rev 21)
00:15.0 Signal processing controller: Intel Corporation Sunrise Point-LP Serial IO I2C Controller #0 (rev 21)
00:15.1 Signal processing controller: Intel Corporation Sunrise Point-LP Serial IO I2C Controller #1 (rev 21)
00:16.0 Communication controller: Intel Corporation Sunrise Point-LP CSME HECI #1 (rev 21)
00:17.0 SATA controller: Intel Corporation Sunrise Point-LP SATA Controller [AHCI mode] (rev 21)
00:1c.0 PCI bridge: Intel Corporation Sunrise Point-LP PCI Express Root Port #5 (rev f1)
00:1c.5 PCI bridge: Intel Corporation Sunrise Point-LP PCI Express Root Port #6 (rev f1)
00:1f.0 ISA bridge: Intel Corporation Sunrise Point-LP LPC Controller (rev 21)
00:1f.2 Memory controller: Intel Corporation Sunrise Point-LP PMC (rev 21)
00:1f.3 Audio device: Intel Corporation Sunrise Point-LP HD Audio (rev 21)
00:1f.4 SMBus: Intel Corporation Sunrise Point-LP SMBus (rev 21)
01:00.0 Network controller: Intel Corporation Wireless 3165 (rev 79)
02:00.0 Ethernet controller: Realtek Semiconductor Co., Ltd. RTL810xE PCI Express Fast Ethernet controller (rev 07)
How to reset root password
- ‘rd.break’ drops to a rescue shell earlier than any other rescue mode.
- Reboot the system, add ‘rd.break’ to the kernel boot parameters
- remount the root filesystem R/W
- use ‘chroot’ to switch to the proper root FS and run ‘passwd’.
- Remember to ’touch /.autorelabel’ before typing ’exit’ twice to resume booting.
Questions
Where could you configure the order in which filesystems are checked at boot time?
/etc/fstabHow to drop to a minimal rescue environment in which only you remained logged in and the system was not available over the network, what command would you run?
systemctl isolate rescue.targetWhich rescue parameter would you pass to the kernel from the grub2 menu if your system was failing to boot because a filesystem check was failing?
systemd.unit=emergency.targetYou are a member of a team of admins who are responsible for a critical system. This system has two different web servers installed: The first (Nginx) is used to serve content, the other (httpd) is installed only to satisfy dependencies and should never be started as it causes a conflict. What command could you run to ensure that
httpdis never accidentally started or enabled by another admin?systemctl mask httpd
How to find open ports/sockets ?
- old systems :
ipstat -tulpn - new systems (socket statistics) :
ss -a
List OpenFiles - lsof
How to find list of open files ?
lsof
How to know Which process is listening on port X ?
lsof -i :80
Which process opened the file
lsof /path_to_file
[root@10 ~]# lsof /usr/bin/bash
COMMAND  PID USER  FD   TYPE DEVICE SIZE/OFF    NODE NAME
bash    1533 root txt    REG  253,0  1219216 8512853 /usr/bin/bash
bash    1820 root txt    REG  253,0  1219216 8512853 /usr/bin/bash
How to find all files that a process has opened ?
lsof -p PID
How To Create a Sudo User on CentOS ?
[root@CentosServer1910 ~]# useradd sriram
[root@CentosServer1910 ~]# passwd sriram
Changing password for user sriram.
New password:
Retype new password:
passwd: all authentication tokens updated successfully.
# By default, on CentOS, members of the wheel group have sudo privileges.
[root@CentosServer1910 ~]# usermod -aG wheel sriram
[root@CentosServer1910 ~]# id sriram
uid=1000(sriram) gid=1000(sriram) groups=1000(sriram),10(wheel)

# Testing new SUDO user
[sriram@CentosServer1910 ~]$ sudo blkid /dev/sda1
[sudo] password for sriram:
/dev/sda1: UUID="64b6f04f-d510-4c39-9a37-cacfeeec774b" TYPE="ext4" PARTUUID="ec47036c-01"
# Debian based system, add the user to sudo group.
sudo usermod -a -G sudo <user_id>
6 - vim
To start with vim, go through the tutorial using command : vimtutor
Basic vim commands
| Task | Command |
|---|---|
| start editing the file content | :i[enter] |
| save the file and exit the editor | :x[return] |
| quit vim without saving the file | :q![return] |
| Save | :w |
| save and exit | :wq |
| exit | :q |
| copy a line | :yy |
| copy | :y |
| Paste | p |
| cut | d |
| cut a line | dd |
| Undo | u |
| go to the end of the file: | :$ and press Enter |
| Move to the beginning of a line | type 0 |
| Move to the end of a line | type $ |
| Go to beginning of file | gg |
| Go to end of file | G (shift + g) |
How to search and replace
%s/text/replacement/g
How to search and replace with confirmation
%s/text/replacement/gc
Forward Search : /
Backward Search : ?
Search Next : n
Search back : N
Configure vim editor
# ~./vimrc

set bg=dark
set ai ts=4 sw=4 et

# et -> expand tab
# sw - > shift width
# ts -> tab space