CICD connects the gaps between development teams and operations teams by automation in building, testing and deployment of applications. Modern day DevOps practices involve continuous development, continuous testing, continuous integration, continuous deployment and continuous monitoring of software applications throughout its development life cycle. The best practices in CICD and CICD pipeline forms the backbone of modern day DevOps operations.
This is the multi-page printable view of this section. Click here to print.
DevOps
Development + Operations
- 1: CICD Tooling
1 - CICD Tooling
Learn more about tooling used in CICD
1.1 - Jenkins
Continuous Integration with Jenkins
1.1.1 - Jenkins
Code Snippets
How to get list of all installed plugins
import jenkins.model.Jenkins
Jenkins.instance.pluginManager.plugins.each{
  plugin ->
    println ("${plugin.getDisplayName()} (${plugin.getShortName()}): ${plugin.getVersion()}")
}
How to test NodeJS
node('linux') {
stage('Linux :: NodeJS :: Default' ) {
    sh 'node --version'
}
stage('Linux :: NodeJS :: v8.9.0' ) {
    def nodejs = tool name: 'Linux NodeJS v8.9.0', type: 'jenkins.plugins.nodejs.tools.NodeJSInstallation'
    sh "$ {nodejs}/bin/node --version"
}
stage('Linux :: NodeJS :: v8.9.0:: withEnv' ) {
    withEnv(["PATH+NODE=${tool 'Linux NodeJS v8.9.0'}/bin"]){
        sh 'node --version'
        }
    }
}
Parallel Pipelines
def labels = [
    'node1',
	'node2'
    ]
def builders = [:]
for (x in labels) {
    def label = x
    // Create a map to pass in to the 'parallel' step so we can fire all the builds at once
    builders[label] = {
      node(label) {
        // build steps that should happen on all nodes go here
        }
    }
}
parallel builders
1.1.2 - Jenkins-Docker
Docker Slave for Jenkins
My use case is to run jenkins pipelines on docker build slaves. To achieve this we have to install Docker plugin. Docker plugin will integrate Jenkins with Docker. This docker plugin depends on Docker API plugin, so intall both the plugins. Restart is required for jenkins after installing these plugins.
Manage Jenkins -> Manage Plugins -> Docker plugin , Docker slave plugin and Docker API plugin
Once docker plugins are installed, restart jenkins master.
Jenkins depends on specific version of Java, in my case i have OpenJDK 10.0.2 installed in my system and jenkins needs java 1.8, hence i downloaded JDK 1.8 and running jenkins with that version of java.
Running Jenkins from war file
export JAVA_HOME=/home/sriram/Downloads/jdk-8u191-linux-x64/jdk1.8.0_191
$JAVA_HOME/bin/java -jar jenkins.war &
Once jenkins is fully up and running , we can see .jenkins folder inside user home directory /home/sriram/.jenkins/
sriram@optimus-prime:~/.jenkins$ pwd
/home/sriram/.jenkins
sriram@optimus-prime:~/.jenkins$ ll
total 104
drwxr-xr-x 12 sriram sriram  4096 nov 10 12:56 ./
drwxr-xr-x 44 sriram sriram  4096 nov 10 12:51 ../
-rw-r--r--  1 sriram sriram  1644 nov 10 12:56 config.xml
-rw-r--r--  1 sriram sriram   156 nov 10 12:56 hudson.model.UpdateCenter.xml
-rw-r--r--  1 sriram sriram   370 nov 10 12:51 hudson.plugins.git.GitTool.xml
-rw-------  1 sriram sriram  1712 nov 10 12:49 identity.key.enc
-rw-r--r--  1 sriram sriram    94 nov 10 12:49 jenkins.CLI.xml
-rw-r--r--  1 sriram sriram     7 nov 10 12:53 jenkins.install.InstallUtil.lastExecVersion
-rw-r--r--  1 sriram sriram     7 nov 10 12:53 jenkins.install.UpgradeWizard.state
-rw-r--r--  1 sriram sriram   179 nov 10 12:53 jenkins.model.JenkinsLocationConfiguration.xml
-rw-r--r--  1 sriram sriram   171 nov 10 12:49 jenkins.telemetry.Correlator.xml
drwxr-xr-x  2 sriram sriram  4096 nov 10 12:49 jobs/
drwxr-xr-x  3 sriram sriram  4096 nov 10 12:49 logs/
-rw-r--r--  1 sriram sriram   907 nov 10 12:56 nodeMonitors.xml
drwxr-xr-x  2 sriram sriram  4096 nov 10 12:49 nodes/
drwxr-xr-x 75 sriram sriram 12288 nov 10 12:51 plugins/
-rw-r--r--  1 sriram sriram   129 nov 10 12:55 queue.xml.bak
-rw-r--r--  1 sriram sriram    64 nov 10 12:49 secret.key
-rw-r--r--  1 sriram sriram     0 nov 10 12:49 secret.key.not-so-secret
drwx------  4 sriram sriram  4096 nov 10 12:53 secrets/
drwxr-xr-x  2 sriram sriram  4096 nov 10 12:50 updates/
drwxr-xr-x  2 sriram sriram  4096 nov 10 12:49 userContent/
drwxr-xr-x  3 sriram sriram  4096 nov 10 12:53 users/
drwxr-xr-x 11 sriram sriram  4096 nov 10 12:49 war/
drwxr-xr-x  2 sriram sriram  4096 nov 10 12:51 workflow-libs/
sriram@optimus-prime:~/.jenkins$
Adding Jenkins Node (Method-1)
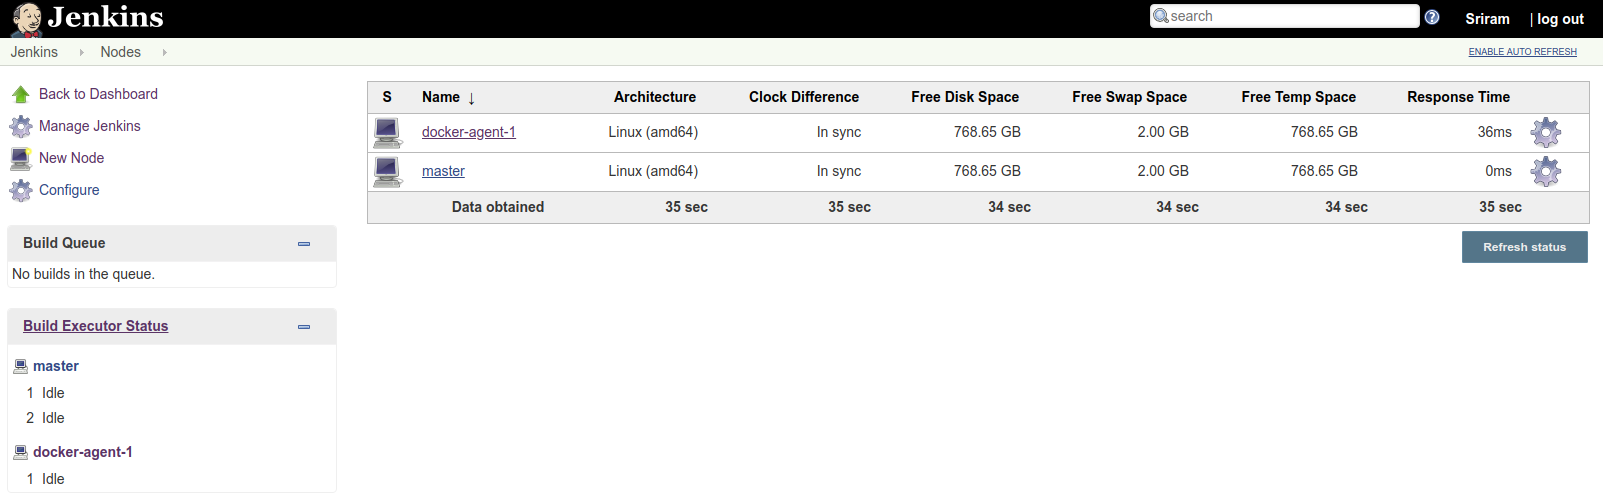
This approach is a static method of using docker container as a build slave.
- create a node in jenkins with Launch method = Launch agent via Java Web Start
- Using the node name and secret key, spin up a container.
- This runing container will act as a build node for jenkins.
I have used jenkins docker slave image from cloudbees. jenkinsci/jnlp-slave
syntax:
docker run jenkins/jnlp-slave -url http://jenkins-server:port <secret> <agent name>

example:
docker run jenkins/jnlp-slave -url http://192.168.2.8:8080 8302b7d76d0828b629bdd1460d587268af64616fe464d69f34c9119f5670f1f3 docker-agent-1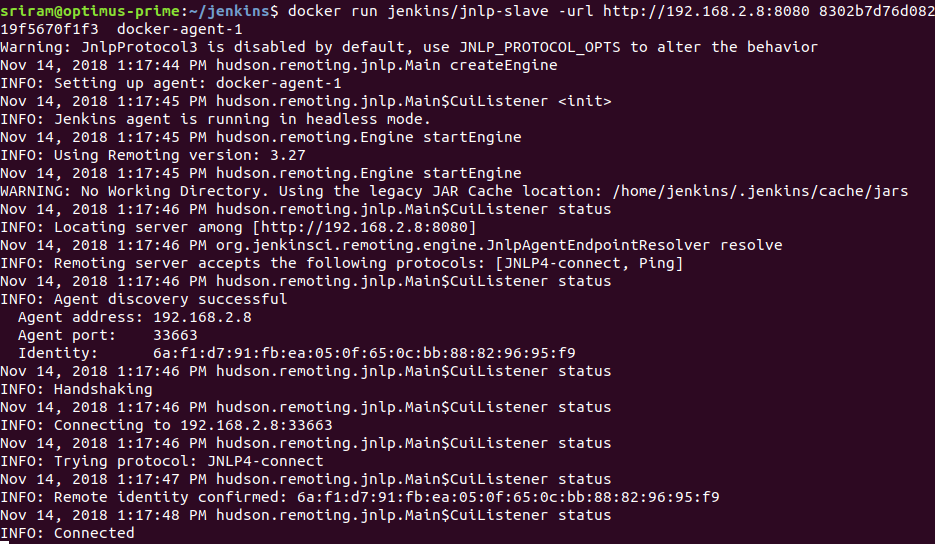
Configure Docker Slaves for Jenkins (Method-2)
Go to Manage Jenkins -> Configure System -> you will now see Cloud option with a drop down to select Docker.
TO-DO
Add screenshots from Jenkins Configuration
1.2 - Nexus
Nexus Repository Manager
1.2.1 - Nexus-yum
Configure Yum repositories with Nexus
Managing Yum packages with Nexus Repository Manager
YUM repositories in Nexus
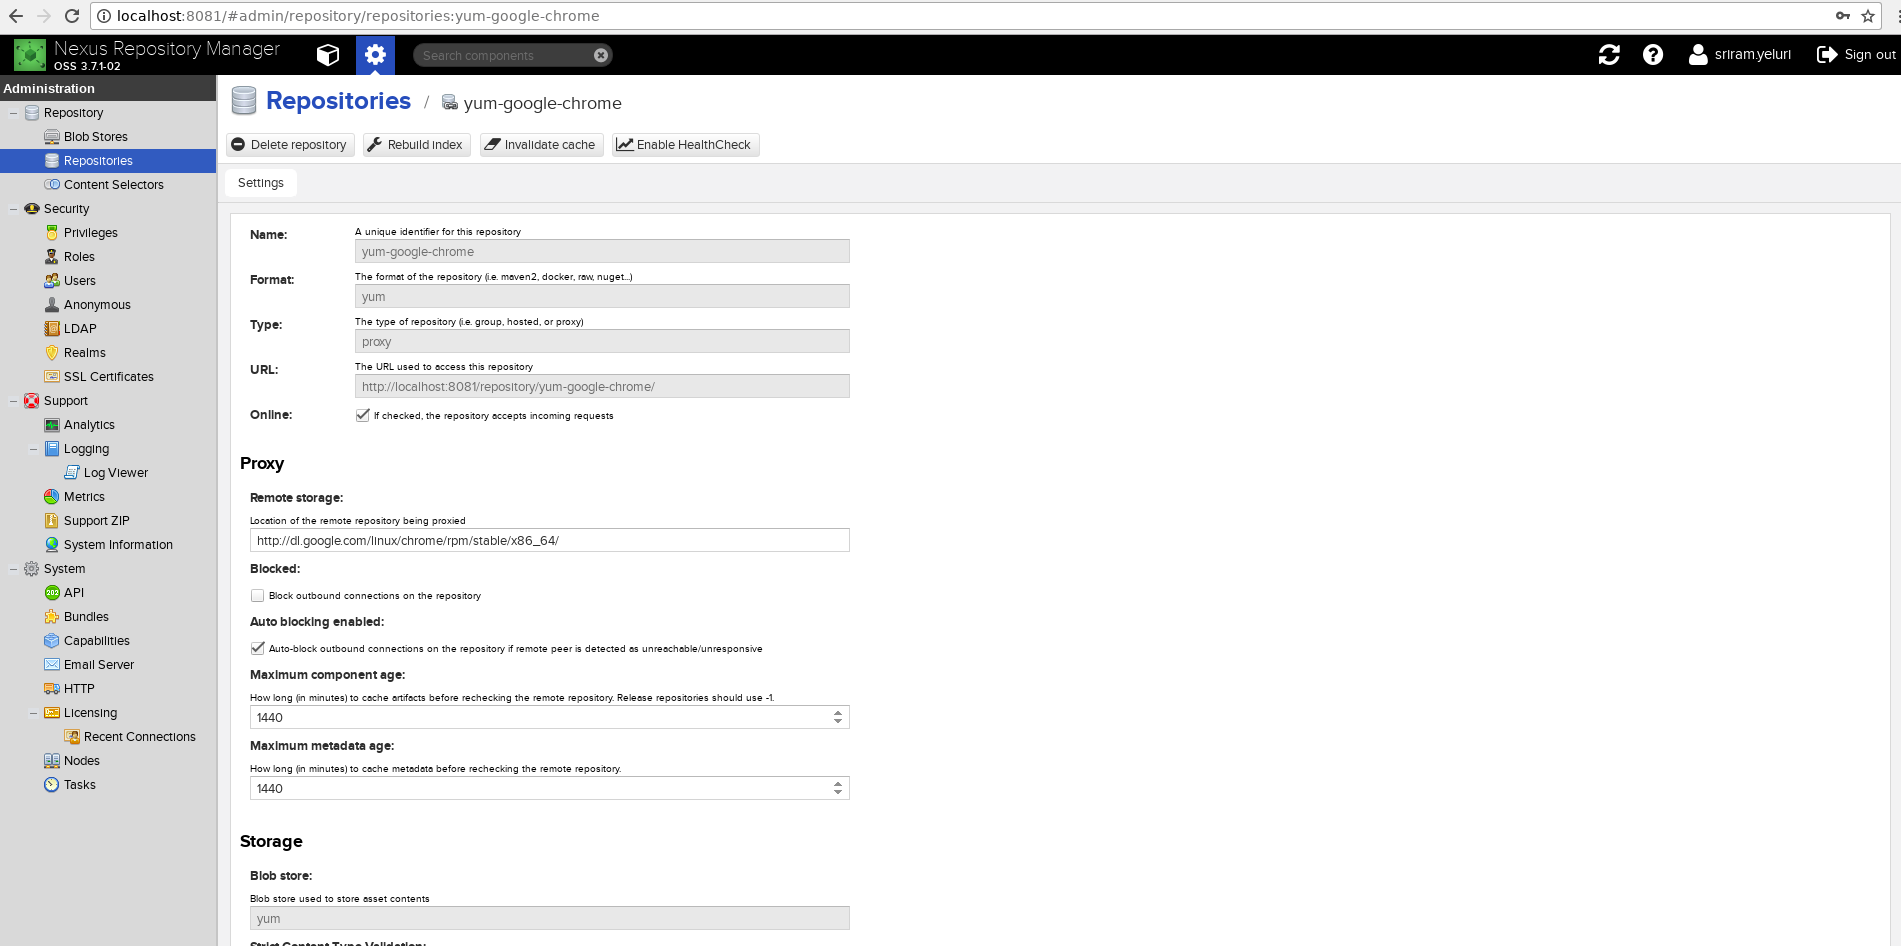
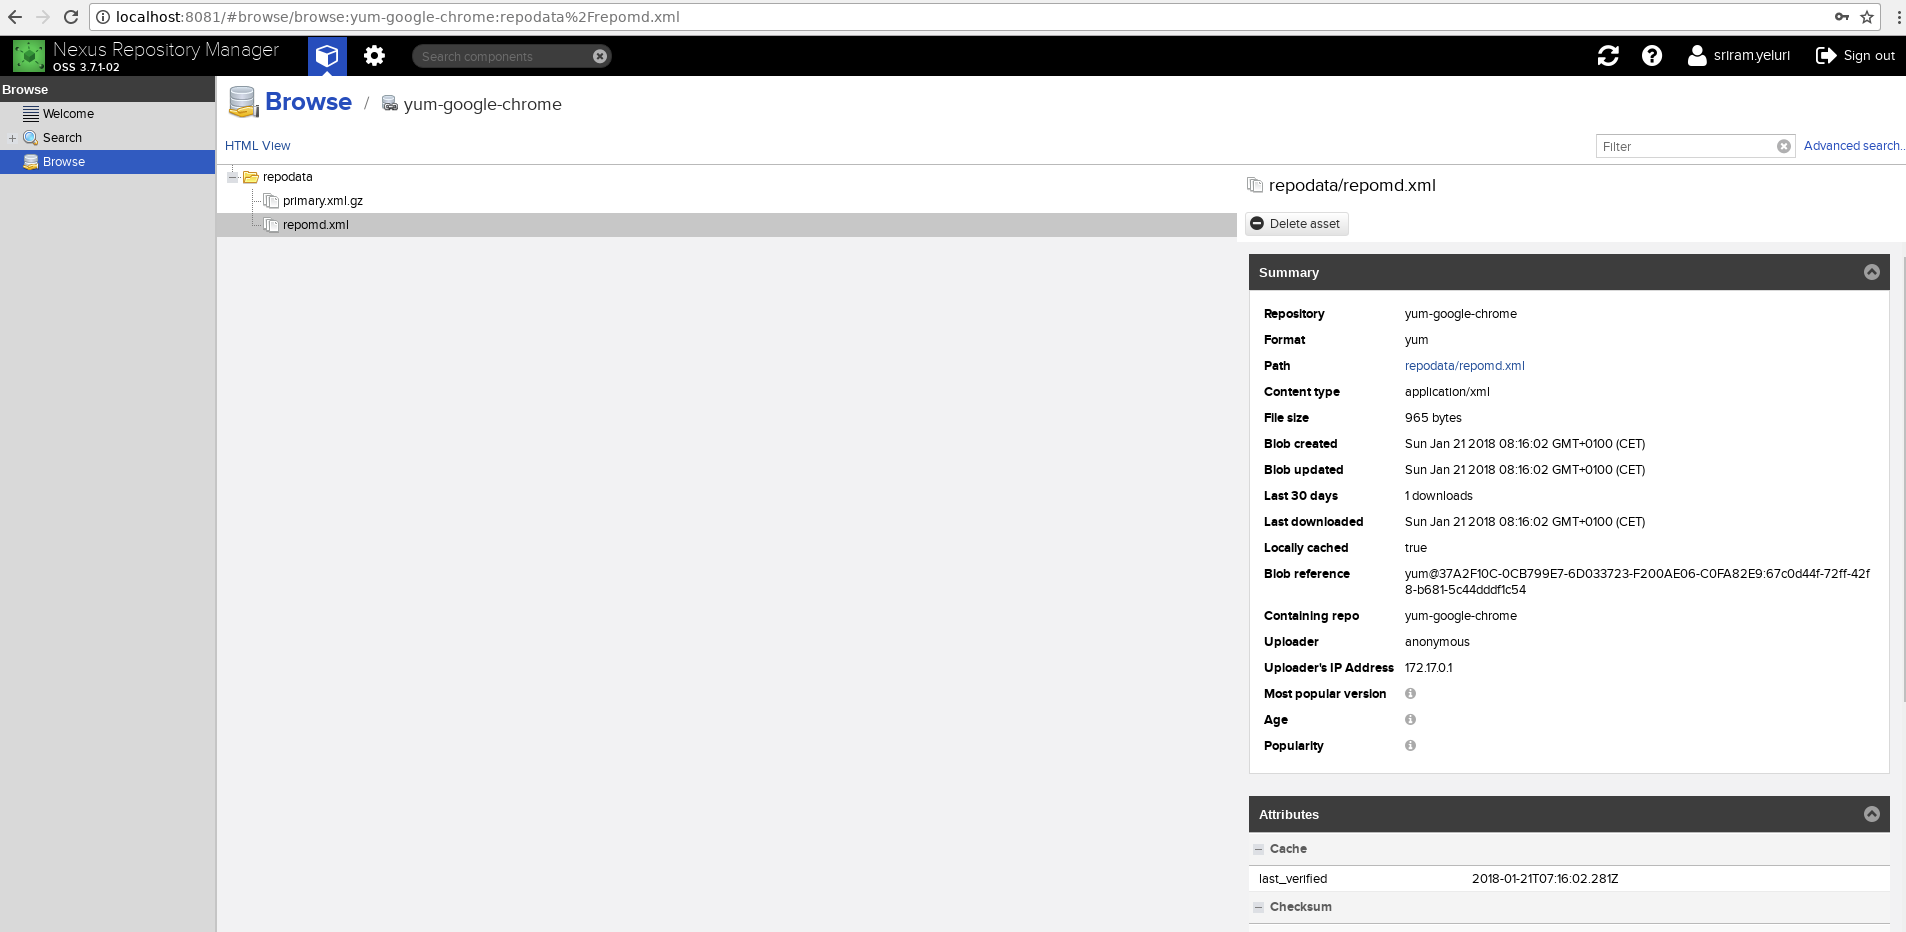
Create a repo of type yum (example as shown below)
Create a repo file in /etc/yum.repos.d/nexus.repo
[nexusrepo]
name=Nexus Repository
baseurl=http://localhost:8081/repository/yum-google-chrome/
enabled=1
gpgcheck=1
gpgkey=https://dl-ssl.google.com/linux/linux_signing_key.pub
priority=1
yum check-update —> this command will check if there is any update for this package
google-chrome repo fetched from nexus

Browse yum proxy repository in nexus
Update existing package using yum update as shown below
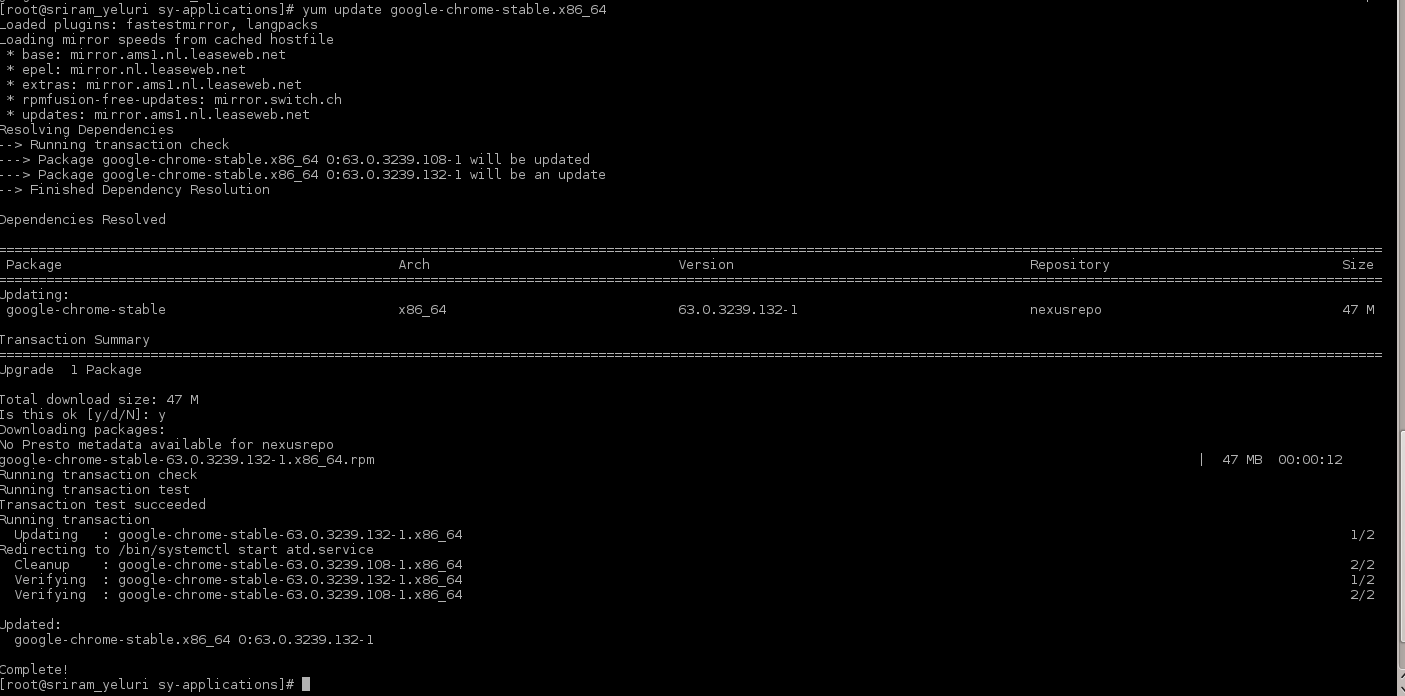
Browse yum proxy to verify if new package is downloaded

How to download the latest available artifact from nexus
There is a metadata file that maintains a latest version of the artifact that you store in Nexus and by using something like the below URL you will be able to download the latest available artifact from nexus
https://localhost:8443/nexus/service/local/artifact/maven/redirect?r=ABC-releases&g=<group_ID>&a=<artifact>&v=LATEST
API : /artifact/maven/redirect
References
1.3 - SonarQube
Code Quality Analysis
1.3.1 - SonarQube
Tool for Code Quality Analysis
Docker container for sonarqube
docker pull sonarqube
docker run -d --name sonarqube -p 9000:9000 <image_name>

# once the container has started successfully, you can open below url to access sonaqube.
# http://localhost:9000/
Python implementation of sonarqube-cli
API End points
To expose all rules of a technology from sonarqube
api/rules/search?languages=xml
getInstalled Plugins: /api/plugins/installed