This is the multi-page printable view of this section. Click here to print.
Documentation
- 1: DevOps
- 1.1: CICD Tooling
- 2: Security
- 3: Docker
- 3.1: Installing Docker
- 3.2: Best Practices
- 3.3: Building Images
- 3.4: Networking
- 3.5: Volumes
- 4: Kubernetes
- 4.1: Architecture
- 4.2: Deployments
- 4.3: Installing Kubernetes
- 4.4: Kind
- 4.5: kubectl
- 4.6: Minikube
- 4.7: Pod
- 4.8: Secrets
- 4.9: Troubleshooting
- 5: Programming
- 5.1: golang
- 5.2: Python
- 5.2.1: Getting Started
- 6: Ansible
- 6.1: Ansible
- 6.2: AnsibleTasks
- 7: Source Code Management
- 8: Linux
- 8.1: Linux Distributions
- 8.2: Concepts
- 8.2.1: Firewall
- 8.2.2: Linux FileSystem
- 8.2.2.1: Linux file system
- 8.2.3: Networking
- 8.2.4: Package Management
- 8.2.5: Storage
- 8.2.5.1: Storage
- 8.2.6: users
- 8.3: Others
- 8.3.1: BootableDrive
- 8.3.2: KDE
- 8.3.3: RHEL
- 8.4: Scripting
- 8.4.1: AWK
- 8.4.2: Shell Scripting
- 8.4.3: Tasks
- 8.5: System Admin
- 8.6: vim
- 9: Cloud
- 9.1: AWS
- 9.2: Azure
- 9.2.1: NetworkWatcher
- 10: LDAP
- 10.1: OpenLDAP
- 11: Virtualization
- 11.1: Virtual Box
- 12: RaspberryPi
- 12.1: Raspberry Pi OS
- 12.2: Ubuntu Server for Pi
- 13: Sriram Yeluri
1 - DevOps
CICD connects the gaps between development teams and operations teams by automation in building, testing and deployment of applications. Modern day DevOps practices involve continuous development, continuous testing, continuous integration, continuous deployment and continuous monitoring of software applications throughout its development life cycle. The best practices in CICD and CICD pipeline forms the backbone of modern day DevOps operations.
1.1 - CICD Tooling
1.1.1 - Jenkins
1.1.1.1 - Jenkins
How to get list of all installed plugins
import jenkins.model.Jenkins
Jenkins.instance.pluginManager.plugins.each{
  plugin ->
    println ("${plugin.getDisplayName()} (${plugin.getShortName()}): ${plugin.getVersion()}")
}
How to test NodeJS
node('linux') {
stage('Linux :: NodeJS :: Default' ) {
    sh 'node --version'
}
stage('Linux :: NodeJS :: v8.9.0' ) {
    def nodejs = tool name: 'Linux NodeJS v8.9.0', type: 'jenkins.plugins.nodejs.tools.NodeJSInstallation'
    sh "$ {nodejs}/bin/node --version"
}
stage('Linux :: NodeJS :: v8.9.0:: withEnv' ) {
    withEnv(["PATH+NODE=${tool 'Linux NodeJS v8.9.0'}/bin"]){
        sh 'node --version'
        }
    }
}
Parallel Pipelines
def labels = [
    'node1',
	'node2'
    ]
def builders = [:]
for (x in labels) {
    def label = x
    // Create a map to pass in to the 'parallel' step so we can fire all the builds at once
    builders[label] = {
      node(label) {
        // build steps that should happen on all nodes go here
        }
    }
}
parallel builders
1.1.1.2 - Jenkins-Docker
My use case is to run jenkins pipelines on docker build slaves. To achieve this we have to install Docker plugin. Docker plugin will integrate Jenkins with Docker. This docker plugin depends on Docker API plugin, so intall both the plugins. Restart is required for jenkins after installing these plugins.
Manage Jenkins -> Manage Plugins -> Docker plugin , Docker slave plugin and Docker API plugin
Once docker plugins are installed, restart jenkins master.
Jenkins depends on specific version of Java, in my case i have OpenJDK 10.0.2 installed in my system and jenkins needs java 1.8, hence i downloaded JDK 1.8 and running jenkins with that version of java.
Running Jenkins from war file
export JAVA_HOME=/home/sriram/Downloads/jdk-8u191-linux-x64/jdk1.8.0_191
$JAVA_HOME/bin/java -jar jenkins.war &
Once jenkins is fully up and running , we can see .jenkins folder inside user home directory /home/sriram/.jenkins/
sriram@optimus-prime:~/.jenkins$ pwd
/home/sriram/.jenkins
sriram@optimus-prime:~/.jenkins$ ll
total 104
drwxr-xr-x 12 sriram sriram 4096 nov 10 12:56 ./
drwxr-xr-x 44 sriram sriram 4096 nov 10 12:51 ../
-rw-r--r-- 1 sriram sriram 1644 nov 10 12:56 config.xml
-rw-r--r-- 1 sriram sriram 156 nov 10 12:56 hudson.model.UpdateCenter.xml
-rw-r--r-- 1 sriram sriram 370 nov 10 12:51 hudson.plugins.git.GitTool.xml
-rw------- 1 sriram sriram 1712 nov 10 12:49 identity.key.enc
-rw-r--r-- 1 sriram sriram 94 nov 10 12:49 jenkins.CLI.xml
-rw-r--r-- 1 sriram sriram 7 nov 10 12:53 jenkins.install.InstallUtil.lastExecVersion
-rw-r--r-- 1 sriram sriram 7 nov 10 12:53 jenkins.install.UpgradeWizard.state
-rw-r--r-- 1 sriram sriram 179 nov 10 12:53 jenkins.model.JenkinsLocationConfiguration.xml
-rw-r--r-- 1 sriram sriram 171 nov 10 12:49 jenkins.telemetry.Correlator.xml
drwxr-xr-x 2 sriram sriram 4096 nov 10 12:49 jobs/
drwxr-xr-x 3 sriram sriram 4096 nov 10 12:49 logs/
-rw-r--r-- 1 sriram sriram 907 nov 10 12:56 nodeMonitors.xml
drwxr-xr-x 2 sriram sriram 4096 nov 10 12:49 nodes/
drwxr-xr-x 75 sriram sriram 12288 nov 10 12:51 plugins/
-rw-r--r-- 1 sriram sriram 129 nov 10 12:55 queue.xml.bak
-rw-r--r-- 1 sriram sriram 64 nov 10 12:49 secret.key
-rw-r--r-- 1 sriram sriram 0 nov 10 12:49 secret.key.not-so-secret
drwx------ 4 sriram sriram 4096 nov 10 12:53 secrets/
drwxr-xr-x 2 sriram sriram 4096 nov 10 12:50 updates/
drwxr-xr-x 2 sriram sriram 4096 nov 10 12:49 userContent/
drwxr-xr-x 3 sriram sriram 4096 nov 10 12:53 users/
drwxr-xr-x 11 sriram sriram 4096 nov 10 12:49 war/
drwxr-xr-x 2 sriram sriram 4096 nov 10 12:51 workflow-libs/
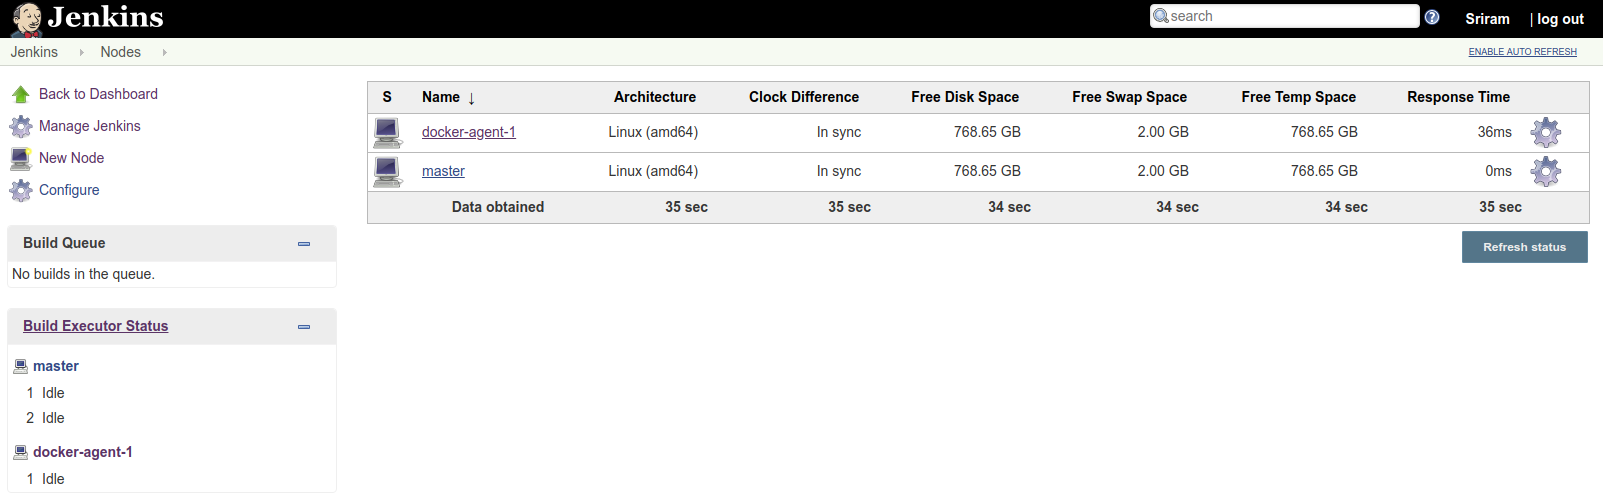
sriram@optimus-prime:~/.jenkins$Adding Jenkins Node (Method-1)
This approach is a static method of using docker container as a build slave.
- create a node in jenkins with Launch method = Launch agent via Java Web Start
- Using the node name and secret key, spin up a container.
- This runing container will act as a build node for jenkins.
I have used jenkins docker slave image from cloudbees. jenkinsci/jnlp-slave
syntax:
docker run jenkins/jnlp-slave -url http://jenkins-server:port <secret> <agent name>

example:
docker run jenkins/jnlp-slave -url http://192.168.2.8:8080 8302b7d76d0828b629bdd1460d587268af64616fe464d69f34c9119f5670f1f3 docker-agent-1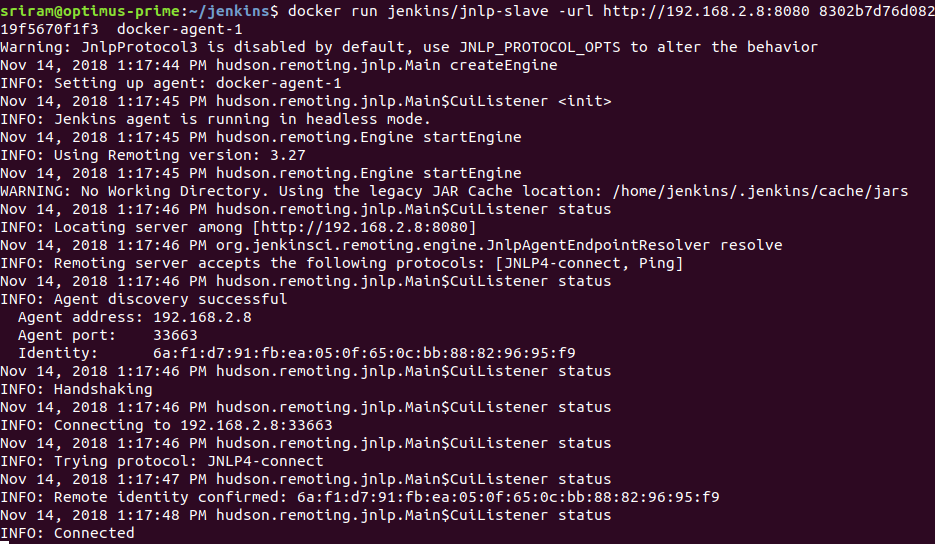
Configure Docker Slaves for Jenkins (Method-2)
Go to Manage Jenkins -> Configure System -> you will now see Cloud option with a drop down to select Docker.
TO-DO
Add screenshots from Jenkins Configuration
1.1.2 - Nexus
1.1.2.1 - Nexus-yum
Managing Yum packages with Nexus Repository Manager
YUM repositories in Nexus
Create a repo of type yum (example as shown below)
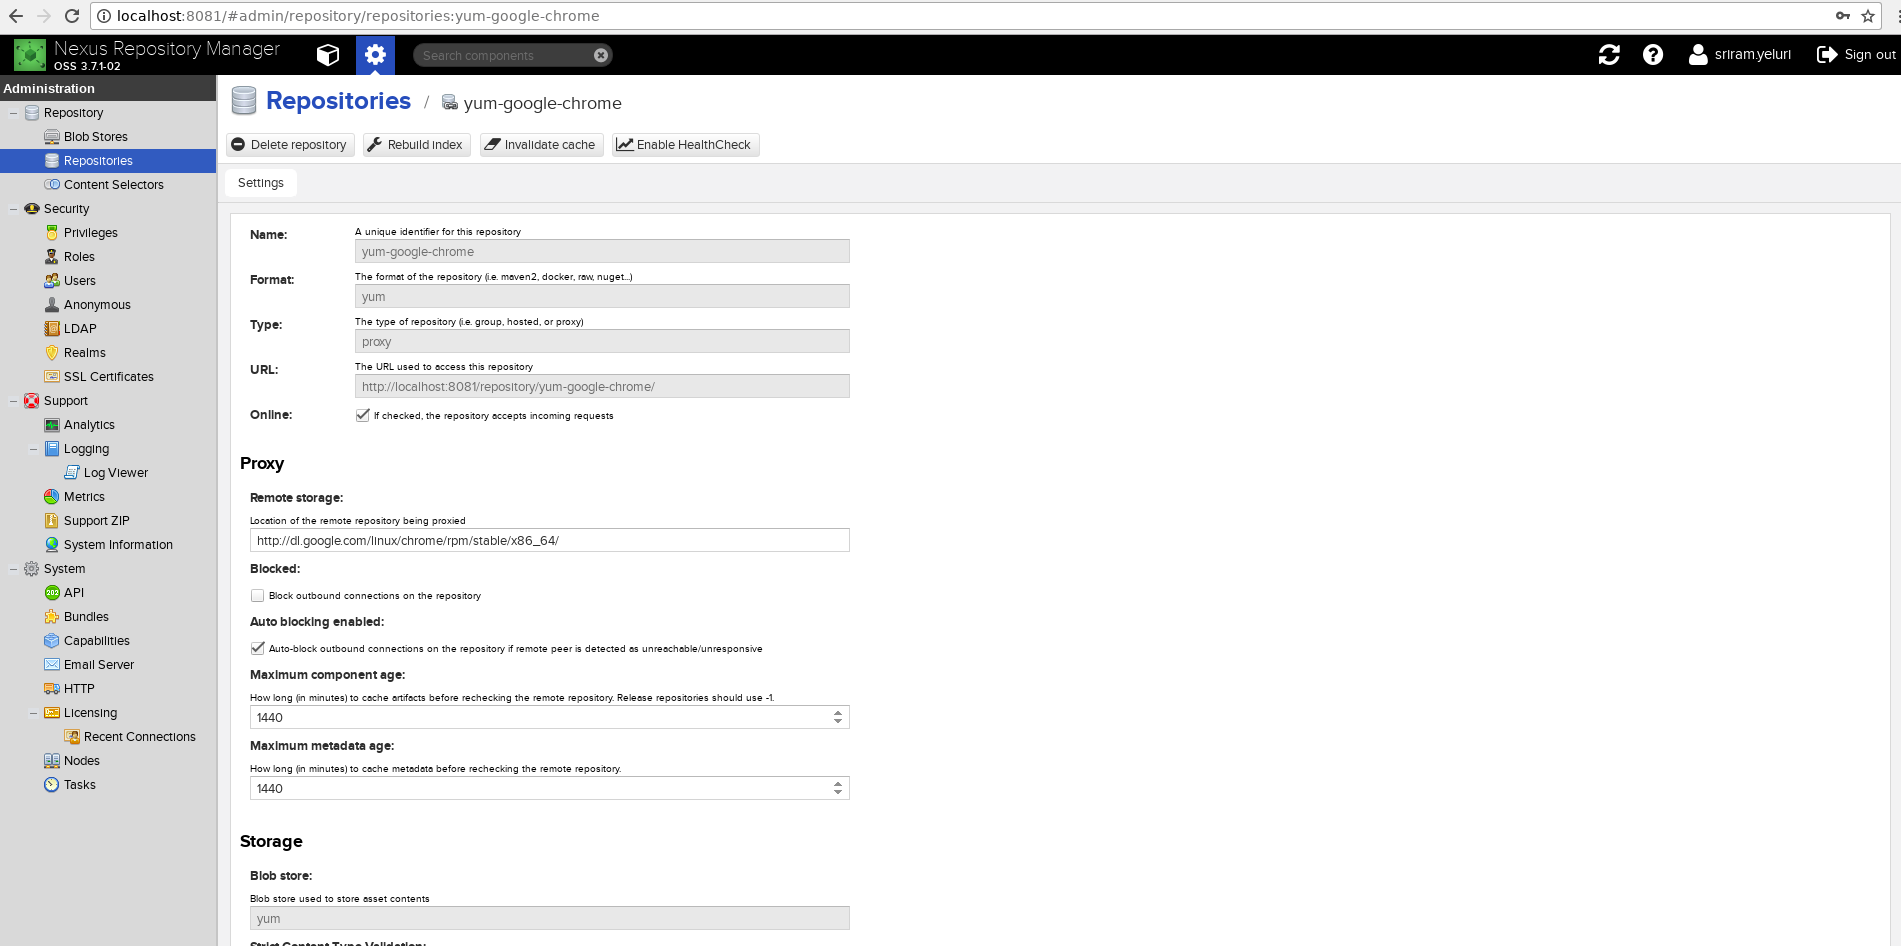
Create a repo file in /etc/yum.repos.d/nexus.repo
[nexusrepo]
name=Nexus Repository
baseurl=http://localhost:8081/repository/yum-google-chrome/
enabled=1
gpgcheck=1
gpgkey=https://dl-ssl.google.com/linux/linux_signing_key.pub
priority=1
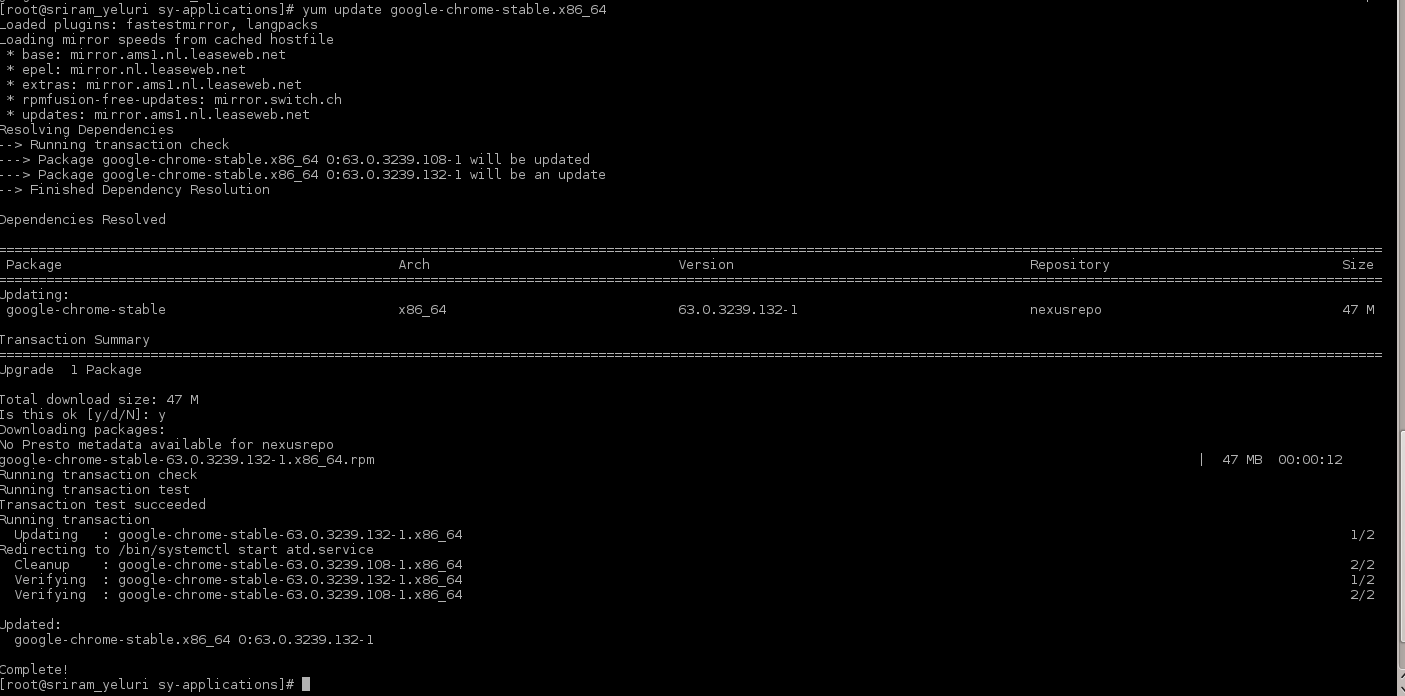
yum check-update —> this command will check if there is any update for this package
google-chrome repo fetched from nexus

Browse yum proxy repository in nexus
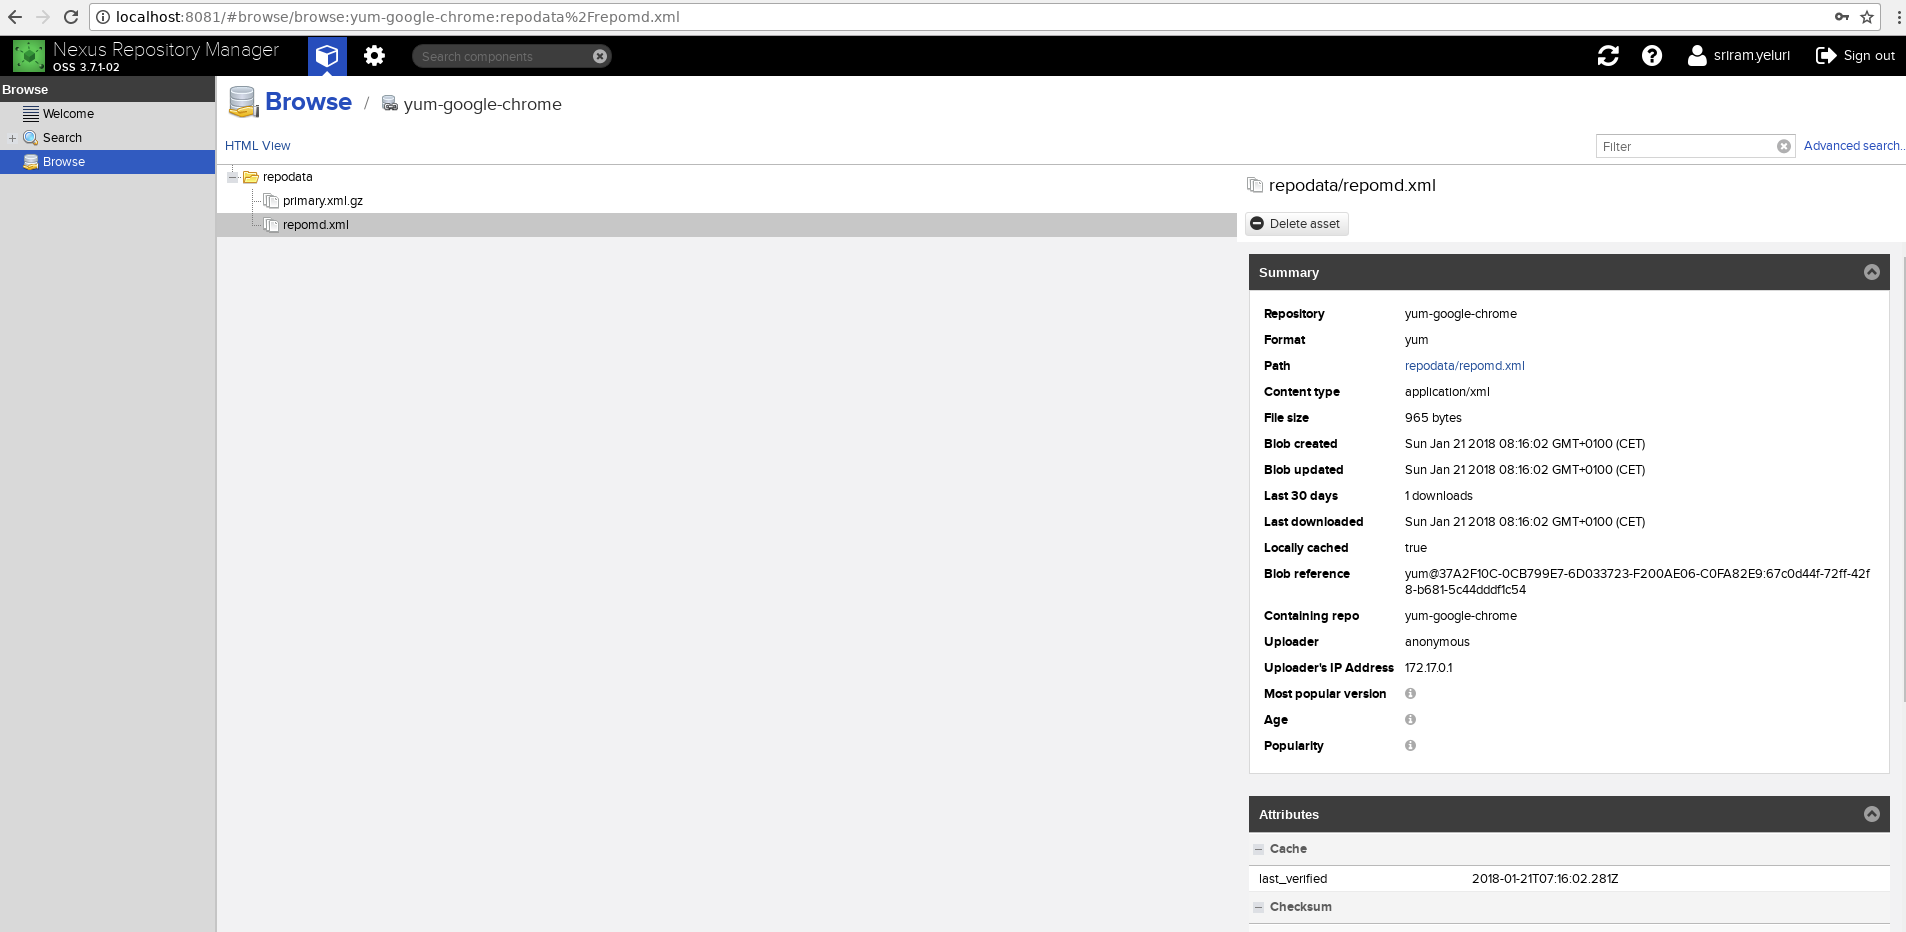
Update existing package using yum update as shown below
Browse yum proxy to verify if new package is downloaded

How to download the latest available artifact from nexus
There is a metadata file that maintains a latest version of the artifact that you store in Nexus and by using something like the below URL you will be able to download the latest available artifact from nexus
https://localhost:8443/nexus/service/local/artifact/maven/redirect?r=ABC-releases&g=<group_ID>&a=<artifact>&v=LATEST
API : /artifact/maven/redirect
References
1.1.3 - SonarQube
1.1.3.1 - SonarQube
Tool for Code Quality Analysis
Docker container for sonarqube
docker pull sonarqube
docker run -d --name sonarqube -p 9000:9000 <image_name>

# once the container has started successfully, you can open below url to access sonaqube.
# http://localhost:9000/
Python implementation of sonarqube-cli
API End points
To expose all rules of a technology from sonarqube
api/rules/search?languages=xml
getInstalled Plugins: /api/plugins/installed
References
2 - Security
2.1 - SELinux
Security Enhanced Linux
SELinux is built into the kernel, and provides a non-discretional (ie. mandatory) access control framework for controlling how OS objects such as ports, users, and executables may interact.
- kernel level mandatory access control mechanism.
- SELinux is a security mechanism built into the Linux kernel.
- Linux distributions like CentOS, RHEL, and Fedora are enabled with SELinux by default.
SELinux Modes
Enforcing: The default mode which will enable and enforce the SELinux security policy on the system, denying access and logging actionsPermissive: In Permissive mode, SELinux is enabled but will not enforce the security policy, only warn and log actions. Permissive mode is useful for troubleshooting SELinux issues. Changing modes between enforcing and permissive does not require a system reboot.Disabled: SELinux is turned off
By default, SELinux starts up in Enforcing mode, running the targeted policy.
SELinux can manage / secure many different type of objects like file system objects, Network Ports, Running Exeutables.
Check status of SELinux : sestatus
[root@10 ~]# sestatus
SELinux status:                 enabled
SELinuxfs mount:                /sys/fs/selinux
SELinux root directory:         /etc/selinux
Loaded policy name:             targeted
Current mode:                   enforcing
Mode from config file:          enforcing
Policy MLS status:              enabled
Policy deny_unknown status:     allowed
Memory protection checking:     actual (secure)
Max kernel policy version:      31
SElinux Configuration /etc/selinux/config
[root@10 ~]# cat /etc/selinux/config

# This file controls the state of SELinux on the system.
# SELINUX= can take one of these three values:
#     enforcing - SELinux security policy is enforced.
#     permissive - SELinux prints warnings instead of enforcing.
#     disabled - No SELinux policy is loaded.
SELINUX=enforcing
# SELINUXTYPE= can take one of these three values:
#     targeted - Targeted processes are protected,
#     minimum - Modification of targeted policy. Only selected processes are protected.
#     mls - Multi Level Security protection.
SELINUXTYPE=targeted
SELinux log messages : /var/log/audit/audit.log
To change the mode from enforcing to permissive type: setenforce 0
References
2.2 - SSH
How SSH communication is established
The client sends a request to the server for a secure session. The server responds by sending its X.509 digital certificate to the client.
The client receives the server’s X.509 digital certificate.
The client authenticates the server, using a list of known certificate authorities.
The client generates a random symmetric key and encrypts it using server’s public key.
The server decrypts the message with private key and extracts the symmetric key sent by client.
The client and server now both know the symmetric key and can use the SSL encryption process to encrypt and decrypt the information contained in the client request and the server response.
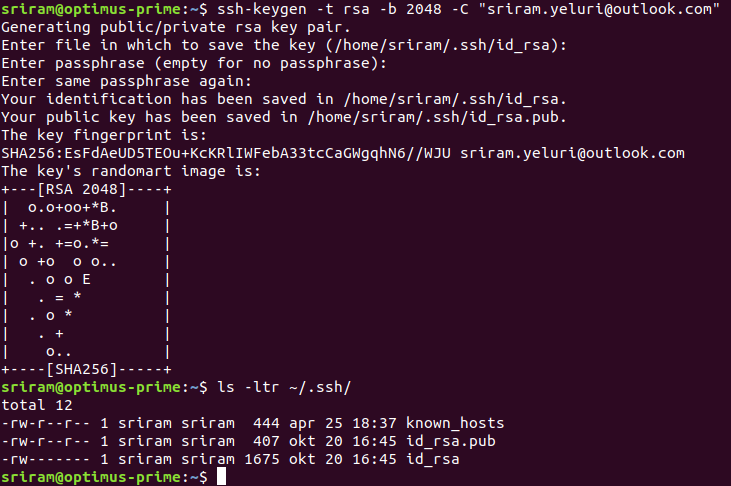
How to generate SSH keypair
ssh-keygen -t rsa -b 2048 -C "your_email@example.com"

ssh keygen will create 2 files in .ssh default path which are id_rsa and id_rsa.pub
id_rsa file will have private key
id_rsa.pub will have the public key
How to install public key to host machine
ssh-copy-id user@host
# This will add public key from ~/.ssh/id_rsa.pub on your system to /home/USER/authorized_keys on target HOST
References
2.3 - TLS
TLS - Transport Layer Security
TLS is a protocol for encrypting internet traffic and to verify the identity of server.
How to extract remote Certificates
echo | openssl s_client -connect www.google.com:443 2>&1 | sed --quiet '/-BEGIN CERTIFICATE-/,/-END CERTIFICATE-/p' > google.crt
How to verify the TLS connection status ?
sriram@sriram-Inspiron-5567:~$ openssl s_client -connect google.com:443 -servername google.com -cipher ALL -brief
CONNECTION ESTABLISHED
Protocol version: TLSv1.3
Ciphersuite: TLS_AES_256_GCM_SHA384
Peer certificate: C = US, ST = California, L = Mountain View, O = Google LLC, CN = *.google.com
Hash used: SHA256
Signature type: ECDSA
Verification: OK
Server Temp Key: X25519, 253 bits
Show Server Certificate chain
openssl s_client -connect google.com:443 -servername google.com -cipher ALL -showcerts
Export Public key from a Certificate
openssl x509 -pubkey -noout -in cert.pem > pubkey.pem
How to find validity of a certificate
echo | openssl s_client -connect google.com:443 2>/dev/null | openssl x509 -noout -dates
Get public key from Private key
# Generate a private key
openssl genrsa -out mykey.pem 2048

# Extract public key from above generated private key
openssl rsa -in mykey.pem -pubout > mykey.pub
TLS Handshake explained
Below example explains how the TLS Handshake happens between a client and server.
sriram@sriram-Inspiron-5567:~$ curl abnamro.com -L -v
* Rebuilt URL to: abnamro.com/
*   Trying 88.221.24.80...
* TCP_NODELAY set
* Connected to abnamro.com (88.221.24.80) port 80 (#0)
> GET / HTTP/1.1
> Host: abnamro.com
> User-Agent: curl/7.58.0
> Accept: */*
< HTTP/1.1 301 Moved Permanently
< Server: AkamaiGHost
< Content-Length: 0
< Location: https://www.abnamro.com/
< Expires: Fri, 09 Aug 2019 04:24:52 GMT
< Cache-Control: max-age=0, no-cache, no-store
< Pragma: no-cache
< Date: Fri, 09 Aug 2019 04:24:52 GMT
< Connection: keep-alive
* Connection #0 to host abnamro.com left intact
* Issue another request to this URL: 'https://www.abnamro.com/'
*   Trying 88.221.24.96...
* TCP_NODELAY set
* Connected to www.abnamro.com (88.221.24.96) port 443 (#1)
* ALPN, offering h2
* ALPN, offering http/1.1
* successfully set certificate verify locations:
*   CAfile: /etc/ssl/certs/ca-certificates.crt
  CApath: /etc/ssl/certs
* (304) (OUT), TLS handshake, Client hello (1):
* (304) (IN), TLS handshake, Server hello (2):
* TLSv1.2 (IN), TLS handshake, Certificate (11):
* TLSv1.2 (IN), TLS handshake, Server key exchange (12):
* TLSv1.2 (IN), TLS handshake, Server finished (14):
* TLSv1.2 (OUT), TLS handshake, Client key exchange (16):
* TLSv1.2 (OUT), TLS change cipher, Client hello (1):
* TLSv1.2 (OUT), TLS handshake, Finished (20):
* TLSv1.2 (IN), TLS handshake, Finished (20):
* SSL connection using TLSv1.2 / ECDHE-RSA-AES256-GCM-SHA384
* ALPN, server accepted to use h2
* Server certificate:
*  subject: jurisdictionC=NL; jurisdictionST=NH; jurisdictionL=Amsterdam; businessCategory=Private Organization; serialNumber=34334259; C=NL; ST=NH; L=Amsterdam; O=ABN AMRO Bank N.V.; OU=Internet Banking; CN=www.abnamro.com
*  start date: Sep 24 13:22:58 2018 GMT
*  expire date: Sep 24 13:31:00 2020 GMT
*  subjectAltName: host "www.abnamro.com" matched cert's "www.abnamro.com"
*  issuer: C=BM; O=QuoVadis Limited; CN=QuoVadis EV SSL ICA G1
*  SSL certificate verify ok.
* Using HTTP2, server supports multi-use
* Connection state changed (HTTP/2 confirmed)
* Copying HTTP/2 data in stream buffer to connection buffer after upgrade: len=0
* Using Stream ID: 1 (easy handle 0x5602954b8580)
> GET / HTTP/2
> Host: www.abnamro.com
> User-Agent: curl/7.58.0
> Accept: */*
References
https://www.feistyduck.com/library/openssl-cookbook/online/ch-testing-with-openssl.html
https://www.ssllabs.com/ssltest/index.html
https://testssl.sh/
http://openssl.cs.utah.edu/docs/apps/s_client.html
https://www.cloudflare.com/learning/ssl/what-is-an-ssl-certificate/
3 - Docker
3.1 - Installing Docker
How to install Docker
# requires elevated access either root or sudo
# install required dependencies (tested on Raspberry Pi 4)
sudo apt-get -y install libffi-dev libssl-dev python3-dev python3 python3-pip
sudo curl -sSL https://get.docker.com | sh

# To run docker as non sudo/root user, add the user to docker group
sudo usermod -aG docker <user> #logout and login after this command.

# Testing
docker run hello-world
How to install Docker CE on Centos7
# Installing dockerCE
yum install -y yum-utils \
  device-mapper-persistent-data \
  lvm2

yum-config-manager \
    --add-repo \
    https://download.docker.com/linux/centos/docker-ce.repo

yum install docker-ce

# post docker install steps
# to run docker as non root user
usermod -aG docker <user_id>

[root@centos7vm ~]# systemctl enable docker
Created symlink from /etc/systemd/system/multi-user.target.wants/docker.service to /usr/lib/systemd/system/docker.service.

[root@centos7vm ~]# chkconfig docker on
Note: Forwarding request to 'systemctl enable docker.service'.

service docker start

docker ps
Docker config file
login credentials are saved in /home/username/.docker/config.json
/var/run/docker.sock
This is an Unix socket the Docker daemon listens on by default, and it can be used to communicate with the daemon from within a container.
#Example, portainer an opensource web interface to manage containers using bind mount
$ docker container run -d \
  -p 9000:9000 \
  -v /var/run/docker.sock:/var/run/docker.sock \ #bind mount
  portainer/portainer
How to enable Docker Remote API on Ubuntu
sudo vi /lib/systemd/system/docker.service

# Modify the line that starts with ExecStart
ExecStart=/usr/bin/docker daemon -H fd:// -H tcp://0.0.0.0:4243

systemctl daemon-reload
sudo service docker restart
#Testing
sriram@optimus-prime:~$ curl http://localhost:4243/version
{"Platform":{"Name":""},"Components":[{"Name":"Engine","Version":"18.03.1-ce","Details":{"ApiVersion":"1.37","Arch":"amd64","BuildTime":"2018-04-26T07:15:45.000000000+00:00","Experimental":"false","GitCommit":"9ee9f40","GoVersion":"go1.9.5","KernelVersion":"4.15.0-38-generic","MinAPIVersion":"1.12","Os":"linux"}}],"Version":"18.03.1-ce","ApiVersion":"1.37","MinAPIVersion":"1.12","GitCommit":"9ee9f40","GoVersion":"go1.9.5","Os":"linux","Arch":"amd64","KernelVersion":"4.15.0-38-generic","BuildTime":"2018-04-26T07:15:45.000000000+00:00"}
3.2 - Best Practices
- Use official Docker images as base images
- Use specific image version
- Use small sized official images
- Optimize caching image layers
- Use
.dockerignoreto exclude unwanted files and folders - Make use of Multi-Stage builds
- Use the least priileged user to run the container
- Scan your images for vulnarabilities
3.3 - Building Images
Dockerfile
- Dockerfile is a simple text file to create a docker image.
- Default file name is “Dockerfile”
Example dockerfile
ENV
FROM
LABEL maintainer=""
      version=""
WORKDIR
RUN
VOLUME
EXPOSE
ENTRYPOINT --> Executes custom scripts while starting a docker container
           --> Do not add layer to docker image
CMD
# Example dockerfile
COPY docker-entrypoint.sh /
RUN chmod +x /docker-entrypoint.sh
ENTRYPOINT ["/docker-entrypoint.sh"]
How to build a docker image
#docker image build -t <image_name>:<version_tag> .
docker image build -t ansible:v1.0 .
How to run the container
docker container run -d -t --name ansible ansible:v1.0 bin/bash
How to connect to a running container
$ docker container exec -it <container_id> bash
# (or) to run shell command directly on a running container, then
$ docker container exec <container_name/id> cat /appl/readme.txt
Data persistance and volume sharing between running containers
In docker, sharing of volumes can be done in 2 ways
- Add VOLUME in dockerfile , example VOLUME [/appl]
- [or] Add -v <volume_path> as a flag while running the container to expose the path, example below
If volume is exposed in either of the above methods, then both the src and dst containers should run on the same physical host
docker container run --rm -itd --name <container_name> -v $PWD:/appl -v /appl/data
Inorder to access data from other containers, use volumes-from flag while running the container
docker container run --rm -itd --name <dest-container> --volumes-from <src_container_name_from_which_data_is_accessed>
optimizing docker images
.dockerignore
Useful docker commands
# To stop all running containers in one go, below command can be used
docker container stop $(docker container ls -a -q)
References
Detailed Explanation of Dockerfile
Best practices for writing Dockerfiles
Video References
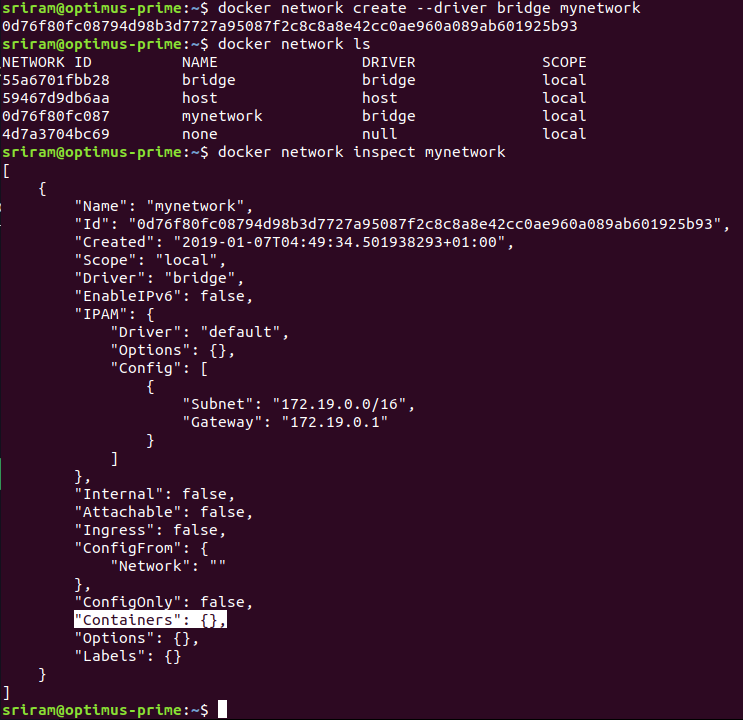
3.4 - Networking
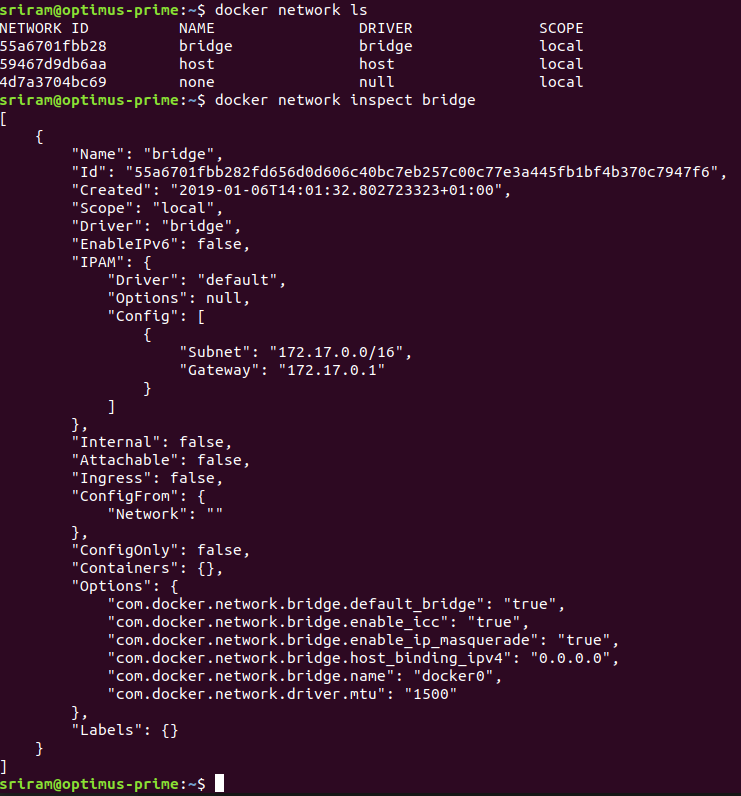
# By default, docker will add all running containers to default bridge network
# To inspect docker bridge network, use below command
docker network inspect bridge
Creating a custom docker network
How to add container to a custom Network
# To run a docker container and join to a custom bridge network, use --net flag
docker container run --rm --itd --name <container_name> --net <network_name>
How to know the IP address of a running container
docker exec <container_name> ifconfig
docker exec <container_name> ip -a
References
To-DO
3.5 - Volumes
Nexus
Sonatype Nexus Docker with persisent data
chown -R 200 /home/sriram.yeluri/Data/NEXUS_DATA

docker run -d \
-p 8081:8081 \
--name nexus \
-v /home/sriram.yeluri/Data/NEXUS_DATA:/nexus-data \
sonatype/nexus3
Jenkins
Jenkins with persisent data
docker run -p 8080:8080 -p 50000:50000 \
--name jenkins \
-v /home/sriram.yeluri/Data/JENKINS_HOME:/var/jenkins_home \
jenkins

docker run -p 8080:8080 -p 50000:50000 \
--name jenkins \
-v /home/sriram.yeluri/Data/JENKINS_HOME:/var/jenkins_home \
jenkins/jenkins:lts
Jenkins Operations Center - JOC
docker run -p 8089:8080 -p 50001:50000 \
--name cjoc \
-v /home/sriram.yeluri/Data/JENKINS_OC_HOME:/var/jenkins_home \
cloudbees/jenkins-operations-center

#Initial secret can be found at below path
/var/jenkins_home/secrets/initialAdminPassword
Postgres
docker run \
--name postgres \
-e POSTGRES_PASSWORD=secret \
-d postgres \
-v /home/sriram.yeluri/Data/PG_DATA:/var/lib/postgresql/data
4 - Kubernetes
4.1 - Architecture
kubernetes cluster components
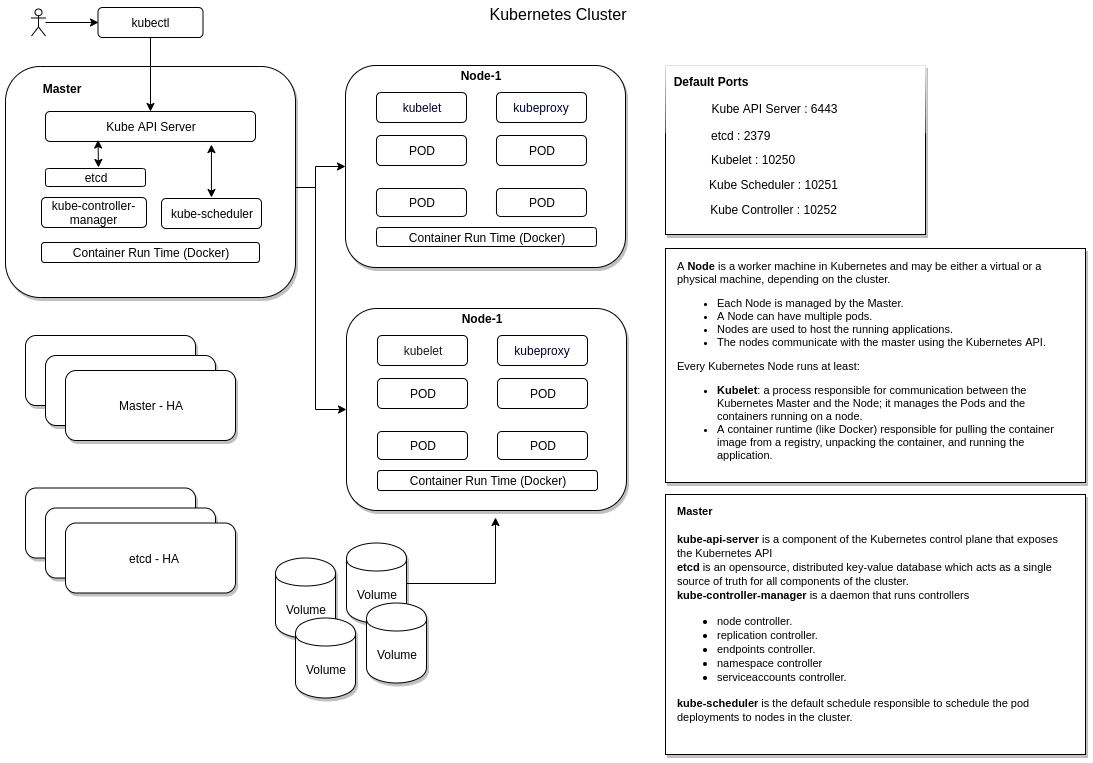
Master
- Masters is responsible for
- Managing the cluster.
- Scheduling the deployments.
- Exposing the kubernetes API.
- Kubernetes master automatically handles scheduling the pods across the Nodes in the cluster.
- The Master’s automatic scheduling takes into account the available resources on each Node.
Node
- A Node is a worker machine in Kubernetes and may be either a virtual or a physical machine, depending on the cluster.
- Each Node is managed by the Master.
- A Node can have multiple pods.
- Nodes are used to host the running applications.
- The nodes communicate with the master using the Kubernetes API.
Every Kubernetes Node runs at least:
Kubelet : process responsible for communication between the Kubernetes Master and the Node; it manages the Pods and the containers running on a machine.
A container runtime (like Docker) responsible for pulling the container image from a registry, unpacking the container, and running the application.
kube api-server
todo
Kube scheduler
todo
Controller manager
The Kubernetes controller manager is a daemon that embeds the core control loops shipped with Kubernetes.
a controller is a control loop that watches the shared state of the cluster through the apiserver and makes changes attempting to move the current state towards the desired state.
Examples of controllers that ship with Kubernetes:
- node controller.
- replication controller
- endpoints controller
- namespace controller
- serviceaccounts controller
etcd
etcd is an opensource, distributed key-value database which acts as a single source of truth for all components of the cluster.
Daemon Set
Daemon set will ensure one copy/instance of pod is present on all the nodes.
UseCases:
- kube-proxy
- Log Viewer
- Monitoring Agent
- Networking Solution (Weave-net)
4.2 - Deployments
Deployments in Kubernetes
The Deployment instructs Kubernetes how to create and update instances of your application.
The Kubernetes master schedules mentioned application instances onto individual Nodes in the cluster.
Once the application instances are created, a Kubernetes Deployment Controller continuously monitors those instances.
Deployment
$ kubectl create deployment hello-node --image=gcr.io/hello-minikube-zero-install/hello-node

deployment.apps/hello-node created

$ kubectl get deployments

NAME         READY   UP-TO-DATE   AVAILABLE   AGE
hello-node   1/1     1            1           19s

$ kubectl get pods
NAME                          READY   STATUS    RESTARTS   AGE
hello-node-55b49fb9f8-bkmnb   1/1     Running   0          43s


$ kubectl get events

LAST SEEN   TYPE     REASON                    OBJECT                             MESSAGE

94s         Normal   Scheduled                 pod/hello-node-55b49fb9f8-bkmnb    Successfully assigned default/hello-node-55b49fb9f8-bkmnb to minikube
92s         Normal   Pulling                   pod/hello-node-55b49fb9f8-bkmnb    Pulling image "gcr.io/hello-minikube-zero-install/hello-node"
91s         Normal   Pulled                    pod/hello-node-55b49fb9f8-bkmnb    Successfully pulled image "gcr.io/hello-minikube-zero-install/hello-node"
90s         Normal   Created                   pod/hello-node-55b49fb9f8-bkmnb    Created container hello-node
90s         Normal   Started                   pod/hello-node-55b49fb9f8-bkmnb    Started container hello-node
94s         Normal   SuccessfulCreate          replicaset/hello-node-55b49fb9f8   Created pod: hello-node-55b49fb9f8-bkmnb
94s         Normal   ScalingReplicaSet         deployment/hello-node              Scaled up replica set hello-node-55b49fb9f8 to 1
4m34s       Normal   NodeHasSufficientMemory   node/minikube                      Node minikube status is now: NodeHasSufficientMemory
4m34s       Normal   NodeHasNoDiskPressure     node/minikube                      Node minikube status is now: NodeHasNoDiskPressure
4m34s       Normal   NodeHasSufficientPID      node/minikube                      Node minikube status is now: NodeHasSufficientPID
4m11s       Normal   RegisteredNode            node/minikube                      Node minikube event: Registered Node minikube in Controller
4m6s        Normal   Starting                  node/minikube                      Starting kube-proxy.

$ kubectl config view

apiVersion: v1
clusters:
- cluster:
    certificate-authority: /root/.minikube/ca.crt
    server: https://172.17.0.27:8443
  name: minikube
contexts:
- context:
    cluster: minikube
    user: minikube
  name: minikube
current-context: minikube
kind: Config
preferences: {}
users:
- name: minikube
  user:
    client-certificate: /root/.minikube/client.crt
    client-key: /root/.minikube/client.key
Nexus Deployment
kubectl run nexus --image=sonatype/nexus3:3.2.1 --port 8081
Expose service:kubectl expose deployment nexus --type=NodePort
Access the service:
Minikube service nexus
nginx deployment
# nginx-deployment.yaml
apiVersion: apps/v1
kind: Deployment
metadata:
  name: nginx-deployment
  labels:
    app: nginx
spec:
  replicas: 3
  selector:
    matchLabels:
      app: nginx
  template:
    metadata:
      labels:
        app: nginx
    spec:
      containers:
      - name: nginx
        image: nginx:1.7.9
        ports:
        - containerPort: 80
$ kubectl apply -f nginx-deployment.yaml
deployment.apps/nginx-deployment created
$ kubectl get events
$ kubectl get pods
$ kubectl delete deployment nginx-deployment
deployment.extensions "nginx-deployment" deleted
Cleanup
$ kubectl get deployments

NAME         READY   UP-TO-DATE   AVAILABLE   AGE
hello-node   1/1     1            1           4m16s

$ kubectl delete deployment hello-node
deployment.extensions "hello-node" deleted

$ kubectl get deployments
No resources found.

$ kubectl get pods
No resources found.
4.3 - Installing Kubernetes
[This page is under construction …]
I am going to cover installation of kubernetes in two ways as mentioned below:
- Install kubernetes with kubeadm
- Install kubernetes the hard way
Prerequisites to install kubernetes with kubeadm
- VirtualBox
- Centos Image
- Virtual Machine with min 2 CPU
Install kubelet, kubectl and kubeadm
Installing-kubeadm-kubelet-and-kubectl
# This script is the modified version from k8s documentation
RELEASE="$(curl -sSL https://dl.k8s.io/release/stable.txt)"

mkdir -p /usr/bin
cd /usr/bin

curl -L --remote-name-all https://storage.googleapis.com/kubernetes-release/release/${RELEASE}/bin/linux/amd64/{kubeadm,kubelet,kubectl}
chmod +x {kubeadm,kubelet,kubectl}

curl -sSL "https://raw.githubusercontent.com/kubernetes/kubernetes/${RELEASE}/build/debs/kubelet.service" > /etc/systemd/system/kubelet.service

mkdir -p /etc/systemd/system/kubelet.service.d

curl -sSL "https://raw.githubusercontent.com/kubernetes/kubernetes/${RELEASE}/build/debs/10-kubeadm.conf" > /etc/systemd/system/kubelet.service.d/10-kubeadm.conf
At this stage, kubelet service will fail to start as the initialization did not happen and /var/lib/kubelet/config.yaml is not yet created.
kubeadm init
[root@10 ~]# swapoff -a
[root@10 ~]# kubeadm init
[init] Using Kubernetes version: v1.15.3
[preflight] Running pre-flight checks
	[WARNING Firewalld]: firewalld is active, please ensure ports [6443 10250] are open or your cluster may not function correctly
	[WARNING Service-Docker]: docker service is not enabled, please run 'systemctl enable docker.service'
[preflight] Pulling images required for setting up a Kubernetes cluster
[preflight] This might take a minute or two, depending on the speed of your internet connection
[preflight] You can also perform this action in beforehand using 'kubeadm config images pull'
[kubelet-start] Writing kubelet environment file with flags to file "/var/lib/kubelet/kubeadm-flags.env"
[kubelet-start] Writing kubelet configuration to file "/var/lib/kubelet/config.yaml"
[kubelet-start] Activating the kubelet service
[certs] Using certificateDir folder "/etc/kubernetes/pki"
[certs] Generating "ca" certificate and key
[certs] Generating "apiserver-kubelet-client" certificate and key
[certs] Generating "apiserver" certificate and key
[certs] apiserver serving cert is signed for DNS names [10.0.2.15 kubernetes kubernetes.default kubernetes.default.svc kubernetes.default.svc.cluster.local] and IPs [10.96.0.1 10.0.2.15]
[certs] Generating "etcd/ca" certificate and key
[certs] Generating "etcd/server" certificate and key
[certs] etcd/server serving cert is signed for DNS names [10.0.2.15 localhost] and IPs [10.0.2.15 127.0.0.1 ::1]
[certs] Generating "etcd/healthcheck-client" certificate and key
[certs] Generating "apiserver-etcd-client" certificate and key
[certs] Generating "etcd/peer" certificate and key
[certs] etcd/peer serving cert is signed for DNS names [10.0.2.15 localhost] and IPs [10.0.2.15 127.0.0.1 ::1]
[certs] Generating "front-proxy-ca" certificate and key
[certs] Generating "front-proxy-client" certificate and key
[certs] Generating "sa" key and public key
[kubeconfig] Using kubeconfig folder "/etc/kubernetes"
[kubeconfig] Writing "admin.conf" kubeconfig file
[kubeconfig] Writing "kubelet.conf" kubeconfig file
[kubeconfig] Writing "controller-manager.conf" kubeconfig file
[kubeconfig] Writing "scheduler.conf" kubeconfig file
[control-plane] Using manifest folder "/etc/kubernetes/manifests"
[control-plane] Creating static Pod manifest for "kube-apiserver"
[control-plane] Creating static Pod manifest for "kube-controller-manager"
[control-plane] Creating static Pod manifest for "kube-scheduler"
[etcd] Creating static Pod manifest for local etcd in "/etc/kubernetes/manifests"
[wait-control-plane] Waiting for the kubelet to boot up the control plane as static Pods from directory "/etc/kubernetes/manifests". This can take up to 4m0s
[apiclient] All control plane components are healthy after 20.014010 seconds
[upload-config] Storing the configuration used in ConfigMap "kubeadm-config" in the "kube-system" Namespace
[kubelet] Creating a ConfigMap "kubelet-config-1.15" in namespace kube-system with the configuration for the kubelets in the cluster
[upload-certs] Skipping phase. Please see --upload-certs
[mark-control-plane] Marking the node 10.0.2.15 as control-plane by adding the label "node-role.kubernetes.io/master=''"
[mark-control-plane] Marking the node 10.0.2.15 as control-plane by adding the taints [node-role.kubernetes.io/master:NoSchedule]
[bootstrap-token] Using token: n2e7ii.lp571oh88qidwzdj
[bootstrap-token] Configuring bootstrap tokens, cluster-info ConfigMap, RBAC Roles
[bootstrap-token] configured RBAC rules to allow Node Bootstrap tokens to post CSRs in order for nodes to get long term certificate credentials
[bootstrap-token] configured RBAC rules to allow the csrapprover controller automatically approve CSRs from a Node Bootstrap Token
[bootstrap-token] configured RBAC rules to allow certificate rotation for all node client certificates in the cluster
[bootstrap-token] Creating the "cluster-info" ConfigMap in the "kube-public" namespace
[addons] Applied essential addon: CoreDNS
[addons] Applied essential addon: kube-proxy

Your Kubernetes control-plane has initialized successfully!

To start using your cluster, you need to run the following as a regular user:

  mkdir -p $HOME/.kube
  sudo cp -i /etc/kubernetes/admin.conf $HOME/.kube/config
  sudo chown $(id -u):$(id -g) $HOME/.kube/config

You should now deploy a pod network to the cluster.
Run "kubectl apply -f [podnetwork].yaml" with one of the options listed at:
  https://kubernetes.io/docs/concepts/cluster-administration/addons/

Then you can join any number of worker nodes by running the following on each as root:

kubeadm join 10.0.2.15:6443 --token n2e7ii.lp571oh88qidwzdj \
    --discovery-token-ca-cert-hash sha256:0957baa4cdea8fda244c159cf2a038a2afe2c0b20fb922014472c5c7918dac81
kubelet service
[root@10 ~]# service kubelet status
Redirecting to /bin/systemctl status kubelet.service
● kubelet.service - kubelet: The Kubernetes Node Agent
   Loaded: loaded (/etc/systemd/system/kubelet.service; enabled; vendor preset: disabled)
  Drop-In: /etc/systemd/system/kubelet.service.d
           └─10-kubeadm.conf
   Active: active (running) since zo 2019-09-01 21:04:42 CEST; 1min 9s ago
     Docs: http://kubernetes.io/docs/
 Main PID: 4682 (kubelet)
   CGroup: /system.slice/kubelet.service
           └─4682 /usr/bin/kubelet --bootstrap-kubeconfig=/etc/kubernetes/bootstrap-kubelet.conf --kubeconfig=/etc/kubernetes/kubelet.conf --c...

sep 01 21:05:35 10.0.2.15 kubelet[4682]: E0901 21:05:35.780354    4682 summary_sys_containers.go:47] Failed to get system container stats for ...
sep 01 21:05:35 10.0.2.15 kubelet[4682]: E0901 21:05:35.780463    4682 summary_sys_containers.go:47] Failed to get system container stats for ...
sep 01 21:05:37 10.0.2.15 kubelet[4682]: W0901 21:05:37.277274    4682 cni.go:213] Unable to update cni config: No networks found in /...ni/net.d
sep 01 21:05:40 10.0.2.15 kubelet[4682]: E0901 21:05:40.725221    4682 kubelet.go:2169] Container runtime network not ready: NetworkRe...tialized
sep 01 21:05:42 10.0.2.15 kubelet[4682]: W0901 21:05:42.277894    4682 cni.go:213] Unable to update cni config: No networks found in /...ni/net.d
sep 01 21:05:45 10.0.2.15 kubelet[4682]: E0901 21:05:45.728937    4682 kubelet.go:2169] Container runtime network not ready: NetworkRe...tialized
sep 01 21:05:45 10.0.2.15 kubelet[4682]: E0901 21:05:45.813742    4682 summary_sys_containers.go:47] Failed to get system container stats for ...
sep 01 21:05:45 10.0.2.15 kubelet[4682]: E0901 21:05:45.813868    4682 summary_sys_containers.go:47] Failed to get system container stats for ...
sep 01 21:05:47 10.0.2.15 kubelet[4682]: W0901 21:05:47.278690    4682 cni.go:213] Unable to update cni config: No networks found in /...ni/net.d
sep 01 21:05:50 10.0.2.15 kubelet[4682]: E0901 21:05:50.733668    4682 kubelet.go:2169] Container runtime network not ready: NetworkRe...tialized
Hint: Some lines were ellipsized, use -l to show in full.
#run the following as a regular user, to start using the cluster
mkdir -p $HOME/.kube
sudo cp -i /etc/kubernetes/admin.conf $HOME/.kube/config
sudo chown $(id -u):$(id -g) $HOME/.kube/config

[root@10 ~]# kubectl get nodes
NAME        STATUS     ROLES    AGE     VERSION
10.0.2.15   NotReady   master   6m38s   v1.15.3
Deploy Weave Network for networking
Weave uses POD CIDR of 10.32.0.0/12 by default.
[root@10 ~]# kubectl apply -f "https://cloud.weave.works/k8s/net?k8s-version=$(kubectl version | base64 | tr -d '\n')"
serviceaccount/weave-net created
clusterrole.rbac.authorization.k8s.io/weave-net created
clusterrolebinding.rbac.authorization.k8s.io/weave-net created
role.rbac.authorization.k8s.io/weave-net created
rolebinding.rbac.authorization.k8s.io/weave-net created
daemonset.extensions/weave-net created

# kubernetes master is now in Ready status after deploying weave-net
[root@10 ~]# kubectl get nodes
NAME        STATUS   ROLES    AGE   VERSION
10.0.2.15   Ready    master   4d    v1.15.3
Verification
[root@10 ~]# kubectl get pods -n kube-system
NAME                                READY   STATUS    RESTARTS   AGE
coredns-5644d7b6d9-9gp2m            0/1     Running   0          23m
coredns-5644d7b6d9-x5f9f            0/1     Running   0          23m
etcd-10.0.2.15                      1/1     Running   0          22m
kube-apiserver-10.0.2.15            1/1     Running   0          22m
kube-controller-manager-10.0.2.15   1/1     Running   0          22m
kube-proxy-xw6mq                    1/1     Running   0          23m
kube-scheduler-10.0.2.15            1/1     Running   0          22m
weave-net-8hmqc                     2/2     Running   0          2m6s

[root@10 ~]# kubectl get pods -A
NAMESPACE     NAME                                READY   STATUS    RESTARTS   AGE
kube-system   coredns-5644d7b6d9-9gp2m            0/1     Running   0          23m
kube-system   coredns-5644d7b6d9-x5f9f            0/1     Running   0          23m
kube-system   etcd-10.0.2.15                      1/1     Running   0          22m
kube-system   kube-apiserver-10.0.2.15            1/1     Running   0          22m
kube-system   kube-controller-manager-10.0.2.15   1/1     Running   0          22m
kube-system   kube-proxy-xw6mq                    1/1     Running   0          23m
kube-system   kube-scheduler-10.0.2.15            1/1     Running   0          22m
kube-system   weave-net-8hmqc                     2/2     Running   0          2m9s
[root@10 ~]# kubectl get componentstatuses
NAME                 STATUS    MESSAGE             ERROR
controller-manager   Healthy   ok
scheduler            Healthy   ok
etcd-0               Healthy   {"health":"true"}
[root@10 ~]# kubectl get events
LAST SEEN   TYPE     REASON                    OBJECT           MESSAGE
4d          Normal   NodeHasSufficientMemory   node/10.0.2.15   Node 10.0.2.15 status is now: NodeHasSufficientMemory
4d          Normal   NodeHasNoDiskPressure     node/10.0.2.15   Node 10.0.2.15 status is now: NodeHasNoDiskPressure
4d          Normal   NodeHasSufficientPID      node/10.0.2.15   Node 10.0.2.15 status is now: NodeHasSufficientPID
4d          Normal   RegisteredNode            node/10.0.2.15   Node 10.0.2.15 event: Registered Node 10.0.2.15 in Controller
4d          Normal   Starting                  node/10.0.2.15   Starting kube-proxy.
38m         Normal   Starting                  node/10.0.2.15   Starting kubelet.
38m         Normal   NodeHasSufficientMemory   node/10.0.2.15   Node 10.0.2.15 status is now: NodeHasSufficientMemory
38m         Normal   NodeHasNoDiskPressure     node/10.0.2.15   Node 10.0.2.15 status is now: NodeHasNoDiskPressure
38m         Normal   NodeHasSufficientPID      node/10.0.2.15   Node 10.0.2.15 status is now: NodeHasSufficientPID
38m         Normal   NodeAllocatableEnforced   node/10.0.2.15   Updated Node Allocatable limit across pods
38m         Normal   Starting                  node/10.0.2.15   Starting kube-proxy.
38m         Normal   RegisteredNode            node/10.0.2.15   Node 10.0.2.15 event: Registered Node 10.0.2.15 in Controller
12m         Normal   NodeReady                 node/10.0.2.15   Node 10.0.2.15 status is now: NodeReady
etc/kubernetes
[root@10 kubernetes]# tree /etc/kubernetes
/etc/kubernetes
├── admin.conf
├── controller-manager.conf
├── kubelet.conf
├── manifests
│   ├── etcd.yaml
│   ├── kube-apiserver.yaml
│   ├── kube-controller-manager.yaml
│   └── kube-scheduler.yaml
├── pki
│   ├── apiserver.crt
│   ├── apiserver-etcd-client.crt
│   ├── apiserver-etcd-client.key
│   ├── apiserver.key
│   ├── apiserver-kubelet-client.crt
│   ├── apiserver-kubelet-client.key
│   ├── ca.crt
│   ├── ca.key
│   ├── etcd
│   │   ├── ca.crt
│   │   ├── ca.key
│   │   ├── healthcheck-client.crt
│   │   ├── healthcheck-client.key
│   │   ├── peer.crt
│   │   ├── peer.key
│   │   ├── server.crt
│   │   └── server.key
│   ├── front-proxy-ca.crt
│   ├── front-proxy-ca.key
│   ├── front-proxy-client.crt
│   ├── front-proxy-client.key
│   ├── sa.key
│   └── sa.pub
└── scheduler.conf

3 directories, 30 files
Docker images for kubernetes cluster
[root@10 kubernetes]# docker images
REPOSITORY                           TAG                 IMAGE ID            CREATED             SIZE
k8s.gcr.io/kube-proxy                v1.15.3             232b5c793146        13 days ago         82.4 MB
k8s.gcr.io/kube-apiserver            v1.15.3             5eb2d3fc7a44        13 days ago         207 MB
k8s.gcr.io/kube-scheduler            v1.15.3             703f9c69a5d5        13 days ago         81.1 MB
k8s.gcr.io/kube-controller-manager   v1.15.3             e77c31de5547        13 days ago         159 MB
k8s.gcr.io/coredns                   1.3.1               eb516548c180        7 months ago        40.3 MB
k8s.gcr.io/etcd                      3.3.10              2c4adeb21b4f        9 months ago        258 MB
k8s.gcr.io/pause                     3.1                 da86e6ba6ca1        20 months ago       742 kB
kubeadm reset
[root@10 ~]# kubeadm reset
[reset] Reading configuration from the cluster...
[reset] FYI: You can look at this config file with 'kubectl -n kube-system get cm kubeadm-config -oyaml'
[reset] WARNING: Changes made to this host by 'kubeadm init' or 'kubeadm join' will be reverted.
[reset] Are you sure you want to proceed? [y/N]: y
[preflight] Running pre-flight checks
[reset] Removing info for node "10.0.2.15" from the ConfigMap "kubeadm-config" in the "kube-system" Namespace
W0901 11:56:16.802756   29062 removeetcdmember.go:61] [reset] failed to remove etcd member: error syncing endpoints with etc: etcdclient: no available endpoints
.Please manually remove this etcd member using etcdctl
[reset] Stopping the kubelet service
[reset] Unmounting mounted directories in "/var/lib/kubelet"
[reset] Deleting contents of config directories: [/etc/kubernetes/manifests /etc/kubernetes/pki]
[reset] Deleting files: [/etc/kubernetes/admin.conf /etc/kubernetes/kubelet.conf /etc/kubernetes/bootstrap-kubelet.conf /etc/kubernetes/controller-manager.conf /etc/kubernetes/scheduler.conf]
[reset] Deleting contents of stateful directories: [/var/lib/etcd /var/lib/kubelet /etc/cni/net.d /var/lib/dockershim /var/run/kubernetes]

The reset process does not reset or clean up iptables rules or IPVS tables.
If you wish to reset iptables, you must do so manually.
For example:
iptables -F && iptables -t nat -F && iptables -t mangle -F && iptables -X

If your cluster was setup to utilize IPVS, run ipvsadm --clear (or similar)
to reset your system's IPVS tables.

The reset process does not clean your kubeconfig files and you must remove them manually.
Please, check the contents of the $HOME/.kube/config file.
[root@10 ~]#
Start k8s cluster after system reboot
# swapoff -a
# systemctl start kubelet
# systemctl status kubelet
kubeadm join token
# This command will create a new token and display the connection string
[root@10 ~]# kubeadm token create --print-join-command
kubeadm join 10.0.2.15:6443 --token 1clhim.pk9teustr2v1gnu2     --discovery-token-ca-cert-hash sha256:efe18b97c7a320e7173238af7126e33ebe76f3877255c8f9aa055f292dbf3755

# Other toke commands
kubeadm token list
kubeadm token delete <TOKEN>
Troubleshooting
kubelet service not starting
# vi /var/log/messages
Sep  1 20:57:25 localhost kubelet: F0901 20:57:25.706063    2874 server.go:198] failed to load Kubelet config file /var/lib/kubelet/config.yaml, error failed to read kubelet config file "/var/lib/kubelet/config.yaml", error: open /var/lib/kubelet/config.yaml: no such file or directory
Sep  1 20:57:25 localhost systemd: kubelet.service: main process exited, code=exited, status=255/n/a
Sep  1 20:57:25 localhost systemd: Unit kubelet.service entered failed state.
Sep  1 20:57:25 localhost systemd: kubelet.service failed.
Sep  1 20:57:35 localhost systemd: kubelet.service holdoff time over, scheduling restart.
Sep  1 20:57:35 localhost systemd: Stopped kubelet: The Kubernetes Node Agent.
Sep  1 20:57:35 localhost systemd: Started kubelet: The Kubernetes Node Agent.
Sep  1 20:57:35 localhost kubelet: F0901 20:57:35.968939    2882 server.go:198] failed to load Kubelet config file /var/lib/kubelet/config.yaml, error failed to read kubelet config file "/var/lib/kubelet/config.yaml", error: open /var/lib/kubelet/config.yaml: no such file or directory
Sep  1 20:57:35 localhost systemd: kubelet.service: main process exited, code=exited, status=255/n/a
Sep  1 20:57:35 localhost systemd: Unit kubelet.service entered failed state.
Sep  1 20:57:35 localhost systemd: kubelet.service failed.
Check journal for kubelet messages
journalctl -xeu kubelet
References
4.4 - Kind
kind : kubernetes in docker
# Set go path, kind path and KUBECONFIG path

export PATH=$PATH:$HOME/go/bin:$HOME/k8s/bin
kind get kubeconfig-path)
# output: /home/sriram/.kube/kind-config-kind
export KUBECONFIG="$(kind get kubeconfig-path)"
sriram@sriram-Inspiron-5567:~$ kind create cluster
Creating cluster "kind" ...
 ✓ Ensuring node image (kindest/node:v1.15.0) 🖼
 ✓ Preparing nodes 📦
 ✓ Creating kubeadm config 📜
 ✓ Starting control-plane 🕹️
 ✓ Installing CNI 🔌
 ✓ Installing StorageClass 💾
Cluster creation complete. You can now use the cluster with:

export KUBECONFIG="$(kind get kubeconfig-path --name="kind")"
kubectl cluster-info
kind create cluster
 kubectl cluster-info
 Kubernetes master is running at https://localhost:37933
 KubeDNS is running at https://localhost:37933/api/v1/namespaces/kube-system/services/kube-dns:dns/proxy

# To further debug and diagnose cluster problems, use 'kubectl cluster-info dump'.
kind delete cluster
Deleting cluster "kind" ...
$KUBECONFIG is still set to use /home/sriram/.kube/kind-config-kind even though that file has been deleted, remember to unset it
References
4.5 - kubectl
kubectl is the command line interface which uses kubernetes API to interact with the cluster
kubectl version
Once kubectl is configured we can see both the version of the client and as well as the server. The client version is the kubectl version; the server version is the Kubernetes version installed on the master. You can also see details about the build.
$ kubectl version

Client Version: version.Info{Major:"1", Minor:"15", GitVersion:"v1.15.2", GitCommit:"f6278300bebbb750328ac16ee6dd3aa7d3549568", GitTreeState:"clean", BuildDate:"2019-08-05T09:23:26Z", GoVersion:"go1.12.5", Compiler:"gc", Platform:"linux/amd64"}

Server Version: version.Info{Major:"1", Minor:"15", GitVersion:"v1.15.0", GitCommit:"e8462b5b5dc2584fdcd18e6bcfe9f1e4d970a529", GitTreeState:"clean", BuildDate:"2019-06-19T16:32:14Z", GoVersion:"go1.12.5", Compiler:"gc", Platform:"linux/amd64"}
cluster-info
$ kubectl cluster-info
$ kubectl cluster-info
Kubernetes master is running at https://172.17.0.45:8443
KubeDNS is running at https://172.17.0.45:8443/api/v1/namespaces/kube-system/services/kube-dns:dns/proxy
To further debug and diagnose cluster problems, use 'kubectl cluster-info dump'.
get nodes
To view the nodes in the cluster, run the kubectl get nodes command:
This command shows all nodes that can be used to host our applications.
Now we have only one node, and we can see that its status is ready (it is ready to accept applications for deployment).
$ kubectl get nodes
NAME       STATUS   ROLES    AGE   VERSION
minikube   Ready    master   11m   v1.15.0

# list nodes with more information
$ kubectl get nodes -o=wide
NAME       STATUS   ROLES    AGE   VERSION   INTERNAL-IP   EXTERNAL-IP   OS-IMAGE              KERNEL-VERSION   CONTAINER-RUNTIME
minikube   Ready    master   13m   v1.15.0   10.0.2.15     <none>        Buildroot 2018.05.3   4.15.0           docker://18.9.6
Creating namespace to isolate the pods in cluster
kubectl create namespace dev
ConfigMaps
Kubectl create configmap \
 <config-name> --from-literal=<key>=<value>

(or)
Kubectl create configmap \
 <config-name> --from-file=<path_to_file>
Example :
Kubectl create configmap \
app-color-config –from-literal=APP_COLOR=blue \
--from-literal=APP_MOD=prod

Kubectl create configmap \
app-config  --from-file=app-config.properties
View Configmaps :
Kubectl get configmaps
References
4.6 - Minikube
minikube is a tool/utility which runs a single node kuberbetes cluster using a virtual box. This tool helps in learning k8s with local setup.
starting minikube for the first time
sriram@sriram-Inspiron-5567:~/k8s$ minikube start
😄  minikube v1.2.0 on linux (amd64)
💿  Downloading Minikube ISO ...
 129.33 MB / 129.33 MB [============================================] 100.00% 0s
🔥  Creating virtualbox VM (CPUs=2, Memory=2048MB, Disk=20000MB) ...
🐳  Configuring environment for Kubernetes v1.15.0 on Docker 18.09.6
💾  Downloading kubeadm v1.15.0
💾  Downloading kubelet v1.15.0
🚜  Pulling images ...
🚀  Launching Kubernetes ...
⌛  Verifying: apiserver proxy etcd scheduler controller dns
🏄  Done! kubectl is now configured to use "minikube"
status
$ minikube status
host: Running
kubelet: Running
apiserver: Running
kubectl: Correctly Configured: pointing to minikube-vm at 192.168.99.100
minikube service list
$ minikube service list

|-------------|------------|--------------|
|  NAMESPACE  |    NAME    |     URL      |
|-------------|------------|--------------|
| default     | kubernetes | No node port |
| kube-system | kube-dns   | No node port |
|-------------|------------|--------------|
minikube stop
$ minikube stop
✋  Stopping "minikube" in virtualbox ...
🛑  "minikube" stopped.

$ minikube status
host: Stopped
kubelet:
apiserver:
kubectl:
restarting minikube
sriram@sriram-Inspiron-5567:~/k8s$ minikube start
😄  minikube v1.2.0 on linux (amd64)
💡  Tip: Use 'minikube start -p <name>' to create a new cluster, or 'minikube delete' to delete this one.
🔄  Restarting existing virtualbox VM for "minikube" ...
⌛  Waiting for SSH access ...
🐳  Configuring environment for Kubernetes v1.15.0 on Docker 18.09.6
🔄  Relaunching Kubernetes v1.15.0 using kubeadm ...
⌛  Verifying: apiserver proxy etcd scheduler controller dns
🏄  Done! kubectl is now configured to use "minikube"
Enable metrics service and listing all apiservices
$ minikube addons enable metrics-server
✅  metrics-server was successfully enabled

sriram@sriram-Inspiron-5567:~/k8s$ kubectl get apiservices
NAME                                   SERVICE                      AVAILABLE   AGE
v1.                                    Local                        True        31m
v1.apps                                Local                        True        31m
v1.authentication.k8s.io               Local                        True        31m
v1.authorization.k8s.io                Local                        True        31m
v1.autoscaling                         Local                        True        31m
v1.batch                               Local                        True        31m
v1.coordination.k8s.io                 Local                        True        31m
v1.networking.k8s.io                   Local                        True        31m
v1.rbac.authorization.k8s.io           Local                        True        31m
v1.scheduling.k8s.io                   Local                        True        31m
v1.storage.k8s.io                      Local                        True        31m
v1beta1.admissionregistration.k8s.io   Local                        True        31m
v1beta1.apiextensions.k8s.io           Local                        True        31m
v1beta1.apps                           Local                        True        31m
v1beta1.authentication.k8s.io          Local                        True        31m
v1beta1.authorization.k8s.io           Local                        True        31m
v1beta1.batch                          Local                        True        31m
v1beta1.certificates.k8s.io            Local                        True        31m
v1beta1.coordination.k8s.io            Local                        True        31m
v1beta1.events.k8s.io                  Local                        True        31m
v1beta1.extensions                     Local                        True        31m
v1beta1.metrics.k8s.io                 kube-system/metrics-server   True        95s
v1beta1.networking.k8s.io              Local                        True        31m
v1beta1.node.k8s.io                    Local                        True        31m
v1beta1.policy                         Local                        True        31m
v1beta1.rbac.authorization.k8s.io      Local                        True        31m
v1beta1.scheduling.k8s.io              Local                        True        31m
v1beta1.storage.k8s.io                 Local                        True        31m
v1beta2.apps                           Local                        True        31m
v2beta1.autoscaling                    Local                        True        31m
v2beta2.autoscaling                    Local                        True        31m
Minikube behind Proxy
export HTTP_PROXY=http://<proxy hostname:port>
export HTTPS_PROXY=https://<proxy hostname:port>
export NO_PROXY=localhost,127.0.0.1,10.96.0.0/12,192.168.99.0/24,192.168.39.0/24

minikube start
References
4.7 - Pod
Kubernetes PODS
$ kubectl describe pods

Name:           kubernetes-bootcamp-5b48cfdcbd-5ddlwNamespace:      defaultPriority:       0

Node:           minikube/172.17.0.90
Start Time:     Mon, 26 Aug 2019 11:54:05 +0000
Labels:         pod-template-hash=5b48cfdcbd
                run=kubernetes-bootcamp

Annotations:    <none>

Status:         Running
IP:             172.18.0.5
Controlled By:  ReplicaSet/kubernetes-bootcamp-5b48cfdcbd

Containers:

  kubernetes-bootcamp:
    Container ID:   docker://016f25827984c14dc74e5cbaafe43b0fb77b20b8838b5818d1e9a90376b8ad5d
    Image:          gcr.io/google-samples/kubernetes-bootcamp:v1
    Image ID:       docker-pullable://jocatalin/kubernetes-bootcamp@sha256:0d6b8ee63bb57c5f5b6156f446b3bc3b3c143d233037f3a2f00e279c8fcc64af
    Port:           8080/TCP
    Host Port:      0/TCP
    State:          Running
      Started:      Mon, 26 Aug 2019 11:54:06 +0000
    Ready:          True
    Restart Count:  0
    Environment:    <none>
    Mounts:
      /var/run/secrets/kubernetes.io/serviceaccount from default-token-5wbkl (ro)
Conditions:
  Type              Status
  Initialized       True
  Ready             True
  ContainersReady   True
  PodScheduled      True
Volumes:
  default-token-5wbkl:
    Type:        Secret (a volume populated by a Secret)
    SecretName:  default-token-5wbkl
    Optional:    false
QoS Class:       BestEffort
Node-Selectors:  <none>
Tolerations:     node.kubernetes.io/not-ready:NoExecute for 300s
                 node.kubernetes.io/unreachable:NoExecute for 300s
Events:
  Type    Reason     Age    From               Message
  ----    ------     ----   ----               -------
  Normal  Scheduled  6m58s  default-scheduler  Successfully assigned default/kubernetes-bootcamp-5b48cfdcbd-5ddlw to minikube
  Normal  Pulled     6m57s  kubelet, minikube  Container image "gcr.io/google-samples/kubernetes-bootcamp:v1" already present on machine
  Normal  Created    6m57s  kubelet, minikube  Created container kubernetes-bootcamp
  Normal  Started    6m57s  kubelet, minikube  Started container kubernetes-bootcamp
POD Manifest/Definition
apiVersion: v1
kind: Pod
metadata:
  name: label-demo
  labels:
    environment: production
    app: nginx
spec:
  containers:
  - name: nginx
    image: nginx:1.7.9
    ports:
    - containerPort: 80
$ kubectl apply -f nginx-pod.yaml $ kubectl get events $ kubectl get pods $ kubectl delete pod label-demo
Static POD
PODS that are created by kubelet without any communication from kube-apiserver are called static pods.
If master node fails, kublet on worker node can manage deploying/deleting the pods. This can be achieved by placing the pod definition files directly in the manifests path on the node (/etc/kubernetes/manifests). Kublet monitors this path regularly and creates a POD and also ensures the POD stays alive.
POD Eviction
If a node runs out of CPU, memory or disk, Kubernetes may decide to evict one or more pods. It may choose to evict the Weave Net pod, which will disrupt pod network operations.
You can see when pods have been evicted via the kubectl get events command or kubectl get pods
Resources
4.8 - Secrets
Managing kubernetes secrets
Secret Manifest with default secret type:
apiVersion: v1
kind: Secret
metadata:
  name: mysecret
type: Opaque
data:
  username: User
  password: **********
$ kubectl apply -f ./secret.yaml
$ kubectl get secrets
NAME                  TYPE                                  DATA   AGE
default-token-prh24   kubernetes.io/service-account-token   3      27m
mysecret              Opaque                                2      14m
type: Opaque means that from kubernetes’s point of view the contents of this Secret is unstructured, it can contain arbitrary key-value pairs.
SecretType = “Opaque” // Opaque (arbitrary data; default) SecretType = “kubernetes.io/service-account-token” // Kubernetes auth token SecretType = “kubernetes.io/dockercfg” // Docker registry auth SecretType = “kubernetes.io/dockerconfigjson” // Latest Docker registry auth
References
4.9 - Troubleshooting
Troubleshooting
kubectl get - list resources
kubectl describe - show detailed information about a resource
kubectl logs - print the logs from a container in a pod
kubectl exec - execute a command on a container in a pod
$ export POD_NAME=$(kubectl get pods -o go-template --template '{{range .items}}{{.metadata.name}}{{"\n"}}{{end}}')

$ echo $POD_NAME
kubernetes-bootcamp-5b48cfdcbd-5ddlw

$ kubectl exec $POD_NAME env

PATH=/usr/local/sbin:/usr/local/bin:/usr/sbin:/usr/bin:/sbin:/bin
HOSTNAME=kubernetes-bootcamp-5b48cfdcbd-5ddlw
KUBERNETES_SERVICE_HOST=10.96.0.1
KUBERNETES_SERVICE_PORT=443
KUBERNETES_SERVICE_PORT_HTTPS=443
KUBERNETES_PORT=tcp://10.96.0.1:443
KUBERNETES_PORT_443_TCP=tcp://10.96.0.1:443
KUBERNETES_PORT_443_TCP_PROTO=tcp
KUBERNETES_PORT_443_TCP_PORT=443
KUBERNETES_PORT_443_TCP_ADDR=10.96.0.1
NPM_CONFIG_LOGLEVEL=info
NODE_VERSION=6.3.1
HOME=/root
# Start a bash session in the Pod’s container:
 ## name of the container can be omitted if we only have a single container in the Pod

kubectl exec -ti $POD_NAME bash
5 - Programming
5.1 - golang
- Go is an opensource programming language developed by Google.
- Go provides garbage collection, type safety, dynamic-typing capability.
- Go provides a rich standard library, called as packages (Standard Libraries) - goPackages
Getting Started
- How to install and set up Go
- How to set custom goPATH
- How to write Go Code
- Dependency Management with go modules
__*GOPATH must not be the same path as your Go Installation*__
# gopath can be any directory on your system
Edit your `~/.bash_profile` and add the line: `export GOPATH=$HOME/go`
source your bash_profile `source ~/.bash_profile`
# Set the GOBIN path to generate a binary file when go install is executed.
 `export GOBIN=$HOME/go/bin`
Environment variables
Command to check environment variables go env
Workspaces
Workspace in go is a directory hierarchy with 3 directories at its root
- src : The src directory contains source code.The path below src determines the import path or executable name.
- pkg : contains go installed package objects. Each target operating system and architecture pair has its own subdirectory of pkg
format: pkg/GOOS_GOARCH
example: pkg/linux_amd64 - bin : contains executable binaries.
IDE for golang
Getting help with go commands
go provides extensive command line help by simply using help option as argument, For any help related to go , use
go help <command>
examples:
go help build
go help install
go help clean
go help gopath
How to build go executables for different architectures
The go build command allows us to create executables for all golang supported architectures. To build executables for different architectures GOOS and GOARC arguments need to be set accordingly.
env GOOS=target-OS GOARCH=target-architecture go build <package-import-path>
env GOOS=windows GOARCH=amd64 go build <path_to_go_src>
To get a complete list of all supported platforms and architectures, use the command : go tool dist list
sriram@optimus-prime:~$ go tool dist list
android/386
android/amd64
android/arm
android/arm64
darwin/386
darwin/amd64
darwin/arm
darwin/arm64
dragonfly/amd64
freebsd/386
freebsd/amd64
freebsd/arm
linux/386
linux/amd64
linux/arm
linux/arm64
linux/mips
linux/mips64
linux/mips64le
linux/mipsle
linux/ppc64
linux/ppc64le
linux/s390x
nacl/386
nacl/amd64p32
nacl/arm
netbsd/386
netbsd/amd64
netbsd/arm
openbsd/386
openbsd/amd64
openbsd/arm
plan9/386
plan9/amd64
plan9/arm
solaris/amd64
windows/386
windows/amd64
References
golang Tutorial
golang wiki page
curated list of awesome Go frameworks
5.2 - Python
5.2.1 - Getting Started
How to install Python3 in Debian
# Install prerequisites
$ sudo apt-get install build-essential
$ sudo apt-get install libreadline-gplv2-dev libncursesw5-dev libssl-dev libsqlite3-dev tk-dev libgdbm-dev libc6-dev libbz2-dev zlib1g-dev

# Download and extract python source tar
cd /tmp
wget https://www.python.org/ftp/python/3.8.5/Python-3.8.5.tar.xz
tar -xvf Python-3.8.5.tar.xz
cd Python-3.8.5
./configure --prefix=/appl/Python_3_8_5 --enable-optimizations
make
make install
Dictionary
# load json file
with open('data_file.json') as json_file:
    data = json.load(json_file)

print(json.dumps(data,indent=4))

for groups in data['values']:
     print(groups.items())
Class
class MyClass:
    def __init__(self,f_name,l_name):
        print("MyClass is instantiated successfully")
        print(f'{f_name}_{l_name}')
        self.f_name = f_name
        self.l_name = l_name

if __name__ == '__main__':
    print('file is called directly')
else:
    print('test2 file is imported')

print(MyClass.__dict__)
How to parse JSON
# https://docs.atlassian.com/bitbucket-server/rest/6.10.0/bitbucket-rest.html
# https://pynative.com/parse-json-response-using-python-requests-library/

import requests

session = requests.Session()
limit = 25
start = 0
isLastPage = False
json_response = []
admin_groups = []

try:
    while not isLastPage:
        url = f'https://bitbucket_url:7999/rest/api/1.0/admin/groups?limit={limit}&start={start}'
        # print(url)
        r = session.get(url,auth=('USer_ID', 'Passwd'))
        json_response.append(r.json())
        isLastPage = r.json()['isLastPage']
        if isLastPage == True:
            break
        start = r.json()['nextPageStart']
except Exception as err:
    print(f'error: {err}')

# json_response is a list with dictionary of values
# iterate through list and get the dictionary
for item in json_response:
    for names in item['values']:
        admin_groups.append(names['name'])      # Add the admin group names to list

# Total number of groups
print(f'Total Number of groups : {len(admin_groups)}')
# iterate through admins list and print the admin group names
for admin in admin_groups:
    print(admin)
Argument Parsing - Flags
import requests
import argparse


def check_app_status(url):
    r = requests.get(url)
    try:
        response = r.json()
    except Exception as e:
        print(f'Exception occured : {e}')
    if (r.status_code == 200 and response['state'] == "RUNNING"):
        print(f'Application is up and running')
    else:
        print(f'Application is not reachable')


def init_argument_parser(argument_list=None):
    parser = argparse.ArgumentParser()
    parser.add_argument('-url', '--url', help='URL of Application ', required=True)
    return parser.parse_args()

if __name__ == '__main__':
    args = init_argument_parser()
    # print(f'{args.url}')
    check_app_status(args.url)
6 - Ansible
6.1 - Ansible
- Automation tool for configuration management
- Tool for automated deployments
- Agent less
- Yaml syntax playbooks
Installation of Ansible
yum update -y && \
yum install ansible -y
Setting up Inventory
- Inventory file lists hostnames and groups in INI-like format
- Inventory file can be static or Dynamic
- Inventory file can specify IP addresses, hostnames and groups
- Inventory file can include specific parameters like non standard ports, aliases
- Default location for ansible inventory :
/etc/ansible/hosts - Inventory can also be located else where and used with -i flag by providing the path in command line
- Important to have local group as ansible communicates back to host instance
Example :
[webservers]
web1 ansible_host=www.mywebserver.com:5309

[loadbalancers]
lb ansible_host=192.168.10.2

[local]
control ansible_connection=local --> this is required to tell ansible not to ssh to local host
Inventory Commands:
ansible --list-hosts all
Setting up Ansible Configuration file
Ansible will search for configuration file in below order
- ANSIBLE_CONFIG (environment variable if set)
- ansible.cfg (in current directory)
~/.ansible.cfg(in home directory)/etc/ansible/ansible.cfg
Create ansible.cfg file in project folder, to control ansible environment settings
# ansible.cfg

[defaults]
inventory = ./inventory-file
remote_user = user_id_of_host_servers
private_key_file = ~/.ssh/ssh_key_file_of_host_servers.pem
host_key_checking = FALSE --> do not check host key finger print while ssh when connecting for first time
Ansible Tasks
Ansible tasks allows us to run adhoc commands against our inventory file. In simple terms , Task is a call to ansible module.
syntax: ansible options host-pattern
Ex: ansible -m ping all —> ansible-command module_flag module_name inventory
Using valut in Ansible
ansible-playbook -i hosts site.yml --ask-vault-pass
ansible-playbook -i hosts site.yml --vault-password-file vault-pass
Warning
If you want to use –vault-password-file option, then make sure you add the password filename to.gitignore, else vault password will be exposed in the git repository.Docker ansible control machine
Inorder to take advantage of the container technology, i have created a simple docker image from centos with ansible. So we can spin up a container and use this as a control machine to run ansible playbooks.
Centos Docker Image with Ansible
References
6.2 - AnsibleTasks
cleanup task using cron module
# contab entry that runs every night
# recursively finds and deletes files and folders older than 7 days.
- name: Creates a cron file under /etc/cron.d
  cron:
    name: Cleanup files and folders older than 7 days
    weekday: "*"
    day: "*"
    minute: "0"
    hour: "0"
    user: <userID>
    job: "find /path/* -mtime +7 exec rm -rf {} \\; > /dev/null"
7 - Source Code Management
Git is a distributed version control system
Git config file
 git config --global user.email "email_id"
 git config --global user.name "User Name"
 git config --list

 # Omit --global to set the identity only to a repository.
Basic Git commands
 git init (initialize a local repository)
 git add --all (or)
 git add [filename] (or)
 git add . [all changed files for commit]
 git status (show the status of working tree)
 git commit -m "commit message"
 git push  (push to remote repository)
 git pull (fetch changes from remote repository)
 git clone [git repo url]
 git fetch (fetch branches, tags from remote repository)
Remove files from staging area
 git reset file_name  (or)
 git reset  (to remove all files from staging area)
Git Tagging
Git tagging is used to mark an important history like a release v1.0
 git tag -a v1.0 -m "Reason for tagging"
 git push origin v1.0

# If there are multiple tags, then use --tags flag
 git push origin --tags (to push all tags)

# To list out all the available tags
 git tag
 git tag -l (or) --list  (optional)
Information about Remote Repository
git remote -v
Git branching
# To display all branches that are present remotely and locally
 git branch -a
# To create a new branch
 git branch branch_name
 git checkout branch_name
Discard all local changes
# discard all local changes/commits and pull from upstream

git reset --hard origin/master
git pull origin master
Commit History
To check commit history : git log
Revert commits
git revert <commit-id>
Compile Git from Source
GIT_VERSION=2.33.1
wget https://mirrors.edge.kernel.org/pub/software/scm/git/git-${GIT_VERSION}.tar.gz
tar -xvf git-${GIT_VERSION}.tar.gz
cd git-${GIT_VERSION}
make configure
./configure --prefix=/appl/Git/${GIT_VERSION} --with-curl --with-expat
make all
make install

cd /appl
tar -cvf git-${GIT_VERSION}.tar Git/${GIT_VERSION}
Git Modues
To-DO
References
git-scm
pro git book
Git basic commands by Atlassian
Video References
Git Tutorial for Beginners: Command-Line Fundamentals8 - Linux
8.1 - Linux Distributions
8.1.1 - Debian
![]()
8.1.1.1 - Debian
Install wifi drivers
When i was installing Debian 10, automatic network detection failed to load wifi drivers. Hence i have to manually add non-free debian sources and install the fimware wifi drivers.
# Reference : https://wiki.debian.org/iwlwifi

apt edit-sources
# add below non-free sources of debian to the list
# deb http://deb.debian.org/debian buster main contrib non-free
# deb-src http://deb.debian.org/debian buster main contrib non-free

apt update

apt install wireless-tools
apt install firmware-iwlwifi

modprobe -r iwlwifi
modprobe iwlwifi
root@sriram-pc:~# lspci
00:00.0 Host bridge: Intel Corporation Xeon E3-1200 v6/7th Gen Core Processor Host Bridge/DRAM Registers (rev 02)
00:02.0 VGA compatible controller: Intel Corporation HD Graphics 620 (rev 02)
00:04.0 Signal processing controller: Intel Corporation Skylake Processor Thermal Subsystem (rev 02)
00:14.0 USB controller: Intel Corporation Sunrise Point-LP USB 3.0 xHCI Controller (rev 21)
00:14.2 Signal processing controller: Intel Corporation Sunrise Point-LP Thermal subsystem (rev 21)
00:15.0 Signal processing controller: Intel Corporation Sunrise Point-LP Serial IO I2C Controller #0 (rev 21)
00:15.1 Signal processing controller: Intel Corporation Sunrise Point-LP Serial IO I2C Controller #1 (rev 21)
00:16.0 Communication controller: Intel Corporation Sunrise Point-LP CSME HECI #1 (rev 21)
00:17.0 SATA controller: Intel Corporation Sunrise Point-LP SATA Controller [AHCI mode] (rev 21)
00:1c.0 PCI bridge: Intel Corporation Sunrise Point-LP PCI Express Root Port #5 (rev f1)
00:1c.5 PCI bridge: Intel Corporation Sunrise Point-LP PCI Express Root Port #6 (rev f1)
00:1f.0 ISA bridge: Intel Corporation Sunrise Point-LP LPC Controller (rev 21)
00:1f.2 Memory controller: Intel Corporation Sunrise Point-LP PMC (rev 21)
00:1f.3 Audio device: Intel Corporation Sunrise Point-LP HD Audio (rev 21)
00:1f.4 SMBus: Intel Corporation Sunrise Point-LP SMBus (rev 21)
01:00.0 Network controller: Intel Corporation Wireless 3165 (rev 79)
02:00.0 Ethernet controller: Realtek Semiconductor Co., Ltd. RTL8101/2/6E PCI Express Fast/Gigabit Ethernet controller (rev 07)
How to enable enp0s8 interface
# List all the available interfaces
ip a

# Install net-tools
apt-get install net-tools

# execute the commands as root
vi /etc/network/interfaces

# Add below lines to the interface file
auto enp0s8
iface enp0s8 inet dhcp

# Start the network interface
ifup enp0s8

# Check the status of enp0s8
ip a show enp0s8
configure static IP for enp0s8
# Add below lines in /etc/network/interfaces
auto enp0s8
iface enp0s8 inet static
        address 192.168.0.100
        netmask 255.255.255.0
        network 192.168.0.0
        broadcast 192.168.0.255
        gateway 192.168.0.1

# Restart the network
systemctl restart networking

# update /etc/hosts entry
127.0.0.1       localhost.localdomain   localhost
192.168.0.100   server1.example.com     server1

# Reboot the system
systemctl reboot
References
8.1.1.2 - Debian
How to install draw.io
# https://github.com/jgraph/drawio-desktop/releases/

cd /tmp
wget https://github.com/jgraph/drawio-desktop/releases/download/v13.6.2/draw.io-amd64-13.6.2.deb
sudo dpkg -i draw.io-amd64-13.6.2.deb
Install insomnia
# Add to sources
echo "deb https://dl.bintray.com/getinsomnia/Insomnia /" \
    | sudo tee -a /etc/apt/sources.list.d/insomnia.list

# Add public key used to verify code signature
wget --quiet -O - https://insomnia.rest/keys/debian-public.key.asc \
    | sudo apt-key add -

# Refresh repository sources and install Insomnia
sudo apt-get update
sudo apt-get install insomnia
References
8.1.2 - CentOS
8.1.2.1 - CentOS-8
Extra Packages for Enterprise Linux (EPEL)
Extra Packages for Enterprise Linux (EPEL) is a special interest group (SIG) from the Fedora Project that provides a set of additional packages for RHEL (and CentOS, and others) from the Fedora sources.
Note
EPEL is not an official part of the RHEL subscription or an official offering from Red Hat. But it can come in handy for admins and developers who work with RHEL and need a few utilities packaged for RHEL from a source they can feel good about.dnf -y install epel-release
dnf update -y
[root@192 ~]# dnf install epel-release
Last metadata expiration check: 1:50:34 ago on Fri 17 Jul 2020 11:34:52 AM CEST.
Dependencies resolved.
================================================================================================================
 Package                       Architecture            Version                    Repository               Size
================================================================================================================
Installing:
 epel-release                  noarch                  8-8.el8                    extras                   23 k

Transaction Summary
================================================================================================================
Install  1 Package

Total download size: 23 k
Installed size: 32 k
Is this ok [y/N]: y
Downloading Packages:
epel-release-8-8.el8.noarch.rpm                                                  98 kB/s |  23 kB     00:00
----------------------------------------------------------------------------------------------------------------
Total                                                                            71 kB/s |  23 kB     00:00
warning: /var/cache/dnf/extras-2770d521ba03e231/packages/epel-release-8-8.el8.noarch.rpm: Header V3 RSA/SHA256 Signature, key ID 8483c65d: NOKEY
CentOS-8 - Extras                                                               1.6 MB/s | 1.6 kB     00:00
Importing GPG key 0x8483C65D:
 Userid     : "CentOS (CentOS Official Signing Key) <security@centos.org>"
 Fingerprint: 99DB 70FA E1D7 CE22 7FB6 4882 05B5 55B3 8483 C65D
 From       : /etc/pki/rpm-gpg/RPM-GPG-KEY-centosofficial
Is this ok [y/N]: y
Key imported successfully
Running transaction check
Transaction check succeeded.
Running transaction test
Transaction test succeeded.
Running transaction
  Preparing        :                                                                                        1/1
  Installing       : epel-release-8-8.el8.noarch                                                            1/1
  Running scriptlet: epel-release-8-8.el8.noarch                                                            1/1
  Verifying        : epel-release-8-8.el8.noarch                                                            1/1
Installed products updated.

Installed:
  epel-release-8-8.el8.noarch

Complete!


[root@192 ~]# dnf update
Extra Packages for Enterprise Linux Modular 8 - x86_64                          122 kB/s |  82 kB     00:00
Extra Packages for Enterprise Linux 8 - x86_64                                  1.1 MB/s | 7.4 MB     00:06
Dependencies resolved.
Nothing to do.
Complete!
How to install draw.io
# check the latest available release of draw.io from github before installing.
sudo dnf install https://github.com/jgraph/drawio-desktop/releases/download/v13.4.5/draw.io-x86_64-13.4.5.rpm
References
8.1.2.2 - CentOS-7
How to setup network after RHEL/CentOS minimal installation
After installing RHEL/CentOS minimal, You may not able to connect network in that machine. This will happen because Ethernet interfaces are not enabled by default.
Method 1 – Using NetworkManager Service
edit '/etc/sysconfig/network-scripts/ifcfg-enp0s8'
change onboot parameter to yes, and restart the interface
'ONBOOT=YES'
# Restart the interface
ifdown ifcfg-enp0s8
ifup ifcfg-enp0s8
Method 2 – Using nmcli Tool
#nmcli d (List the available interfaces)
#nmtui
1. open Network manager, and choose Edit connection
2. choose you network interfaces and click “Edit”
3. Choose “Automatic” in IPv4 CONFIGURATION and check Automatically connect check box and press OK and quit from Network manager.
4. Restart network service 'systemctl restart NetworkManager.service'

[root@10 ~]# nmcli dev status
[or]
[root@10 ~]# nmcli d
DEVICE  TYPE      STATE      CONNECTION
enp0s3  ethernet  connected  enp0s3
enp0s8  ethernet  connected  enp0s8

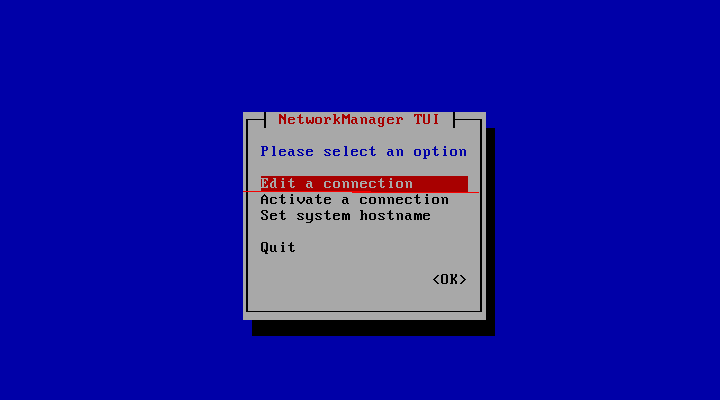
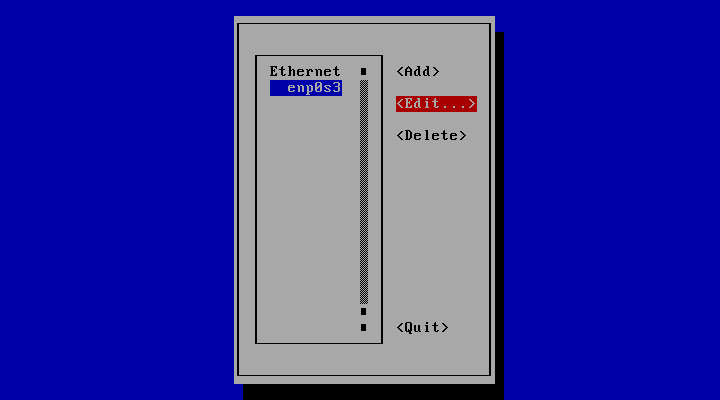
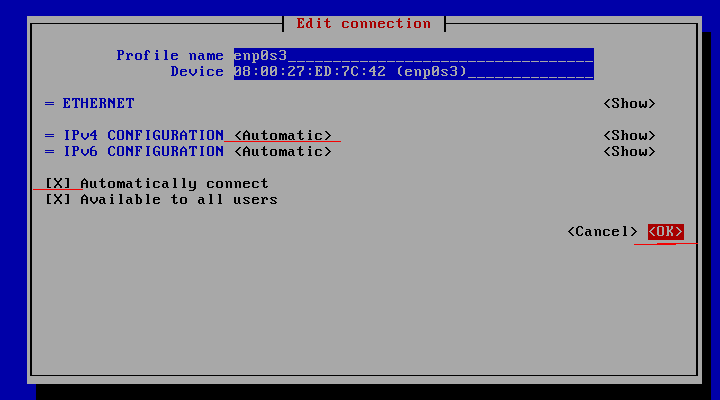
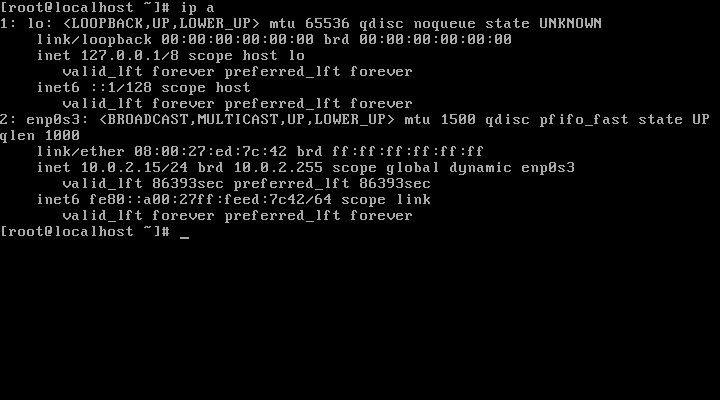
How to configure Static IP address
# vim /etc/sysconfig/network-scripts/ifcfg-eth0

## Default Configuration
DEVICE="eth0"
ONBOOT=yes
NETBOOT=yes
UUID="41171a6f-bce1-44de-8a6e-cf5e782f8bd6"
IPV6INIT=yes
BOOTPROTO=dhcp
HWADDR="00:08:a2:0a:ba:b8"
TYPE=Ethernet
NAME="eth0"

## Configuration for Static IP
HWADDR=00:08:A2:0A:BA:B8
TYPE=Ethernet
BOOTPROTO=static
# Server IP #
IPADDR=192.168.2.203
# Subnet #
PREFIX=24
# Set default gateway IP #
GATEWAY=192.168.2.254
# Set dns servers #
DNS1=192.168.2.254
DNS2=8.8.8.8
DNS3=8.8.4.4
DEFROUTE=yes
IPV4_FAILURE_FATAL=no
# Disable ipv6 #
IPV6INIT=no
NAME=eth0
# This is system specific and can be created using `uuidgen eth0` command #
UUID=41171a6f-bce1-44de-8a6e-cf5e782f8bd6
DEVICE=eth0
ONBOOT=yes
# Restart network interface
systemctl restart NetworkManager

# Verify new IP settings:
ip a s eth0

# Verify new routing settings:
ip r

# Verify DNS servers settings
cat /etc/resolv.conf
How to enable kernel modules
# Error message : "Your system does not seem to be set up to build kernel modules"
# Solution:
yum clean all
yum install gcc-c++
yum install kernel-devel
yum install kernel-headers
8.1.3 - Ubuntu
Show Hiddenfiles
Ctrl + H
Taking a screenshot
Hold shift + prtScr , mouse turns to a cross. Select the area to screenshot.
Image will be saved to pictures folder by default.To copy to Clipboard, use: Ctrl + Shift + PrtScn
Configure Wifi Network
Reference: netplan
- Find the network interface :
ip link show - Add
config.yamlfile in/etc/netplans
ubuntu@myberry:/etc/netplan$ cat config.yaml
network:
  version: 2
  renderer: networkd
  wifis:
    wlan0:
      dhcp4: no
      dhcp6: no
      addresses: [192.168.2.40/24]
      gateway4: 192.168.2.1
      nameservers:
              addresses: [8.8.8.8,192.168.2.1]
      access-points:
        "ACCESSPOINT_NAME":
          password: "PASSWORD"
- Apply the configuration :
sudo netplan apply - See the routing table :
ip r
ubuntu@myberry:/etc/netplan$ ip r
default via 192.168.2.1 dev wlan0 proto static
192.168.2.0/24 dev wlan0 proto kernel scope link src 192.168.2.40
Settingup SSH service
If there is any issue starting ssh service, remove and install openssh packages.
sudo apt remove openssh-server openssh-client --purge \
&& sudo apt autoremove \
&& sudo apt autoclean \
&& sudo apt update \
&& sudo apt install openssh-server openssh-client
sudo systemctl enable ssh
sudo systemctl daemon-reload
sudo systemctl status ssh

ubuntu@myberry:/etc/netplan$ systemctl status ssh
● ssh.service - OpenBSD Secure Shell server
     Loaded: loaded (/lib/systemd/system/ssh.service; enabled; vendor preset: enabled)
     Active: active (running) since Sat 2020-07-04 19:44:17 UTC; 21min ago
       Docs: man:sshd(8)
             man:sshd_config(5)
   Main PID: 1880 (sshd)
      Tasks: 1 (limit: 9255)
     CGroup: /system.slice/ssh.service
             └─1880 sshd: /usr/sbin/sshd -D [listener] 0 of 10-100 startups

Jul 04 19:44:17 myberry systemd[1]: Starting OpenBSD Secure Shell server...
Jul 04 19:44:17 myberry sshd[1880]: Server listening on 0.0.0.0 port 22.
Jul 04 19:44:17 myberry sshd[1880]: Server listening on :: port 22.
Jul 04 19:44:17 myberry systemd[1]: Started OpenBSD Secure Shell server.
Jul 04 19:47:28 myberry sshd[2195]: Accepted password for ubuntu from 192.168.2.13 port 36716 ssh2
Jul 04 19:47:28 myberry sshd[2195]: pam_unix(sshd:session): session opened for user ubuntu by (uid=0)
8.2 - Concepts
8.2.1 - Firewall
A firewall provides a means to protect machines from any unwanted traffic. It enables users/administrators to control incoming network traffic on host machines by defining a set of firewall rules. These rules are used to sort the incoming traffic and either block it or allow through.
firewalld
firewalldis a firewall service daemon that provides a dynamic customizable host-based firewall. Being dynamic, it enables creating, changing, and deleting the rules without the necessity to restart the firewall daemon each time the rules are changed.firewalld uses the concepts of zones and services
Zones are predefined sets of rules.
Network interfaces and sources can be assigned to a zone.
The traffic allowed depends on the network your computer is connected to and the security level this network is assigned.
Firewall services are predefined rules that cover all necessary settings to allow incoming traffic for a specific service and they apply within a zone.
Services use one or more ports or addresses for network communication.
Firewall filter communication based on ports.
# To start firewalld
systemctl unmask firewalld
systemctl enable firewalld.service
systemctl start firewalld

# To stop firewalld
systemctl stop firewalld
systemctl disable firewalld
systemctl mask firewalld

# Quick command to check whether the firewall is enabled or disabled
systemctl is-enabled firewalld
[root@centos8 ~]# systemctl status firewalld
● firewalld.service - firewalld - dynamic firewall daemon
   Loaded: loaded (/usr/lib/systemd/system/firewalld.service; enabled; vendor preset: enabled)
   Active: active (running) since Mon 2019-10-28 15:05:45 CET; 1min 25s ago
     Docs: man:firewalld(1)
 Main PID: 772 (firewalld)
    Tasks: 2 (limit: 11525)
   Memory: 36.2M
   CGroup: /system.slice/firewalld.service
           └─772 /usr/libexec/platform-python -s /usr/sbin/firewalld --nofork --nopid

Oct 28 15:05:44 centos8 systemd[1]: Starting firewalld - dynamic firewall daemon...
Oct 28 15:05:45 centos8 systemd[1]: Started firewalld - dynamic firewall daemon.
firewall-cmd
firewall-cmd is a cli for firewall service.
To get more details on how to use firewall-cmd : firewall-cmd --help
# Examples:

# How to add a service to firewall
yum install tftp-server
firewall-cmd --add-service=tftp

# How to add and open port to firewall
## The command below will open the port effective immediately, but will not persist across reboots:
firewall-cmd --add-port=<YOUR PORT>/tcp
## The following command will create a persistent rule, but will not be put into effect immediately:
firewall-cmd --permanent --add-port=<YOUR PORT>/tcp
Resources
firewalld(1) man page
firewalld.zone(5) man page
redhat-documentation
8.2.2 - Linux FileSystem
8.2.2.1 - Linux file system
sriram@sriram-Inspiron-5567:~$ sudo fdisk -l /dev/sda
Disk /dev/sda: 111,8 GiB, 120034123776 bytes, 234441648 sectors
Units: sectors of 1 * 512 = 512 bytes
Sector size (logical/physical): 512 bytes / 512 bytes
I/O size (minimum/optimal): 512 bytes / 512 bytes
Disklabel type: gpt
Disk identifier: 833807FE-A7E1-46DA-B629-ECC1B32A087E

Device         Start       End   Sectors   Size Type
/dev/sda1       2048   1050623   1048576   512M EFI System
/dev/sda2    1050624 217874431 216823808 103,4G Linux filesystem
/dev/sda3  217874432 234440703  16566272   7,9G Linux swap
Linux File Permissions
-rwsrwsrwtchmod u+s,g+s,o+t dir
- Sticky bit
Items in directory may only be deleted by owner.
[root@10 ~]# ls -ld /tmp
drwxrwxrwt. 8 root root 216 Oct 27 11:18 /tmp
SGID - Set Group Identity
Can be set on directories aswell as on files Directory : New objects in this directory inherit its group ownership.
Execuable File : Runs as owning group rather than invoker’s group.SUID - Set User Identity
Executable: Program runs as owner, rather than caller.
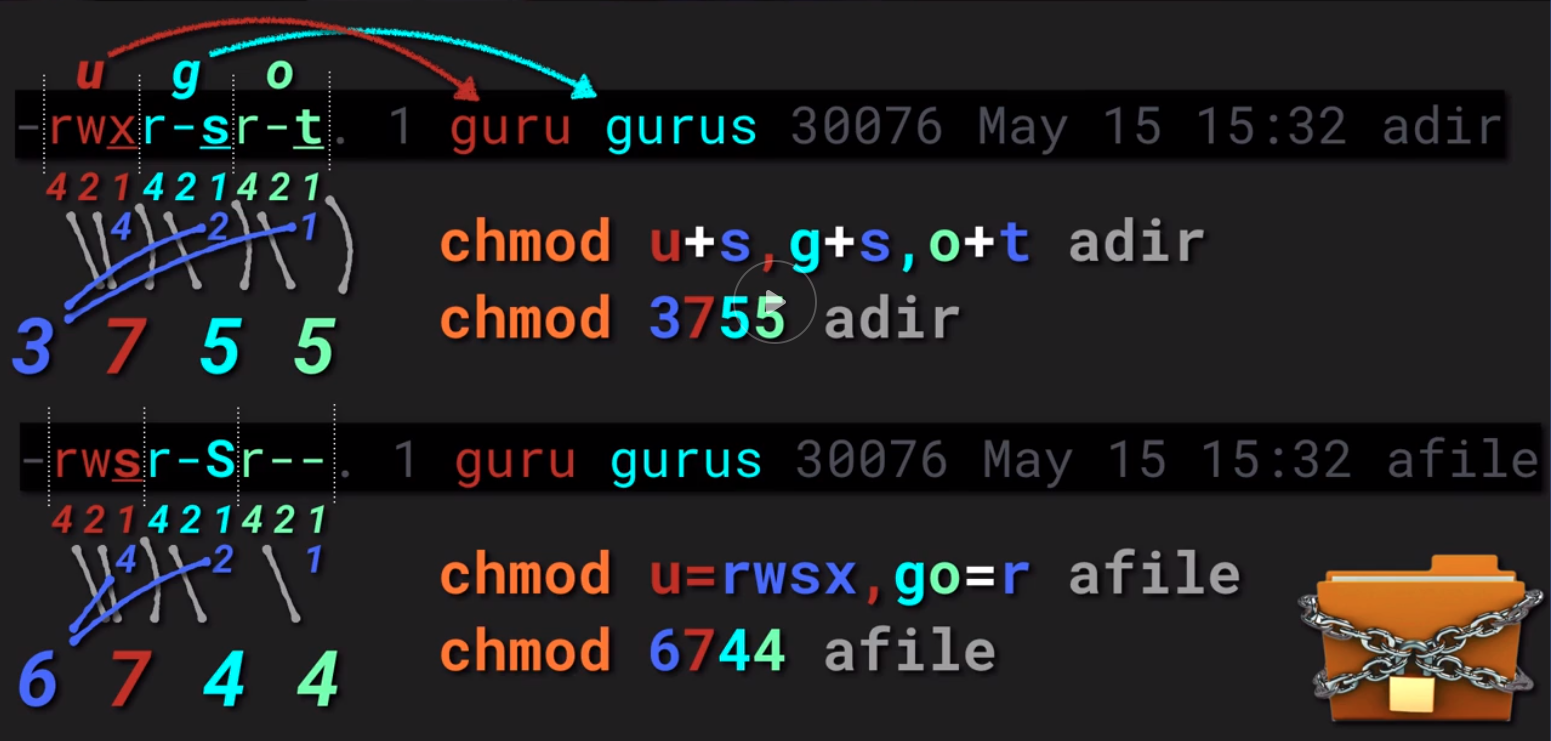
References
Linux file system
man hier
8.2.3 - Networking
Warning
net-tools utilities are obsoleted by iproute2https://wiki.linuxfoundation.org/networking/iproute2
| Legacy utility | Replacement command | Note |
|---|---|---|
| ifconfig | ip addr, ip link, ip -s | Address and link configuration |
| route | ip route | Routing tables |
| arp | ip neigh | Neighbors |
| iptunnel | ip tunnel | Tunnels |
| nameif | ifrename, ip link set name | Rename network interfaces |
| ipmaddr | ip maddr | Multicast |
| netstat | ip -s, ss, ip route | Socket statistics |
ip address statistics with colors and human readable format
ip -stats -color -human addrip -s -c -h a
How to start/stop an interface
ifup eth0  (deprecated)
ifdown eth0 (deprecated)
To show the current neighbour table in kernel$ ip neigh
To temporarily assign IP Address to a specific network interface (eth0)$ sudo ip addr add 192.168.56.1 dev eth0
To remove an assigned IP address from an network interface (eth0)
$ sudo ip addr del 192.168.56.15/24 dev eth0
ethtool
a command line utility for querying and modifying network interface controller parameters and device drivers.$ sudo ethtool enp0s3
ping (Packet INternet Groper)
Utility normally used for testing connectivity between two systems on a network (Local Area Network (LAN) or Wide Area Network (WAN)). It uses ICMP (Internet Control Message Protocol) to communicate to nodes on a network.
To test connectivity to another node, simply provide its IP or host name, for example.$ ping 192.168.0.1
traceroute | tracepath
Traceroute is a command line utility for tracing the full path from your local system to another network system. It prints number of hops (router IP’s) in that path you travel to reach the end server. It is an easy-to-use network troubleshooting utility after ping command.
Tracepath is similar to traceroute but for non root users.
In this example, we are tracing the route packets take from the local system to one of Google’s servers with IP address 216.58.204.46.$ traceroute 216.58.204.46
If traceroute is not available on the system, then install the utility as a root : yum install traceroute
MTR - a network diagnostic tool
MTR is a modern command-line network diagnostic tool that combines the functionality of ping and traceroute into a single diagnostic tool. Its output is updated in real-time, by default until you exit the program by pressing q.
The easiest way of running mtr is to provide it a host name or IP address as an argument, as follows.
$ mtr google.com (or) $ mtr 216.58.223.78
route - show / manipulate the IP routing table
route is a command line utility for displaying or manipulating the IP routing table of a Linux system. It is mainly used to configure static routes to specific hosts or networks via an interface.
You can view Kernel IP routing table by typing.
$ route
Add a default gateway to the routing table.
$ sudo route add default gw <gateway-ip>
Add a network route to the routing table.
$ sudo route add -net <network ip/cidr> gw <gateway ip> <interface>
Delete a specific route entry from the routing table.
$ sudo route del -net <network ip/cidr>
nmcli - command line tool for network management
nmcli is an easy-to-use, scriptable command-line tool to report network status, manage network connections, and control the NetworkManager.
Install network-manager for nmcli:sudo apt install network-manager
To check network connections on your system$ nmcli con show
List out all network interfaces and status$ nmcli d (or) $ nmcli dev status
[root@10 ~]# nmcli d
DEVICE  TYPE      STATE      CONNECTION
enp0s3  ethernet  connected  enp0s3
enp0s8  ethernet  connected  enp0s8
lo      loopback  unmanaged  --
Warning
netstat is obsolete and replaced by ssAdditionally, it is also a fundamental network service debugging tool used to check which programs are listening on what ports. For instance, the following command will show all TCP ports in listening mode and what programs are listening on them. $ sudo netstat -tnlp
To view kernel routing table, use the -r flag (which is equivalent to running route command above). $ netstat -r
ss (socket statistics) - another utility to investigate sockets
ss (socket statistics) is a powerful command line utility to investigate sockets. It dumps socket statistics and displays information similar to netstat. In addition, it shows more TCP and state information compared to other similar utilities.
The following example show how to list all TCP ports (sockets) that are open on a server.$ ss -ta
nc (or netcat) - arbitrary TCP and UDP connections and listens
NC (NetCat) also referred to as the “Network Swiss Army knife”, is a powerful utility used for almost any task related to TCP, UDP, or UNIX-domain sockets.
- It can open TCP connections
- send UDP packets
- listen on arbitrary TCP and UDP ports
- do port scanning
- deal with both IPv4 and IPv6.
Example to show how to scan a list of ports.$ nc -zv www.google.com 21 22 80 443 3000
nc -zv www.google.com 21 22 80 443 3000
nc: connect to www.google.com port 21 (tcp) failed: Connection timed out
nc: connect to www.google.com port 21 (tcp) failed: Connection timed out
nc: connect to www.google.com port 22 (tcp) failed: Connection timed out
nc: connect to www.google.com port 22 (tcp) failed: Connection timed out
Connection to www.google.com 80 port [tcp/http] succeeded!
Connection to www.google.com 443 port [tcp/https] succeeded!
nc: connect to www.google.com port 3000 (tcp) failed: Connection timed out
You can also specify a range of ports as shown.$ nc -zv www.google.com 20-90
The following example shows how to use nc to open a TCP connection to port 5000 on server2.tecmint.lan, using port 3000 as the source port, with a timeout of 10 seconds.$ nc -p 3000 -w 10 server2.tecmint.lan 5000
nmap
Nmap (Network Mapper) is a powerful and extremely versatile tool for Linux system/network administrators. It is used gather information about a single host or explore networks an entire network. Nmap is also used to perform security scans, network audit and finding open ports on remote hosts and so much more.
You can scan a host using its host name or IP address, for instance.
$ nmap google.com
Find all devices connected to the same Network using nmap
~$ nmap -sP 192.168.2.1/24
Starting Nmap 7.80 ( https://nmap.org ) at 2020-07-04 22:14 CEST
Nmap scan report for wn3000rpv3.home (192.168.2.1)
Host is up (0.098s latency).
Nmap scan report for 192.168.2.6 (192.168.2.6)
Host is up (0.098s latency).
Nmap scan report for 192.168.2.11 (192.168.2.11)
Host is up (0.011s latency).
Nmap scan report for sriram-inspiron-5567.home (192.168.2.13)
Host is up (0.00024s latency).
Nmap scan report for 192.168.2.40 (192.168.2.40)
Host is up (0.064s latency).
Nmap scan report for router.home (192.168.2.254)
Host is up (0.088s latency).
Nmap done: 256 IP addresses (6 hosts up) scanned in 11.17 seconds
DNS Lookup Utilities
host command is a simple utility for carrying out DNS lookups, it translates host names to IP addresses and vice versa.$ host google.com
dig (domain information groper) is also another simple DNS lookup utility, that is used to query DNS related information such as A Record, CNAME, MX Record etc, for example:$ dig google.com
Nslookup is also a popular command line utility to query DNS servers both interactively and non-interactively. It is used to query DNS resource records (RR). You can find out “A” record (IP address) of a domain as shown.$ nslookup google.com
tcp dump
Linux Network Packet Analyzers: Tcpdump is a very powerful and widely used command-line network sniffer. It is used to capture and analyze TCP/IP packets transmitted or received over a network on a specific interface.
To capture packets from a given interface, specify it using the -i option.$ tcpdump -i eth1
To capture a specific number of packets, use the -c option to enter the desired number.$ tcpdump -c 5 -i eth1
To capture and save packets to a file for later analysis, use the -w flag and specify the output file.$ tcpdump -w captured.pacs -i eth1
References
8.2.4 - Package Management
8.2.4.1 - apk
Alpine is the light weight linux distribution. Alpine uses apk as the package manager.
References
8.2.4.2 - deb
The major reason to use apt tools though is for the dependency management. The apt tools understand that in order to install a given package, other packages may need to be installed too, and apt can download these and install them, whereas dpkg does not.
References
8.2.4.3 - dnf
DNF or Dandified yum is the next generation version of yum, a package manager for RPM-based Linux distributions like fedora,centos and redhat.
dnf -h
dnf --help
[root@192 ~]# dnf history
ID     | Command line             | Date and time    | Action(s)      | Altered
-------------------------------------------------------------------------------
     5 | install transmission-gtk | 2020-07-17 13:26 | Install        |    3
     4 | install epel-release     | 2020-07-17 13:25 | Install        |    1
     3 |                          | 2020-07-17 11:33 | Install        |    8
     2 |                          | 2020-07-17 11:27 | Removed        |    1
     1 |                          | 2020-07-17 11:15 | Install        | 1476 EE
[root@192 ~]# dnf repolist
repo id                             repo name
AppStream                           CentOS-8 - AppStream
BaseOS                              CentOS-8 - Base
epel                                Extra Packages for Enterprise Linux 8 - x86_64
epel-modular                        Extra Packages for Enterprise Linux Modular 8 - x86_64
extras                              CentOS-8 - Extras
google-chrome                       google-chrome
#search package details for the given string

[root@192 ~]# dnf search chrome
Last metadata expiration check: 0:31:24 ago on Fri 17 Jul 2020 01:25:55 PM CEST.
======================================== Name & Summary Matched: chrome ========================================
google-chrome-stable.x86_64 : Google Chrome
google-chrome-beta.x86_64 : Google Chrome (beta)
google-chrome-unstable.x86_64 : Google Chrome (unstable)
chromedriver.x86_64 : WebDriver for Google Chrome/Chromium
============================================= Name Matched: chrome =============================================
chrome-gnome-shell.x86_64 : Support for managing GNOME Shell Extensions through web browsers
mathjax-winchrome-fonts.noarch : Fonts used by MathJax to display math in the browser
=========================================== Summary Matched: chrome ============================================
webextension-token-signing.x86_64 : Chrome and Firefox extension for signing with your eID on the web
# clear all cached packages from the system
[root@192 ~]# dnf clean all
44 files removed
References
8.2.4.4 - rpm
8.2.4.5 - yum
yum is broken on the server
### YUM not working on Centos and gave below error
could not retrieve mirrorlist http://mirrorlist.centos.org/?release=7&arch=x86_64&repo=extras&infra=stock error was
14: curl#6 - "Could not resolve host: mirrorlist.centos.org; Unknown error"

### To Fix above issue : go to /etc/resolve.conf and add/update nameserver
nameserver 8.8.8.8
Fix : Rebuild the yum database
yum clean all
rm -f /var/lib/rpm/__db*
rpm --rebuilddb
yum update
8.2.5 - Storage
8.2.5.1 - Storage
# from baremetal
sriram@sriram-Inspiron-5567:~$ sudo fdisk -l /dev/sda
Disk /dev/sda: 111,8 GiB, 120034123776 bytes, 234441648 sectors
Units: sectors of 1 * 512 = 512 bytes
Sector size (logical/physical): 512 bytes / 512 bytes
I/O size (minimum/optimal): 512 bytes / 512 bytes
Disklabel type: gpt
Disk identifier: 833807FE-A7E1-46DA-B629-ECC1B32A087E

Device         Start       End   Sectors   Size Type
/dev/sda1       2048   1050623   1048576   512M EFI System
/dev/sda2    1050624 217874431 216823808 103,4G Linux filesystem
/dev/sda3  217874432 234440703  16566272   7,9G Linux swap

# From Virtual Machine
[root@CentosServer1910 ~]# fdisk -l
Disk /dev/sda: 10 GiB, 10737418240 bytes, 20971520 sectors
Units: sectors of 1 * 512 = 512 bytes
Sector size (logical/physical): 512 bytes / 512 bytes
I/O size (minimum/optimal): 512 bytes / 512 bytes
Disklabel type: dos
Disk identifier: 0xec47036c

Device     Boot   Start      End  Sectors Size Id Type
/dev/sda1  *       2048  2099199  2097152   1G 83 Linux
/dev/sda2       2099200 20971519 18872320   9G 8e Linux LVM

Disk /dev/mapper/cl_centosserver1910-root: 8 GiB, 8585740288 bytes, 16769024 sectors
Units: sectors of 1 * 512 = 512 bytes
Sector size (logical/physical): 512 bytes / 512 bytes
I/O size (minimum/optimal): 512 bytes / 512 bytes

Disk /dev/mapper/cl_centosserver1910-swap: 1 GiB, 1073741824 bytes, 2097152 sectors
Units: sectors of 1 * 512 = 512 bytes
Sector size (logical/physical): 512 bytes / 512 bytes
I/O size (minimum/optimal): 512 bytes / 512 bytes
UUID - Get the uuid of devices on linux
UUID is the universally unique identifier that is assigned to devices on a linux system for the purpose of identification.
For example if your hard disk has 3 partitions then each partition is a device and has a uuid.
To find the uuid of devices connected to a system use the command ls -l /dev/disk/by-uuid/
[sriram@CentosServer1910 ~]$ ls -l /dev/disk/by-uuid/
total 0
lrwxrwxrwx. 1 root root 10 Nov  3 12:55 64b6f04f-d510-4c39-9a37-cacfeeec774b -> ../../sda1
lrwxrwxrwx. 1 root root 10 Nov  3 12:55 860d422d-1b58-4545-a139-10ffc6677f63 -> ../../dm-1
lrwxrwxrwx. 1 root root 10 Nov  3 12:55 86f561ac-6bdf-4768-8cdd-4333d6e74b47 -> ../../dm-0
Another command to find UUI : blkid
# from baremetal
sriram@sriram-Inspiron-5567:~$ sudo blkid
/dev/sda1: UUID="5FAA-9D41" TYPE="vfat" PARTLABEL="EFI System Partition" PARTUUID="80a7a0c8-1f77-45b0-b720-93a044c6b597"
/dev/sda2: UUID="17e11c76-30e6-4e5d-84ee-9ad13021351b" TYPE="ext4" PARTUUID="2376aa03-2148-4b8c-92c5-c0a40a3124a3"
/dev/sda3: UUID="170ab405-c120-4c49-a8cd-24a0b2bf346d" TYPE="swap" PARTUUID="ed20cc7f-76de-4371-8016-e10c030c1ef8"

# from virtual server
[sriram@CentosServer1910 ~]$ blkid
/dev/mapper/cl_centosserver1910-root: UUID="86f561ac-6bdf-4768-8cdd-4333d6e74b47" TYPE="xfs"
/dev/sda2: UUID="wi21xh-Sj3l-ocKe-Q6Qr-aRLv-n3Nm-hcYhL5" TYPE="LVM2_member" PARTUUID="ec47036c-02"
To get the uuid of a specific device, simply put the device name next to blkid : blkid /dev/sda1
[sriram@CentosServer1910 ~]$ sudo blkid /dev/sda*
/dev/sda: PTUUID="ec47036c" PTTYPE="dos"
/dev/sda1: UUID="64b6f04f-d510-4c39-9a37-cacfeeec774b" TYPE="ext4" PARTUUID="ec47036c-01"
/dev/sda2: UUID="wi21xh-Sj3l-ocKe-Q6Qr-aRLv-n3Nm-hcYhL5" TYPE="LVM2_member" PARTUUID="ec47036c-02"
8.2.6 - users
How to create a non-login user?
- Create user with -M (caps) flag.
- Lock the account to prevent from login
useradd -M subversion
usermod -L subversion
How to create a system user ?
$ adduser --system -s usr/sbin/nologin subversion
# The -r flag will create a system user - one which does not have a password, a home dir and is unable to login.
# -s flag is for shell , /bin/nologin prevents to have a shell for this user.

## Testing
$ sudo adduser --system --no-create-home --shell /usr/sbin/nologin subversion
Adding system user `subversion' (UID 109) ...
Adding new user `subversion' (UID 109) with group `nogroup' ...
Not creating home directory `/home/subversion'.

$ sudo grep subversion /etc/passwd /etc/shadow
/etc/passwd:subversion:x:109:65534::/home/subversion:/usr/sbin/nologin
/etc/shadow:subversion:*:18628:0:99999:7:::

## Check if account is usuable
$ sudo -u subversion whoami
subversion

$ sudo -u subversion date
Fri 01 Jan 2021 07:35:20 PM CET
8.3 - Others
8.3.1 - BootableDrive
How to create a bootable drive
dd bs=4M if=<path to your image.iso> of=<path to your USB> status=progress
bs : This stands for “block size.
if : This stands for “input file”. input file will be the iso file.
of : This stands for “output file”.
status : To see the progress.
8.3.2 - KDE
How to manage KDE applications launcher
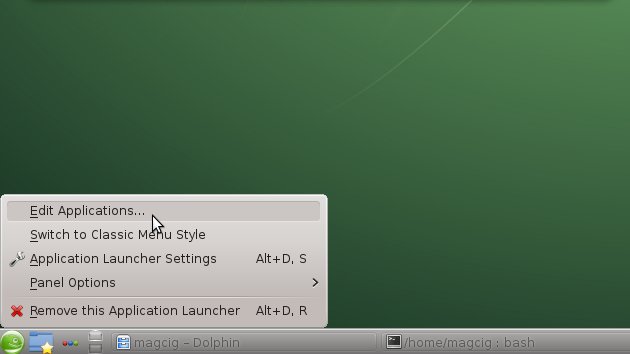

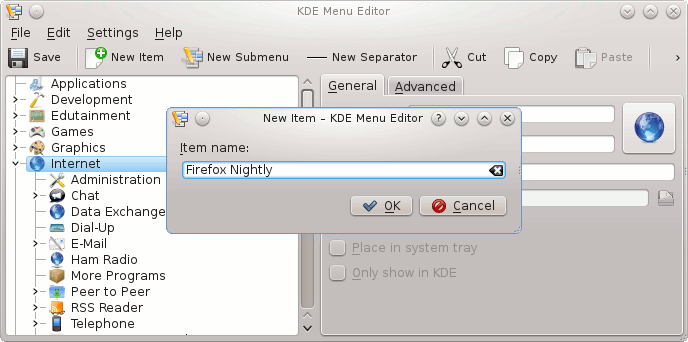

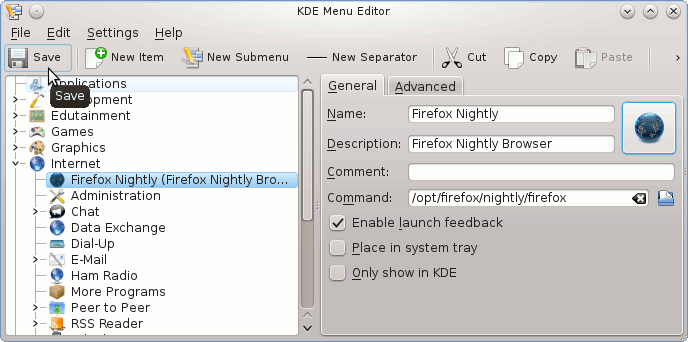
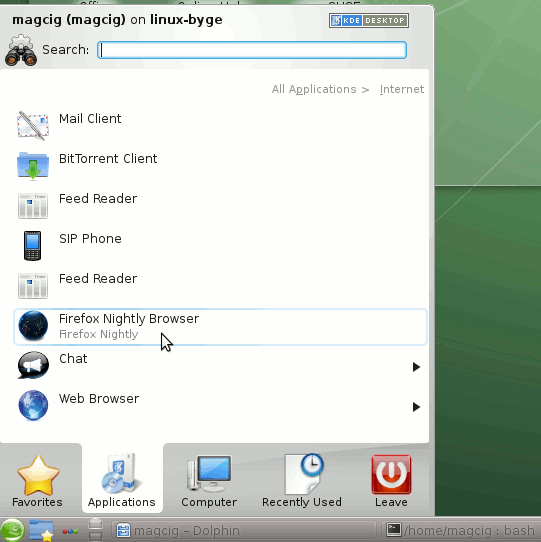
8.3.3 - RHEL
RedHat Enterprise Linux.
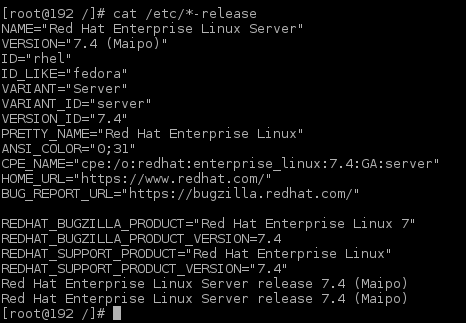
How to subscribe to Redhat using subscription-manager
subscription-manager
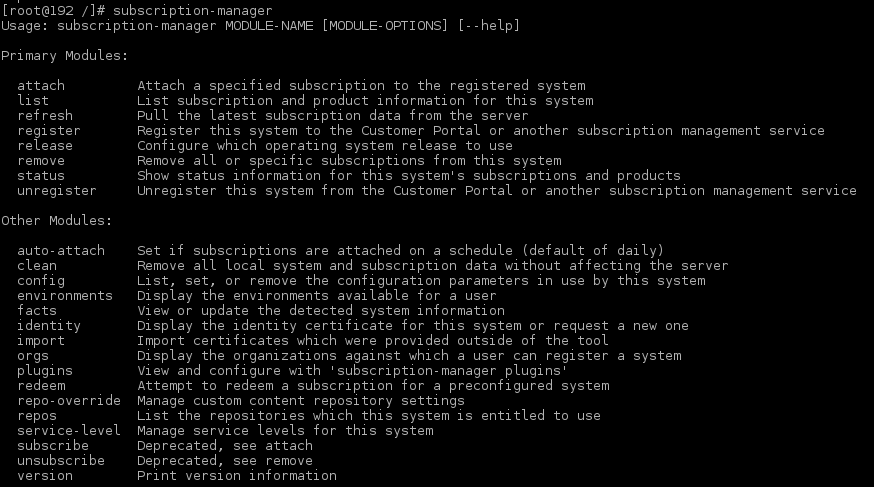
subscription-manager list
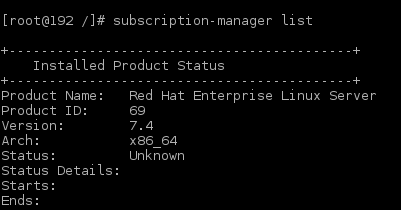
subscription-manager register

subscription-manager attach
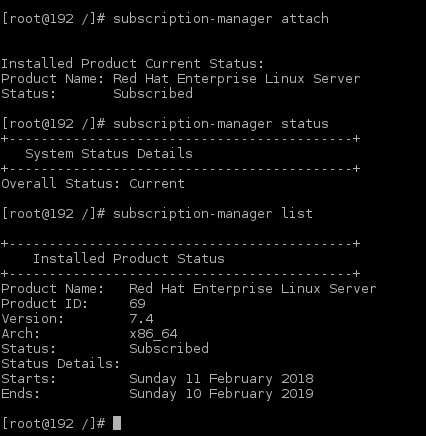
subscription-manager identity
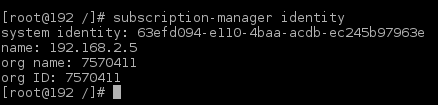
Add GUI from basic installation
 yum groupinstall gnome-desktop x11 fonts
 yum groupinstall "Server with GUI"
 systemctl set-default graphical.target
 systemctl start graphical.target
References
8.4 - Scripting
8.4.1 - AWK
- Scans a file line by line
- Splits each input line into fields
- Compares input line/fields to pattern
- Performs action(s) on matched lines
Search Patterns:
Patterns are marked by forward slash at beginning and end of search key word
awk '/keyword/ {print}'
cat /etc/passwd | awk -F: '/bin/ {print}'
cat /etc/passwd | awk -F: '/bin\/false/ {print}'
cat /etc/passwd | awk -F: '/usr\/sbin\/nologin/ {print $1}'
Delimiter and Multiple Delimiters
cat /etc/passwd | awk -F: '/bin/ {print}'

awk -F'[/=]' '{print $3 "\t" $5 "\t" $8}' filename

SYNTAX: -F"<separator1>|<separator2>|..."
awk -F"/|=" '{print $3 "\t" $5 "\t" $8}' filename
8.4.2 - Shell Scripting
Linux Shell Scripting
| Special Parameter | Description |
|---|---|
| $0 | returns name of the script |
| $# | returns total number of arguments count |
| $@ | returns list of arguments |
| $* | If a script receives two arguments, $* is equivalent to $1 $2 |
| $? | returns exit value of the last executed command |
| $! | returns process number of the last background command |
| $$ | returns PID of current shell |
| !$ | Last argument in a command |
`$*` and `$@` both will act the same unless they are enclosed in double quotes, "".
"$*" special parameter takes the entire list as one argument with spaces between and the "$@" special parameter takes the entire list and separates it into separate arguments.
#!/bin/bash
# Check if arguments are given, $0 is the script name #
if [ $# -lt 3 ]
then
        echo "Missing Arguments"
        echo "Usage : $0 arg1 arg2 arg3"
        exit
fi
File Test Operators
| operator | Description |
|---|---|
| -a file | True if file exists. |
| -b file | True if file exists and is a block special file. |
| -c file | True if file exists and is a character special file. |
| -d file | True if file exists and is a directory. |
| -e file | True if file exists. |
| -f file | True if file exists and is a regular file. |
| -g file | True if file exists and is set-group-id. |
| -h file | True if file exists and is a symbolic link. |
| -k file | True if file exists and its ``sticky’’ bit is set. |
| -p file | True if file exists and is a named pipe (FIFO). |
| -r file | True if file exists and is readable. |
| -s file | True if file exists and has a size greater than zero. |
| -t fd | True if file descriptor fd is open and refers to a terminal. |
| -u file | True if file exists and its set-user-id bit is set. |
| -w file | True if file exists and is writable. |
| -x file | True if file exists and is executable. |
| -G file | True if file exists and is owned by the effective group id. |
| -L file | True if file exists and is a symbolic link. |
| -N file | True if file exists and has been modified since it was last read. |
| -O file | True if file exists and is owned by the effective user id. |
| -S file | True if file exists and is a socket. |
| -v varname | True if the shell variable varname is set (has been assigned a value). |
| -z string | True if the length of string is zero. |
| -n string | True if the length of string is non-zero. |
| str | Check if str is not empty; if empty, then returns false. |
# $1 is the first argument, expecting a string
if [ -z $1 ]; then
   echo "You must specify a string in first argument"
   exit
fi

# using translate command 'tr', Translate any uppercase characters into lowercase #
test=$( echo "$1" | tr -s  '[:upper:]'  '[:lower:]' )
# Check if the given file exists where arg3 is the given filename to check #
if [ ! -f $3 ]
then
        echo "Filename given \"$3\" doesn't exist"
        exit
fi
Standard Streams
| value | Stream |
|---|---|
| 0 | /dev/stdin |
| 1 | /dev/stdout |
| 2 | /dev/stderr |
String vs Numeric comparision
For string comparision use,
==
!=
<

For numeric comparision use,
-gt
-lt
-eq
-ne
For and While loops
#!/bin/bash
for variable in {list}
do
    <commands>
done

# Example
for i in {1..10}
do
    echo $i
done

# Bash v4.0+ has inbuilt support for setting up a step value using {START..END..INCREMENT} syntax
#!/bin/bash
echo "Bash version ${BASH_VERSION}..."
for i in {0..10..2}
  do
     echo "Count $i times"
 done

#output
Bash version 4.4.20(1)-release...
Count 0 times
Count 2 times
Count 4 times
Count 6 times
Count 8 times
Count 10 times
# C Style for loop
#!/bin/bash
for (( i=1; i<=5; i++ ))
do
   echo "Welcome $i times"
done

# Infinite loop
#!/bin/bash
for (( ; ; ))
do
   echo "infinite loops [ hit CTRL+C to stop]"
done
Loop through array elements
BOOKS=('Title-1' \
     'Title-2' \
     'Title-3' \
     'Title-4')
for book in "${BOOKS[@]}"
do
  echo "Book: $book"
done

# Output
Book: Title-1
Book: Title-2
Book: Title-3
Book: Title-4
Conditional exit with break
You can do early exit with break statement inside the for loop.You can exit from within a FOR, WHILE or UNTIL loop using break.
for i in {1..10}
do
  statements1      #Executed for all values of ''i'', up to a disaster-condition if any.
  statements2
  if (disaster-condition)
  then
     break            #Abandon the loop.
  fi
  statements3         #While good and, no disaster-condition.
done

# Example
# This shell script will go though all files stored in /etc directory.
# The for loop will be abandon when /etc/resolv.conf file found.

#!/bin/bash
for file in /etc/*
do
     if [ "${file}" == "/etc/resolv.conf" ]
     then
          countNameservers=$(grep -c nameserver /etc/resolv.conf)
          echo "Total  ${countNameservers} nameservers defined in ${file}"
          break
     fi
done
#!/bin/bash
while [[condition]]
do
    <commands>
done

# Example
num=1
while [ $num -le 5 ]
do
   echo "$num"
   num=$((num+1))
done
Continue
To resume the next iteration of the enclosing FOR, WHILE or UNTIL loop use continue statement.
for I in 1 2 3 4 5
do
  statements1      #Executed for all values of ''I'', up to a disaster-condition if any.
  statements2
  if (condition)
  then
     continue   #Go to next iteration of I in the loop and skip statements3
  fi
  statements3
done

# Example
# This script will make backup of all file names specified on command line. If .bak file exists, it will skip the cp command.
#!/bin/bash
FILES="$@"
for f in $FILES
do
        # if .bak backup file exists, read next file
     if [ -f ${f}.bak ]
     then
          echo "Skiping $f file..."
          continue  # read next file and skip the cp command
     fi
     /bin/cp $f $f.bak
done
Case
# The CASE statement is the simplest form of the IF-THEN-ELSE statement in BASH.
case $variable in
     pattern-1)
          commands
          ;;
     pattern-2)
          commands
          ;;
     pattern-3|pattern-4|pattern-5)
          commands
          ;;
     pattern-N)
          commands
          ;;
     *)
          commands
          ;;
esac
References
gnu.org Bash Reference Manual
Conditional Expressions
bash wikibook
Linux Shell Scripting Tutorial
Bash-Scripting
Bash-Beginners-Guide
8.4.3 - Tasks
Find all files aged more than 7 days and delete
find /path/* -mtime +7 exec rm -rf {} \; > /dev/null
8.5 - System Admin
List all Hardware : lshw
List all pci devices : lspci
# Required pciutuls package to be installed 'yum install pciutils'

[root@10 ~]# lspci
00:00.0 Host bridge: Intel Corporation Xeon E3-1200 v6/7th Gen Core Processor Host Bridge/DRAM Registers (rev 02)
00:02.0 VGA compatible controller: Intel Corporation HD Graphics 620 (rev 02)
00:04.0 Signal processing controller: Intel Corporation Xeon E3-1200 v5/E3-1500 v5/6th Gen Core Processor Thermal Subsystem (rev 02)
00:14.0 USB controller: Intel Corporation Sunrise Point-LP USB 3.0 xHCI Controller (rev 21)
00:14.2 Signal processing controller: Intel Corporation Sunrise Point-LP Thermal subsystem (rev 21)
00:15.0 Signal processing controller: Intel Corporation Sunrise Point-LP Serial IO I2C Controller #0 (rev 21)
00:15.1 Signal processing controller: Intel Corporation Sunrise Point-LP Serial IO I2C Controller #1 (rev 21)
00:16.0 Communication controller: Intel Corporation Sunrise Point-LP CSME HECI #1 (rev 21)
00:17.0 SATA controller: Intel Corporation Sunrise Point-LP SATA Controller [AHCI mode] (rev 21)
00:1c.0 PCI bridge: Intel Corporation Sunrise Point-LP PCI Express Root Port #5 (rev f1)
00:1c.5 PCI bridge: Intel Corporation Sunrise Point-LP PCI Express Root Port #6 (rev f1)
00:1f.0 ISA bridge: Intel Corporation Sunrise Point-LP LPC Controller (rev 21)
00:1f.2 Memory controller: Intel Corporation Sunrise Point-LP PMC (rev 21)
00:1f.3 Audio device: Intel Corporation Sunrise Point-LP HD Audio (rev 21)
00:1f.4 SMBus: Intel Corporation Sunrise Point-LP SMBus (rev 21)
01:00.0 Network controller: Intel Corporation Wireless 3165 (rev 79)
02:00.0 Ethernet controller: Realtek Semiconductor Co., Ltd. RTL810xE PCI Express Fast Ethernet controller (rev 07)
How to reset root password
- ‘rd.break’ drops to a rescue shell earlier than any other rescue mode.
- Reboot the system, add ‘rd.break’ to the kernel boot parameters
- remount the root filesystem R/W
- use ‘chroot’ to switch to the proper root FS and run ‘passwd’.
- Remember to ’touch /.autorelabel’ before typing ’exit’ twice to resume booting.
Questions
Where could you configure the order in which filesystems are checked at boot time?
/etc/fstabHow to drop to a minimal rescue environment in which only you remained logged in and the system was not available over the network, what command would you run?
systemctl isolate rescue.targetWhich rescue parameter would you pass to the kernel from the grub2 menu if your system was failing to boot because a filesystem check was failing?
systemd.unit=emergency.targetYou are a member of a team of admins who are responsible for a critical system. This system has two different web servers installed: The first (Nginx) is used to serve content, the other (httpd) is installed only to satisfy dependencies and should never be started as it causes a conflict. What command could you run to ensure that
httpdis never accidentally started or enabled by another admin?systemctl mask httpd
How to find open ports/sockets ?
- old systems :
ipstat -tulpn - new systems (socket statistics) :
ss -a
List OpenFiles - lsof
How to find list of open files ?
lsof
How to know Which process is listening on port X ?
lsof -i :80
Which process opened the file
lsof /path_to_file
[root@10 ~]# lsof /usr/bin/bash
COMMAND  PID USER  FD   TYPE DEVICE SIZE/OFF    NODE NAME
bash    1533 root txt    REG  253,0  1219216 8512853 /usr/bin/bash
bash    1820 root txt    REG  253,0  1219216 8512853 /usr/bin/bash
How to find all files that a process has opened ?
lsof -p PID
How To Create a Sudo User on CentOS ?
[root@CentosServer1910 ~]# useradd sriram
[root@CentosServer1910 ~]# passwd sriram
Changing password for user sriram.
New password:
Retype new password:
passwd: all authentication tokens updated successfully.
# By default, on CentOS, members of the wheel group have sudo privileges.
[root@CentosServer1910 ~]# usermod -aG wheel sriram
[root@CentosServer1910 ~]# id sriram
uid=1000(sriram) gid=1000(sriram) groups=1000(sriram),10(wheel)

# Testing new SUDO user
[sriram@CentosServer1910 ~]$ sudo blkid /dev/sda1
[sudo] password for sriram:
/dev/sda1: UUID="64b6f04f-d510-4c39-9a37-cacfeeec774b" TYPE="ext4" PARTUUID="ec47036c-01"
# Debian based system, add the user to sudo group.
sudo usermod -a -G sudo <user_id>
8.6 - vim
To start with vim, go through the tutorial using command : vimtutor
Basic vim commands
| Task | Command |
|---|---|
| start editing the file content | :i[enter] |
| save the file and exit the editor | :x[return] |
| quit vim without saving the file | :q![return] |
| Save | :w |
| save and exit | :wq |
| exit | :q |
| copy a line | :yy |
| copy | :y |
| Paste | p |
| cut | d |
| cut a line | dd |
| Undo | u |
| go to the end of the file: | :$ and press Enter |
| Move to the beginning of a line | type 0 |
| Move to the end of a line | type $ |
| Go to beginning of file | gg |
| Go to end of file | G (shift + g) |
How to search and replace
%s/text/replacement/g
How to search and replace with confirmation
%s/text/replacement/gc
Forward Search : /
Backward Search : ?
Search Next : n
Search back : N
Configure vim editor
# ~./vimrc

set bg=dark
set ai ts=4 sw=4 et

# et -> expand tab
# sw - > shift width
# ts -> tab space
9 - Cloud
9.1 - AWS
9.1.1 - CFT
Cloud Formation Template
- A template is a JSON or YAML formatted text file that describes your AWS infrastructure.
- A template is a declaration of the AWS resources that make up a stack.
Intrinsic Functions
- Intrinsic functions are built in functions provided by AWS to manage the stack.
- Values assigned by the intrinsic functions are available only at run time.
References
Template Anatomy
CloudFormation support for Visual Studio Code
Intrinsic Functions
AWS support for YAML
9.1.2 - Services
AWS Services
Storage
EBS - Elastic Block Store
- Amazon EBS delivers high-availability block-level storage volumes for Amazon Elastic Compute Cloud (EC2) instances
- It stores data on a file system which is retained after the EC2 instance is shut down
- EBS
- AWS::EC2::Volume
EFS - Elastic File System
- Managed NFS for use with AWS EC2 instances.
- Built to scale on demand to petabytes without disrupting applications.
- Storage size will grow and shrink automatically as you add and remove files.
- EFS
- AWS::EFS::FileSystem
S3 - Simple Storage Service
- object storage service that offers scalability, data availability, security, and performance.
- You can store and protect any amount of data for a range of use cases, such as websites, mobile applications, backup and restore, archive, enterprise applications, IoT devices, and big data analytics.
- S3
- AWS::S3::Bucket
Compute
EC2 - Elastic Compute Cloud
- Virtual machine in the cloud.
- AWS::EC2::Instance
9.2 - Azure
9.2.1 - NetworkWatcher
Monitoring
Connection monitor
Network Watcher Connection Monitor enables you to configure and track connection reachability, latency, and network topology changes. If there is an issue, it tells you why it occurred and how to fix it.
Network diagnostic tools
IP flow verify
Network Watcher IP flow verify checks if a packet is allowed or denied to or from a virtual machine based on 5-tuple information. The security group decision and the name of the rule that denied the packet is returned.
Next hop
Next Hop provides the next hop from the target virtual machine to the destination IP address.
VPN troubleshoot
Network Watcher VPN Troubleshoot diagnoses the health of the virtual network gateway or connection. This request is a long running transaction, and the results are returned once the diagnosis is complete. You can select multiple gateways or connections to troubleshoot simultaneously.
Packet capture
Connection troubleshoot
Network Watcher Connection Troubleshoot provides the capability to check a direct TCP connection from a virtual machine (VM) to a VM, fully qualified domain name (FQDN), URI, or IPv4 address. To start, choose a source to start the connection from, and the destination you wish to connect to and select “Check”. See the screenshots below.
Logs
NSG flow logs
Network security group (NSG) flow logs allows you to view information about ingress and egress IP traffic through a Network security groups or Network security groups (classic) . NSG flow logs do not support Storage accounts (classic).
Diagnostic logs
Diagnostic settings are used to configure streaming export of platform logs and metrics for a resource to the destination of your choice. You may create up to five different diagnostic settings to send different logs and metrics to independent destinations.
Traffic Analytics
Traffic Analytics monitors your cloud environment and provides visibility into user and application activity across Azure. Traffic Analytics analyzes NSG Flow logs across Azure regions and subscriptions and equips you with actionable information to optimize workload performance, secure applications and data, audit your organization’s network activity and stay compliant.
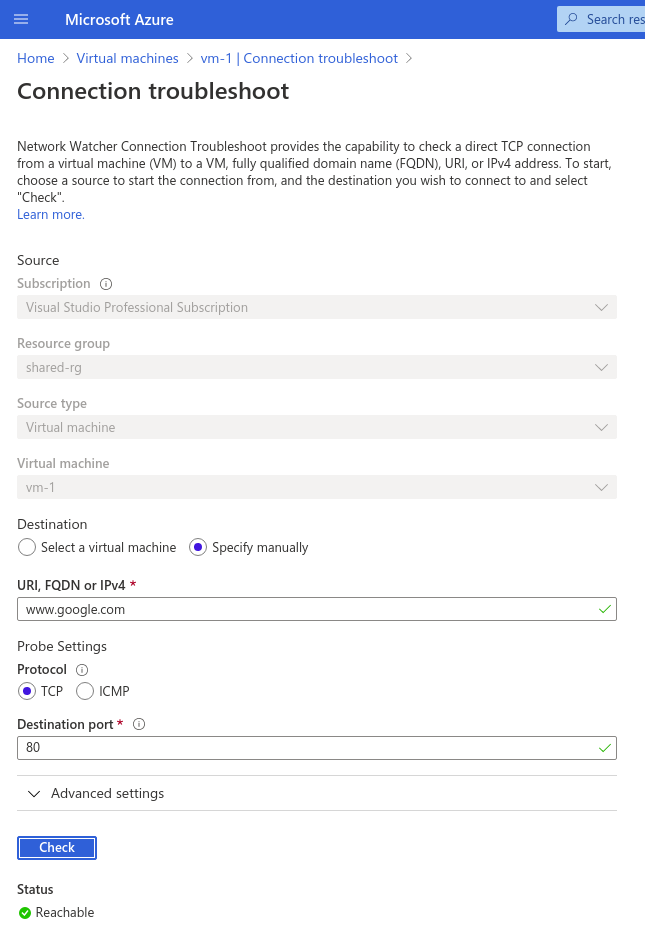
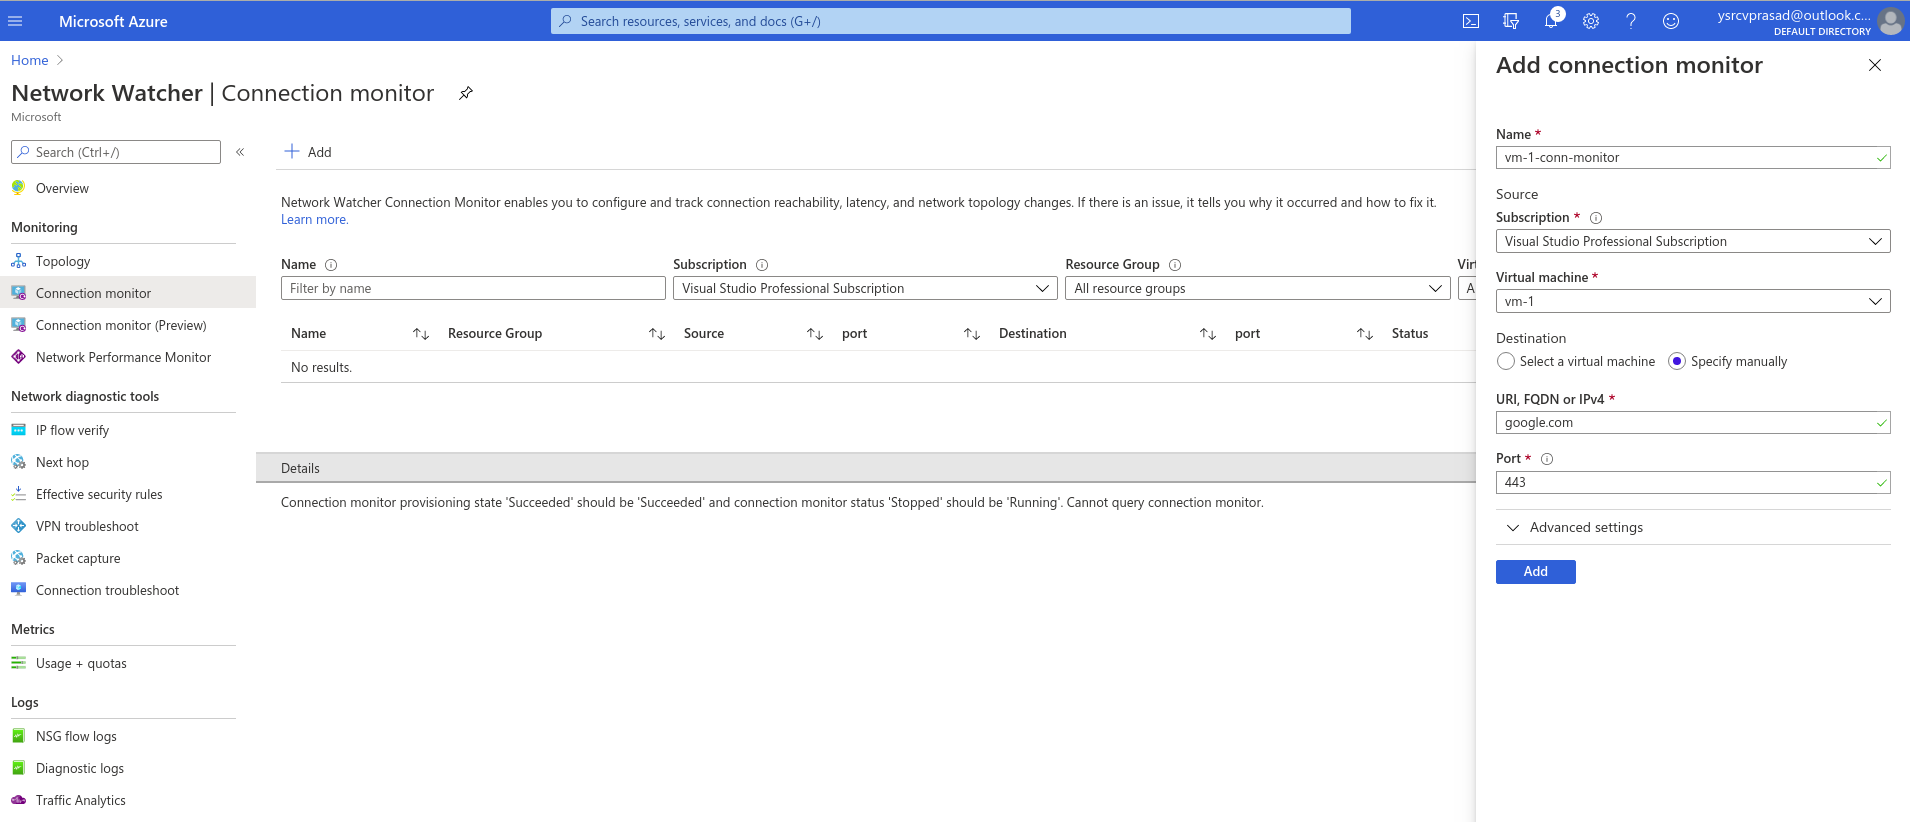
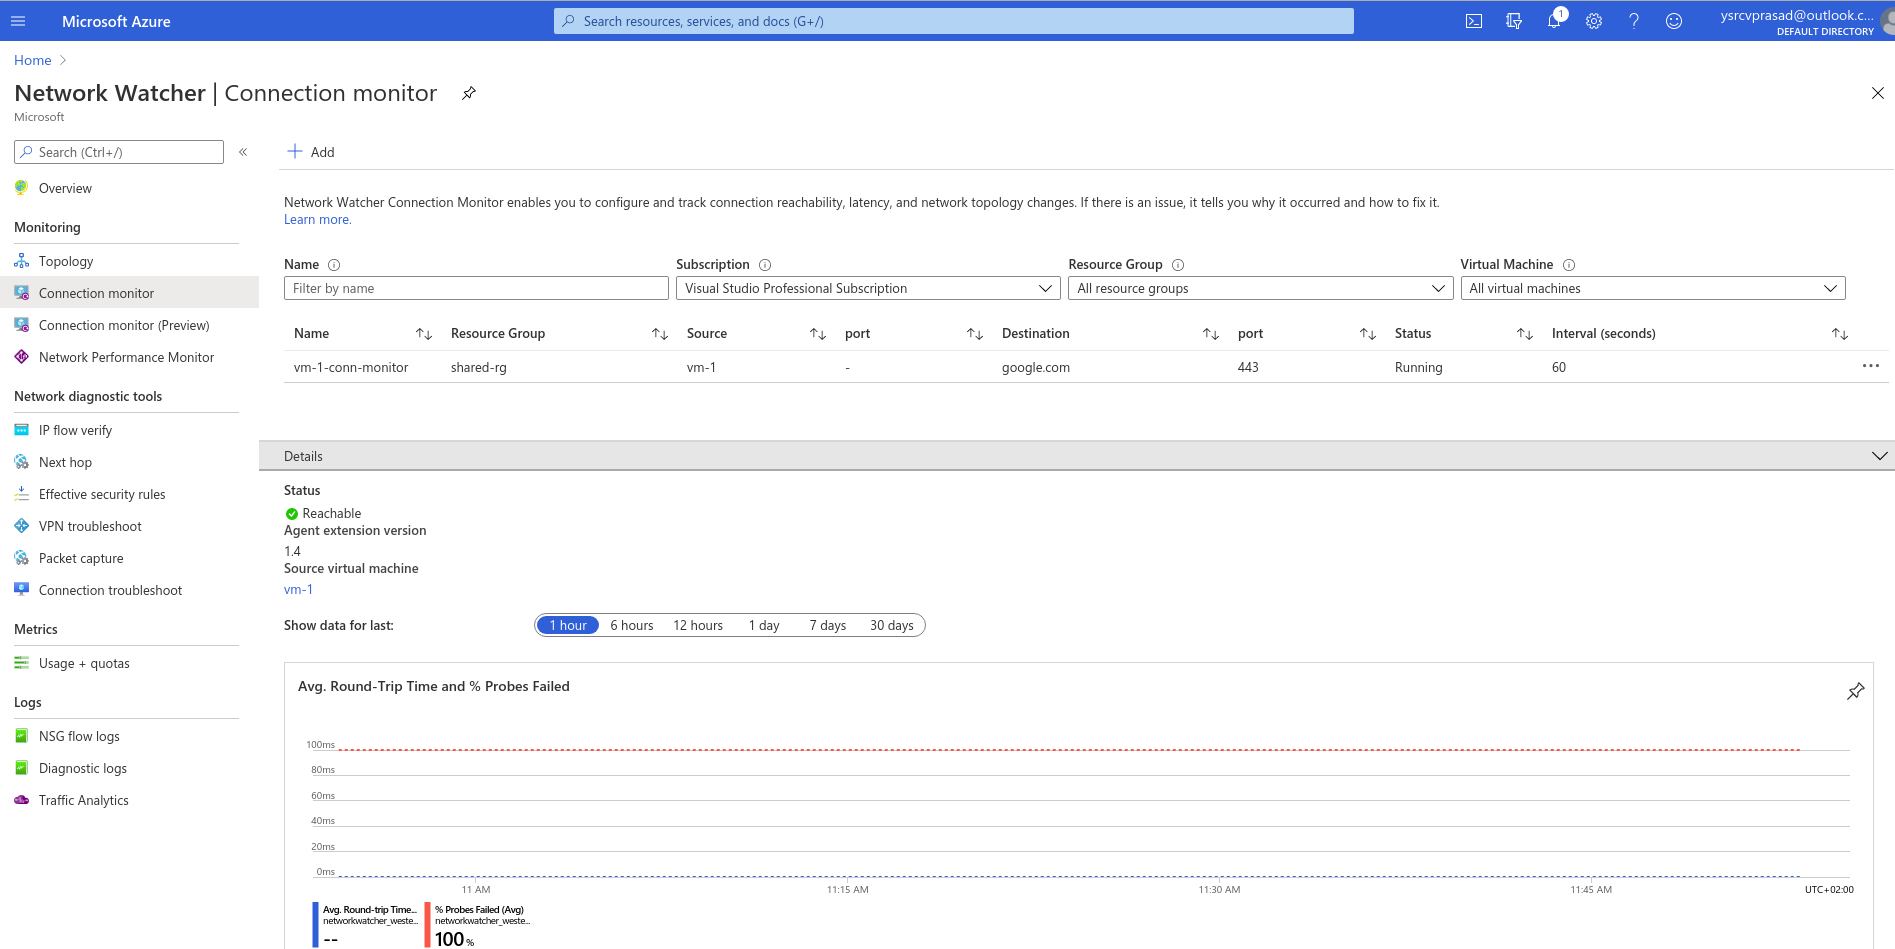
10 - LDAP
10.1 - OpenLDAP
OpenLDAP is a free and opensource LightWeight Directory Access Protocol software.
Docker images for OpenLDAP
Docker Image for OpenLDAP
How to compile and Build OpenLdap
Generate password for slapd.conf file
/appl/openldap/sbin/slappasswd
Update slapd.conf
./slaptest -f /appl/openldap/etc/openldap/slapd.conf -F /appl/openldap/etc/openldap/slapd.d
How to know the version of OpenLdap
 /appl/openldap/libexec/slapd -VV
 /appl/openldap/bin/ldapsearch -VV
How to start the OpenLDAP server manually
# Go to the path /appl/openldap/libexec and run OpenLDAP daemon
 ./slapd -h "ldap://0.0.0.0:10389 ldaps://0.0.0.0:10636"
How to take OpenLDAP backup manually
# Use slapcat utility from OpenLDAP to create a backup file
 /appl/openldap/sbin/slapcat -b "cn=root,o=sccm" -l openldap-backupfile.ldif
How to restore OpenLDAP manually
- Stop OpenLDAP service by stopping slapd daemon
- Go to
/appl/openldap/var/openldap-data-sccmand delete all the files - Execute the slapadd command
./slapadd -q -l /appl/openldap/backup/backupfile.ldif - Change the permissions
chmod -R 700 /appl/openldap/var/openldap-data - Start OpenLDAP service by starting slapd daemon
References
11 - Virtualization
11.1 - Virtual Box
VBox Logs
For Vbox if you encounter errors, check vbox logs
# log location
/var/log/vboxadd-install.log

# Command to display list of vms on the vbox
vboxmanage list vms

vboxmanage showvminfo Centos7 --details
ipod-not-recognised-in-windows-guest
- Install Extension Pack.
- Install Guest Additions in the Windows 7 guest machine.
- select USB 2.0 as the controller in Settings
Install virtualbox Extension pack
how-to-install-virtualbox-extension-pack
wget http://download.virtualbox.org/virtualbox/5.2.4/Oracle_VM_VirtualBox_Extension_Pack-5.2.4-119785.vbox-extpack
sudo vboxmanage extpack Oracle_VM_VirtualBox_Extension_Pack-5.2.4-119785.vbox-extpack
Once installed, you can see at : File -> Preferences -> Extensions
To verify if it has been successfully installed, list all installed extension packs:
VBoxManage list extpacks
Cloning VMs in VirtualBox
how-do-i-fix-broken-networking-in-cloned-virtual-machines
/etc/sysconfig/network-scripts/ifcfg-enp0s3
/etc/udev/rules.d/*-persistent-net.rules
Run VM in background
#Get the VM name by listing VMs
vboxmanage list vms

VBoxManage startvm ${VM_NAME} --type headless
example : vboxmanage startvm centos7vm2 --type headless
Networking
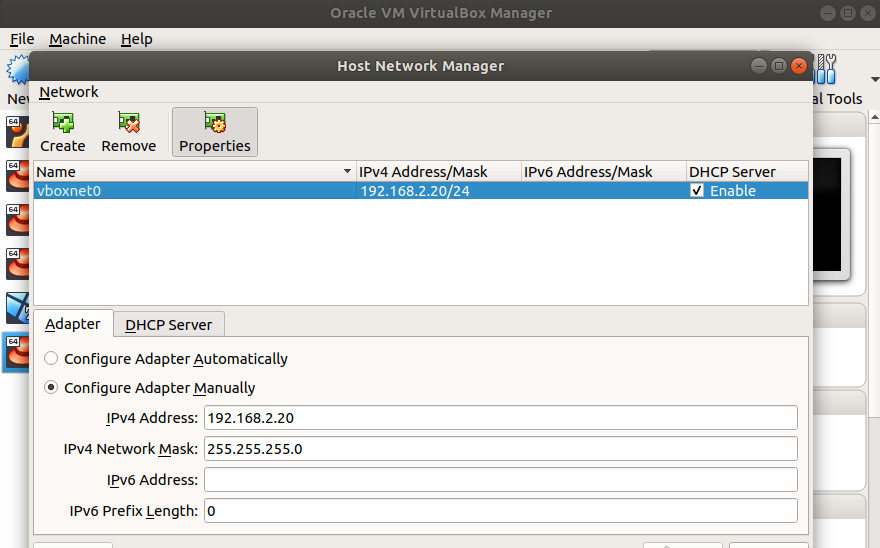


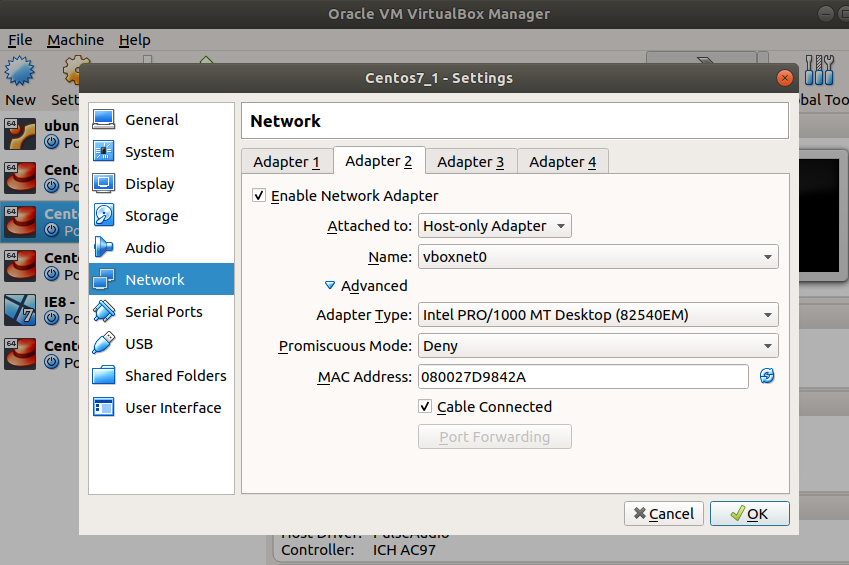

12 - RaspberryPi
12.1 - Raspberry Pi OS
How to configure a static IP address
- Find the available interfaces using :
ip a - Add static ip configuration in
dhcpcd.conffile - Restart dhcpcd service
#/etc/dhcpcd.conf
interface wlan0
static ip_address=192.168.2.123/24
static routers=192.168.2.254
static domain_name_servers=8.8.8.8

## reload the service configuration
sudo systemctl daemon-reload

## restart dhcpcd service
sudo systemctl restart dhcpcd.service
12.2 - Ubuntu Server for Pi
How to enable wifi and configure a static IP address
Find the available interfaces using :
ip a[or] use
networkctlto Query the status of network links
sriram@ubuntu:~$ networkctl
IDX LINK  TYPE     OPERATIONAL SETUP
  1 lo    loopback carrier     unmanaged
  2 eth0  ether    no-carrier  configuring
  3 wlan0 wlan     routable    configured

3 links listed.
- Use
netplanto configure the interface
# edit /etc/netplan/50-cloud-init.yaml
# add entry for wlan0
# add entry for static ip address, gateway and nameservers.
# below is an example configuration

sriram@ubuntu:~$ cat /etc/netplan/50-cloud-init.yaml
network:
    ethernets:
        eth0:
            dhcp4: true
            match:
                driver: bcmgenet smsc95xx lan78xx
            optional: true
            set-name: eth0
    version: 2
    wifis:
      wlan0:
        dhcp4: no
        addresses:
          - 192.168.2.123/24
        gateway4: 192.168.2.254
        nameservers:
          addresses: [8.8.8.8, 1.1.1.1]
        optional: true
        access-points:
          "ACCESSPOINT-NAME":
            password: "password"

## apply the changes with netplan
sudo netplan apply
13 - Sriram Yeluri
I am working as an IT consultant with 18 years of professional experience. I played a key role in setting-up solutions for container vulnerability scanning using Prisma cloud, 3rd party component vulnerability scanning using Nexus Lifecycle, and static code scanning with Fortify.
Key Strengths
- Infrastructure as Code(IaaC), Software as a Service (SaaS)
- Solution design for cloud implementations and migrations.
- Experience in setting of security tooling (Prismacloud, Nexus LifeCycle, Fortify) and the integrations.
- Experience in DevSecOps and CICD best practices.
- Experience in designing of automated solutions.
- Strong Mindset of continuous improvement in the way of working
Technical Skills
Azure | AWS
Docker | Kubernetes
Jenkins | AzureDevOps
Ansible | Terraform | Bicep | Helm
Linux System administration | Shell Scripting
Golang | Python
Git
Certifications
Certified Courses
- Certified Kubernetes Administrator (CKA) with Practice Tests
- Terraform
- Docker Fundamentals
- Ansible
- AWS Certified Solutions Architect Associate